Seated Skater On A Chair
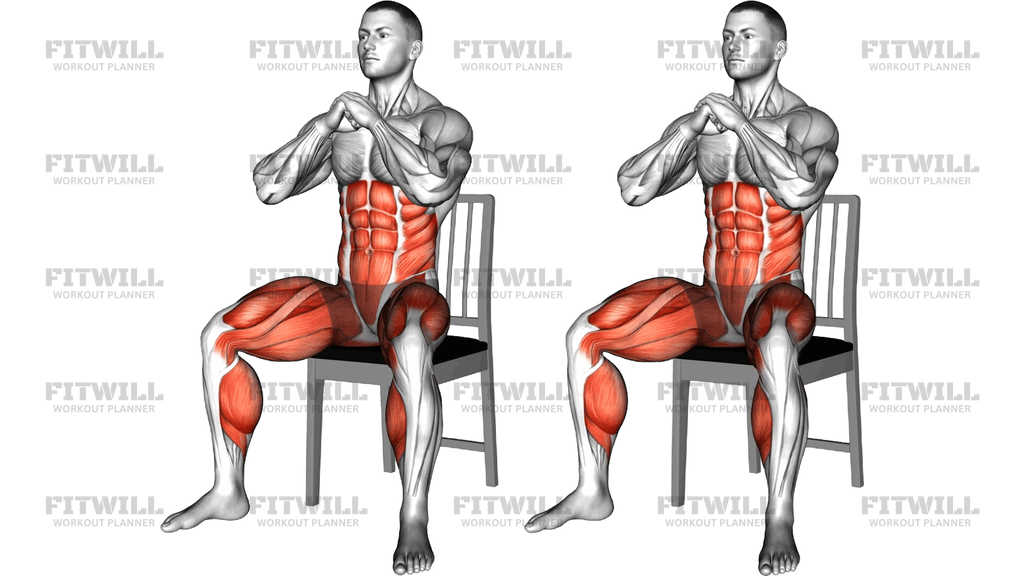
The Seated Skater On A Chair is a body weight core exercise that recreates the side-to-side weight shift of speed skating while you stay seated on a sturdy chair. You sit tall at the front edge of the seat, plant your feet wide and flat, clasp your hands in front of your chest, and rock your torso laterally from one hip to the other, loading one leg at a time. The chair removes the balance and joint demands of a standing lateral lunge or skater hop, which makes the same carving pattern accessible to almost anyone.
This movement mainly trains the abdominals and obliques, which work to control the sideways lean and pull you back to center each rep. Because your weight shifts over one leg at a time, the thigh muscles on the loaded side, particularly the quads, work isometrically to keep you stable, and the hip muscles around the working hip get steady low-level activation as well. It is not a heavy strength builder, but it is excellent for teaching lateral core control and building tolerance in the trunk for side-to-side forces.
The Seated Skater On A Chair is a great fit for older adults, people returning from a layoff, office workers looking for a discreet mid-day core drill, and anyone whose knees or ankles dislike standing lateral jumps. Skaters and athletes in lateral-dominant sports can also use it as a low-load patterning drill to reinforce the feel of shifting weight edge to edge before progressing to harder standing versions.
Setup matters more than it looks. Sitting on the front third of the chair keeps your sit bones free to shift and gives your hips room to move; slumping back against the backrest turns the drill into a passive lean. Feet wide and firmly planted create the base you shift between, and clasping the hands at chest height gives the obliques a fixed lever to rotate and lean against. Without that stable base, you end up wiggling rather than deliberately loading each side.
To execute it well, brace your midsection, lean the torso slightly forward, and shift your chest and shoulders deliberately over one foot, feeling your weight roll onto that hip and leg. Pause briefly, then shift smoothly across center to the opposite side. The key quality is control: each transfer should feel like carving an arc, not falling sideways and catching yourself. Keep the movement in your hips and trunk, not in your neck or shoulders, and stop before your lower back starts rounding to compensate.
[ Workout Log & Planner ]
Put your next workout in Fitwill
Keep your plan and training log ready when you are.


Instructions
- Sit on the front third of a sturdy, non-rolling chair with your feet flat on the floor, spread wider than hip width, toes angled slightly out.
- Clasp your hands together in front of your chest with elbows bent and tucked toward your ribs, and sit up tall with a slight forward lean from the hips.
- Brace your abdominal muscles as if preparing for a light push, and keep your neck relaxed and gaze forward.
- Shift your chest and shoulders sideways over your right foot, letting your weight roll onto the right hip and thigh until you feel the right side of your trunk working.
- Pause for a beat at the end of the shift, keeping both feet glued to the floor and both sit bones in contact with the seat.
- Push through the loaded leg and drive your torso smoothly back across center and over toward the left foot, loading the left hip and thigh the same way.
- Continue shifting side to side in a smooth, arcing path, mimicking the weight transfer of a skater carving across ice.
- Exhale as you shift into each side and inhale as you cross back through center; avoid holding your breath.
- Complete your chosen number of shifts per side, then sit back upright, release the hand clasp, and rest before the next set.
Tips & Tricks
- If you find yourself sliding forward off the seat, you are leaning too far sideways; reduce the range until your weight transfer stays controlled over the chair's front edge.
- Do not let the unloading foot lift or twist as you shift — the drill only works when both feet stay flat and act as the two ends of your base.
- A common mistake is swaying the head and shoulders while the hips stay dead center. Drive the movement from the trunk and hips so the loaded side actually receives your weight.
- Keep the forward lean coming from your hips, not from rounding your lower back; if your midsection slumps, reset to tall sitting and brace again before continuing.
- Slow the transition through center down — most people rush the middle and turn the drill into uncontrolled rocking, which takes the work away from the obliques.
- If the seat is too soft or low and your hips sink, place a firm cushion on the chair so your thighs stay roughly parallel to the floor.
- Gripping the sides of the seat with your hands defeats the purpose; keep the hands clasped at the chest so the trunk has to do the stabilizing.
- Start with short, modest side shifts and only increase the range once both sit bones stay on the seat through every rep.
- On a chair without a backrest or with a shaky frame, move it against a wall first so it cannot tip as you shift your weight.
Frequently Asked Questions
What muscles does the Seated Skater On A Chair work?
The abdominals and obliques do most of the work controlling the side-to-side lean, while the quads and hip muscles on the loaded leg work to stabilize each shift. The movement is a core control drill first, with the thighs playing a supporting role.
Is the Seated Skater On A Chair suitable for beginners?
Yes, it is one of the most beginner-friendly lateral core drills because the chair supports your weight and removes the balance demands of standing skater variations. Start with small shifts and a slow tempo before widening the range.
Why do my hands stay clasped at my chest during this exercise?
Clasping the hands at chest height gives your obliques a fixed lever to lean with and stops you from cheating by pushing off the seat or swinging your arms. It also makes it easier to notice when your torso shifts versus when you are just swaying.
Why should I sit on the front edge of the chair instead of leaning back?
Sitting on the front third frees your hips and lets your weight genuinely transfer over each foot. Leaning against the backrest turns the drill into a passive upper-body sway and takes the work away from your core and thighs.
Can I do the Seated Skater On A Chair if standing lunges hurt my knees?
Often yes, because you remain seated and the knee joints stay mostly flexed at a fixed angle rather than absorbing bending loads. Keep the shifts small and comfortable, and if a position causes knee pain, reduce the range or stop.
How do I know I am doing the seated skater motion correctly?
You should feel the side of your trunk working as you shift across center and a clear weight change onto the loaded hip and thigh on each side. If your hips never actually load one leg at a time, you are rocking rather than skating.
What is the most common mistake with this exercise?
The most common error is rushing through center so the torso falls side to side and catches itself. Slow the crossing phase down deliberately so the obliques, not momentum, control each transfer.
What can I use instead of a chair?
Any firm, stable seat works — a sturdy bench, an exercise bench, or a stable ottoman at a similar height. Avoid rolling office chairs with the brakes off, folding chairs, or anything that can slide as you shift your weight.
How many reps and sets should I do?
A good starting point is 10 to 15 controlled shifts to each side for 2 to 3 sets, resting about a minute between sets. Increase reps or range only when every rep stays smooth and both feet stay flat.
Is this exercise safe for people with lower back issues?
Because the movement is seated and low-load, many people with cranky lower backs tolerate it well, but individual situations vary. Keep the lean coming from the hips rather than rounding the spine, use a modest range, and check with a qualified professional if you have a specific condition.