Bridge Straight Leg Raise
The Bridge Straight Leg Raise combines two demanding positions into one movement: you hold a glute bridge on one planted foot while lifting your other leg, kept completely straight, up toward the ceiling. It looks simple from the outside, but the moment that straight leg leaves the floor, your glutes, hamstrings, and core have to work overtime to keep your hips high and level. This is what makes the exercise far more challenging than a standard two-leg bridge.
The setup is what separates this movement from a regular bridge. One foot stays flat on the floor with the knee bent, while the opposite leg extends out long. As you raise that straight leg, the weight of it pulls your pelvis toward rotation and your lower back toward arching. Holding the bridge position while resisting that pull trains the glutes and hamstrings isometrically and the deep core in a way that carries over directly to single-leg activities like running, climbing stairs, and lunging.
This exercise suits intermediate trainees who already own a solid two-leg glute bridge and want to progress, as well as runners, cyclists, and anyone rebuilding single-side hip strength after time off. Because one side works at a time, it also exposes and helps correct left-right differences in hip strength and control, which is one of its most practical benefits.
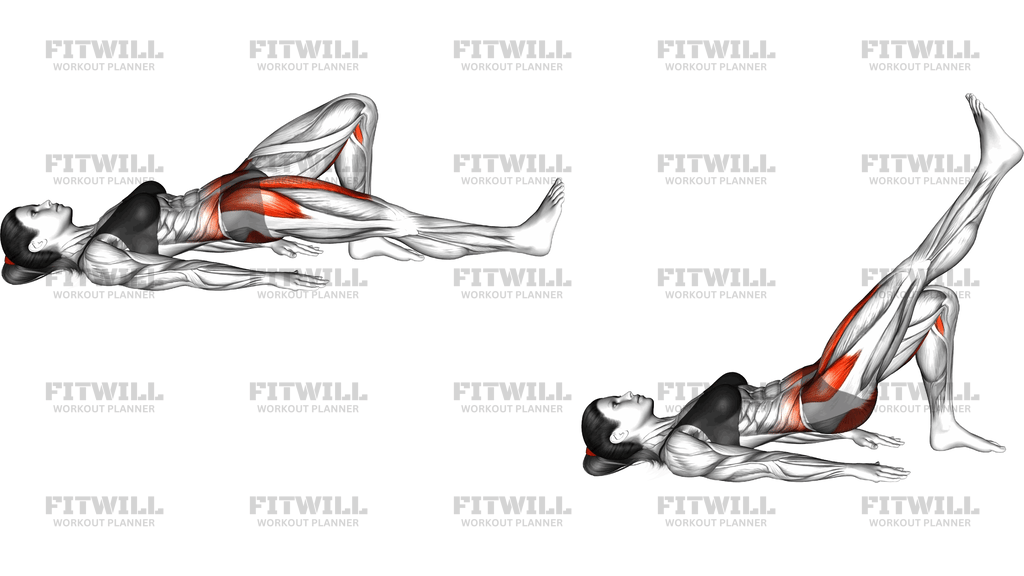
To perform it well, lie on your back with knees bent and feet flat, then extend one leg so the knees stay together or the extended leg hovers just above the floor. Drive through the planted heel to lift your hips until your body forms a straight line from shoulders to the knee of the planted leg, then raise the straight leg upward until it points roughly at the ceiling. Pause briefly at the top, lower the leg with control, and only then lower your hips.
The main coaching point is keeping the bridge height constant. A common breakdown is the hips dipping or twisting as the leg travels up and down, which shifts work away from the glutes and into the lower back. Move the straight leg slowly, keep your ribs down, and think about pushing the floor away with the planted foot for the entire set rather than just at the start.
Perform the Bridge Straight Leg Raise on a mat or other cushioned surface, in the rep ranges that match your goal: lower reps with strict form for strength, or longer holds with slow leg lowers for endurance and control. If your hips drop or your lower back starts to arch before you finish the set, stop there — quality of the bridge position matters more than the number of leg raises.
[ Workout Log & Planner ]
Put your next workout in Fitwill
Keep your plan and training log ready when you are.


Instructions
- Lie on your back on an exercise mat with your knees bent and both feet flat on the floor, hip-width apart, arms resting at your sides with palms down.
- Extend one leg so it is straight, with the knee lined up next to the knee of your planted leg and the foot hovering just above the mat or resting lightly on it.
- Brace your abdominal muscles and gently tuck your pelvis so your lower back stays in contact with the floor before you lift anything.
- Press through the heel of your planted foot and squeeze your glutes to raise your hips until your body forms a straight line from your shoulders to the knee of the bent leg.
- Keeping the bridge height exactly where it is, lift your straight leg upward in a smooth arc until it points toward the ceiling or as high as you can go without your hips dropping.
- Pause for one to two seconds at the top with the leg extended and both hips level.
- Lower the straight leg slowly back toward the starting height, resisting the pull of gravity rather than letting it drop.
- Exhale as you lift the leg and inhale as you lower it, keeping your breathing steady throughout the hold.
- Complete all reps on one side, then lower your hips fully to the mat, reset your position, and switch to the other leg.
- If your hips sag mid-set, set them down, rest briefly, and rebuild the bridge before continuing rather than pushing through a compromised position.
Tips & Tricks
- The most common failure is the hips dipping or rotating toward the side of the raising leg — fix it by imagining a glass of water balanced on your pelvis that you cannot spill.
- Keep most of your weight on the heel and mid-foot of the planted leg; rising onto the toes usually means the glutes have stopped driving and the quads are taking over.
- Do not chase leg height at the cost of the bridge — a controlled raise to hip height with level hips beats a high reach with a twisted pelvis.
- If your lower back arches as the leg goes up, reduce the range of the raise and focus on pulling your ribs down toward your hips.
- Push the floor away with the planted foot for the entire set, not just on the initial lift; the bridge is an active hold, not a resting position.
- Avoid letting the straight leg drop quickly on the way down — the lowering phase is where the hip flexors and core get much of their work.
- Keep the arms relaxed on the floor; if you find yourself pressing hard into your hands to hold the bridge, the legs and hips are not doing their share.
- Breathe continuously instead of holding your breath during the top pause — a held breath often coincides with a loss of core tension and a sagging bridge.
- If one side lifts smoothly while the other shakes or dips, start every set with your weaker side and match the reps with your stronger side.
Frequently Asked Questions
Which muscles does the Bridge Straight Leg Raise work the most?
The glutes and hamstrings of the planted leg do the main work of holding the bridge, while the hip flexors lift the straight leg. Your abs and deep core work continuously to keep the pelvis level and stop your lower back from arching.
Why does the Bridge Straight Leg Raise feel so much harder than a regular glute bridge?
Removing one foot from the floor cuts your base of support in half, and the weight of the straight leg constantly pulls your pelvis off level. Your planted-side glutes and your core must work together just to maintain the bridge, before the leg raise itself even begins.
Can beginners do the Bridge Straight Leg Raise?
Beginners should first master the two-leg glute bridge and then the single-leg bridge with the free leg simply held still. Once you can hold a level single-leg bridge for 20 to 30 seconds, adding the straight leg raise is a sensible next step.
Should my hips stay at the same height while the leg moves?
Yes — a constant bridge height is the whole point of the exercise. If your hips drop or tilt as the straight leg rises, you are lifting the leg higher than your hips can currently stabilize, so shorten the range and rebuild from there.
How high should I raise the straight leg?
Raise it only as high as you can while keeping both hips level and your lower back flat against your ribs' natural position. For most people this is somewhere between 45 degrees and vertical, and it often improves as control develops.
My lower back aches after this exercise — what am I doing wrong?
Lower back discomfort usually means the pelvis is tilting forward and the bridge height is dropping as the leg lifts. Slow the movement down, reduce the leg raise range, and consciously squeeze the glute of the planted leg throughout the set.
What can I substitute if the Bridge Straight Leg Raise is too difficult?
A single-leg glute bridge with the free leg held still, or a two-leg bridge where you only extend one knee without lifting the leg, are both good regressions. Single-leg deadlifts and bird dogs also train similar hip and core stability.
How many reps and sets of the Bridge Straight Leg Raise should I do?
Start with 2 to 3 sets of 6 to 10 controlled leg raises per side, resting between sides. As control improves, progress to 12 to 15 reps per side or add a longer pause at the top of each raise.
Do I need any equipment for the Bridge Straight Leg Raise?
No equipment is required beyond a mat or soft surface for your shoulders and head. The exercise relies entirely on body weight and position.
Is it safe to do the Bridge Straight Leg Raise every day?
Because it is a body-weight movement with no external load, most people tolerate it well several times per week. Still, treat it like any strength exercise — allow at least a day between harder sessions so the glutes and hip stabilizers can recover.