Opposite Arm And Leg Raise Against Wall
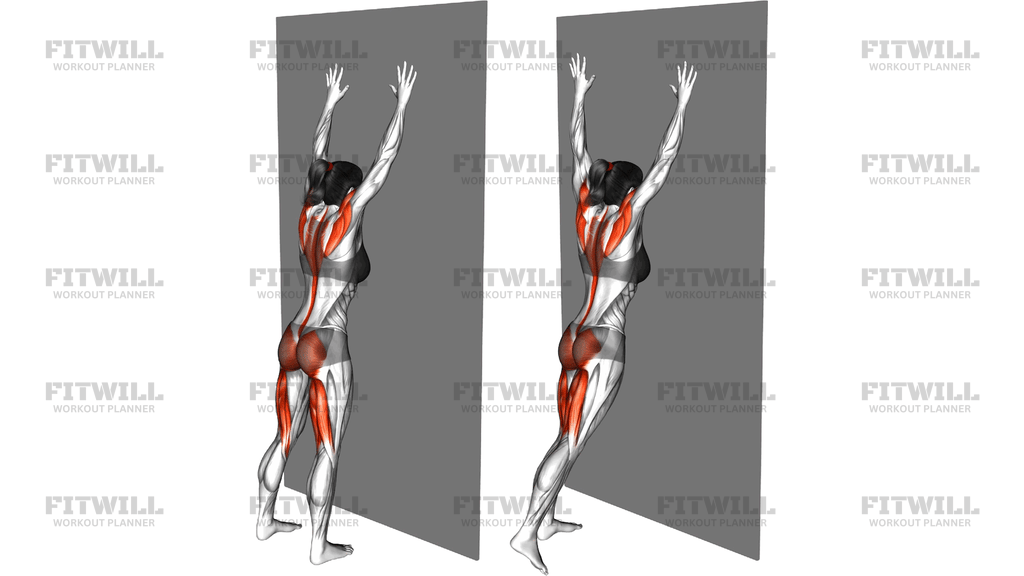
The Opposite Arm And Leg Raise Against Wall is a standing balance and stability exercise that uses a wall as a light reference point while you extend one arm and the opposite leg at the same time. You stand facing the wall, keep your fingertips or palms in contact with it for support, and then lift one leg straight behind you while the opposite arm reaches up along the wall. This cross-body pattern closely mirrors the bird dog done on the floor, but doing it standing changes the demand entirely because your supporting leg and trunk have to control the movement against gravity.
This exercise is especially useful for people who want to train hip extension and trunk stability without getting down on the floor. It suits older adults working on balance, desk workers reawakening sleepy glutes, runners and lifters looking for a low-fatigue activation drill, and beginners who are not yet steady enough for a free-standing single-leg hinge. The wall gives just enough assistance to keep the movement honest without removing the balance challenge.
The main work comes from the glute of the lifting leg, along with the hamstrings as they assist the hip extension. The lower back and deep core muscles work together to keep your pelvis level and your spine neutral, which is the real point of the exercise. Meanwhile the reaching arm engages the shoulder and upper back, and the standing leg's hip and ankle stabilizers are quietly doing a lot of the behind-the-scenes work. Because you are using an opposite arm and leg, your trunk has to resist rotation, which trains coordination between the two sides of the body.
Setup matters here more than it might seem. Standing about an arm's length from the wall with a soft bend in your elbows lets you use the wall as a guide rather than a crutch. If you lean heavily into it, the glutes and core stop doing their job and the movement loses most of its value. Aim for light fingertip contact, and think of the wall as something you touch, not something you hang on.
To execute it well, hinge slightly forward from the hips, brace your trunk, and lift the leg by squeezing the glute rather than by arching the lower back. The raised leg should reach roughly hip height or a little less, with the toes pointing down and the hips staying square to the wall. The opposite arm slides or reaches up the wall until it is fully extended overhead. Pause briefly at the top, lower with control, and complete all reps on one side before switching, or alternate sides if that feels more natural.
A few practical points will keep this safe and effective. Move slowly, because speed hides balance problems and encourages cheating with the lower back. Keep the lifted leg straight but not locked, and avoid twisting the hips open as the leg goes back. If you feel the work mostly in your lower back instead of your glutes, you are arching rather than extending at the hip, so reduce the height of the lift and reset your brace. Two to three sets of eight to twelve controlled raises per side is a sensible working range.
[ Workout Log & Planner ]
Put your next workout in Fitwill
Keep your plan and training log ready when you are.


Instructions
- Stand facing a clear wall about an arm's length away, with your feet roughly hip-width apart and your weight evenly distributed.
- Lean slightly forward from the hips and place the fingertips of both hands lightly against the wall at around chest to shoulder height, keeping your elbows soft.
- Brace your abdominals gently and tuck your tailbone slightly so your lower back is long rather than arched.
- Shift your weight onto your left leg and find your balance before moving anything else.
- Squeeze your right glute and raise your right leg straight back behind you, letting your torso lean a little further toward the wall as you go, while your left arm slides up the wall until it is extended overhead.
- At the top, your body should form one long line from the raised hand through the shoulders, hips, and lifted foot, with the hips facing the wall and the lifted leg at or just below hip height.
- Pause for one to two seconds, keeping light contact with the wall through the fingertips of the supporting hand.
- Lower the right leg and the left arm back to the starting position under control, without letting your trunk collapse or your foot slap the floor.
- Breathe steadily throughout: exhale as you lift the arm and leg, inhale as you return.
- Complete all repetitions on one side, then switch sides so the right hand and left leg work together.
Tips & Tricks
- Keep your fingertip contact feather-light. If you catch yourself pressing hard into the wall or leaning on it, step back an inch and re-set so the standing leg and core do the real work.
- The most common mistake is lifting the leg by arching the lower back instead of extending at the hip. If your ribs flare or your back feels strained, lift the leg only to hip height and focus on squeezing the glute.
- Watch for hip rotation. As the leg swings back, the hip on that side tends to open up and turn your torso; think about keeping both hip bones pointed at the wall the entire time.
- Keep the lifted leg straight but never locked, with the toes pointing down. Turning out the toes usually signals that the hip has rotated.
- If you wobble badly, slow everything down and shorten the range rather than gripping the wall harder. Balance improves with controlled reps, not speed.
- Point the fingers of the reaching arm up the wall and keep the shoulder drawn slightly away from the ear so the upper back works instead of the neck.
- Do not rush the return. The lowering phase is where the standing leg's hip stabilizers get their training effect, so take a full breath's worth of time to come back down.
- If your hamstrings cramp, that is normal at first since they assist the glute in hip extension. Stretch briefly between sets and reduce the hold time at the top.
- Bare feet or flat, thin-soled shoes work best. Cushioned or unstable footwear makes the standing-leg balance much harder than it needs to be.
Frequently Asked Questions
What muscles does the Opposite Arm And Leg Raise Against Wall work?
The glutes and hamstrings of the lifting leg do the main hip extension, while the lower back and deep core stabilize the trunk. The reaching arm also works the shoulder and upper back, and the standing leg trains its hip and ankle stabilizers throughout.
Is the Opposite Arm And Leg Raise Against Wall suitable for beginners?
Yes, it is one of the more accessible standing balance exercises because the wall provides a safety reference. Beginners can limit the leg to a small lift behind them and use fingertip contact until their balance improves.
How far from the wall should I stand for the Opposite Arm And Leg Raise Against Wall?
Stand about an arm's length away so your fingertips rest on the wall with soft elbows when you lean forward slightly. If you have to bend far forward or press hard to reach it, move closer.
Why does my lower back work harder than my glutes in this exercise?
That usually means the leg is being lifted by arching the spine rather than extending at the hip. Tuck the tailbone slightly, brace the abdominals, and lower the leg to hip height or below while consciously squeezing the glute.
How high should I raise my leg during the Opposite Arm And Leg Raise Against Wall?
About hip height is enough. Lifting higher than that usually forces the lower back to arch and the hips to rotate, which defeats the purpose of the movement.
Can I do the Opposite Arm And Leg Raise Against Wall instead of a bird dog?
It is a reasonable standing substitute that trains a similar cross-body pattern. It places more demand on the standing leg's balance and less compression on the wrists and knees than the floor version.
Should I alternate sides or finish all reps on one side?
Either works, but finishing all reps on one side first makes it easier to notice and correct left-right differences in balance and hip control. Alternating sides is fine if staying balanced on one leg for a full set is difficult.
Is it safe to do this exercise if I have lower back issues?
Because the wall supports a light forward lean, many people find it comfortable, but keep the leg lift small and avoid any arching or twisting of the spine. If a movement causes pain rather than normal muscle effort, stop and consult a qualified professional.
How many sets and reps of the Opposite Arm And Leg Raise Against Wall should I do?
Two to three sets of eight to twelve controlled raises per side covers most needs, whether it is used as a warm-up activation or as a balance drill. Rest briefly between sides so the standing-leg stabilizers recover.