Lying Arms Slide
The Lying Arms Slide is a floor-based mobility drill where you lie flat on your back and slide one arm out to the side and up toward overhead without it ever leaving the floor. Because the ground guides the entire arc, the movement gives you constant feedback about where your shoulder moves freely and where it starts to compensate. The highlighted musculature in the demonstration makes the intent clear: this drill stretches and mobilizes the chest and the front of the shoulder, with the latissimus dorsi joining in as the arm travels overhead.
This exercise suits almost anyone. Desk workers with rounded shoulders and tight pecs get a gentle, low-load way to open the front of the torso, while lifters can use it as a warm-up before pressing days or as a cooldown after heavy bench or overhead work. It is also a common recommendation in shoulder rehabilitation settings because the floor limits the range and removes any load, letting you work exactly within what the joint allows on that day.
The setup matters more than it looks. Lying on your back keeps your spine supported and your ribcage from flaring, which means the stretch lands on the chest and shoulder instead of being borrowed from the lower back. Keeping the palm and the back of the arm in contact with the floor the whole way is what turns a random arm swing into a controlled slide through the shoulder's true available range.
To perform it well, keep the movement slow and deliberate. Press the palm lightly into the floor as the arm travels through the arc, stop as soon as you feel a comfortable stretch across the pec or the front of the shoulder, and slide back down the same path. The moment the shoulder shrugs up toward the ear or the ribs lift off the floor, you have gone past the useful range for today.
A practical starting dose is five to eight slow slides per side, pausing for a breath or two at the furthest comfortable point. As range improves over weeks, the hand will travel closer to overhead while staying flat on the floor. Treat the progress as a slow dial, not a lever to force, since the shoulder responds better to consistency than to aggressive stretching.
Fitwill
Log Workouts, Track Progress & Build Strength.
Achieve more with Fitwill: explore over 9600 exercises with images and videos, access built-in and custom workouts, perfect for both gym and home sessions, and see real results.
Start your journey. Download today!




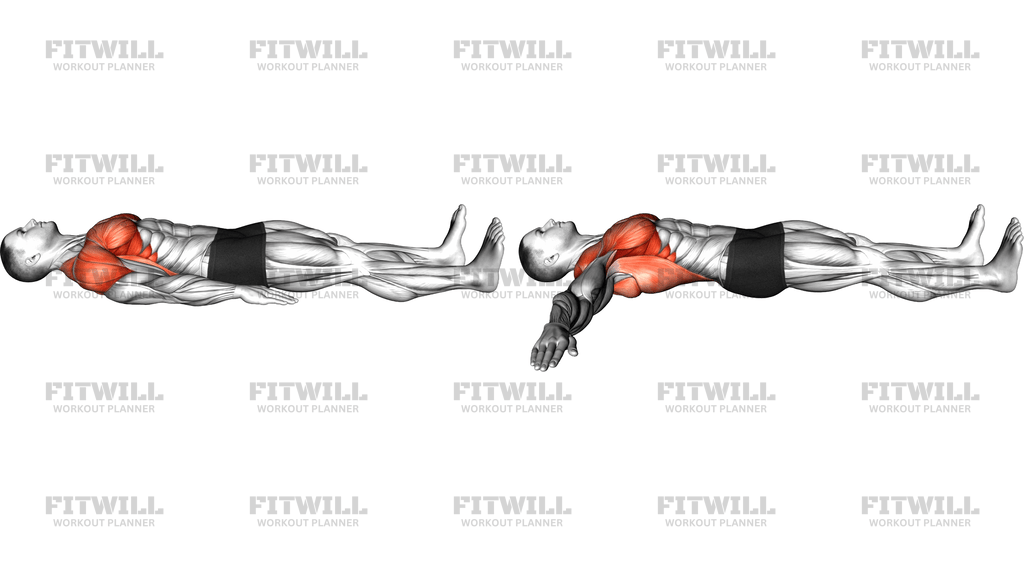
Instructions
- Lie flat on your back on the floor with your legs straight and relaxed, and let your head rest in a neutral position.
- Place both arms at your sides with palms facing down and the backs of your hands resting against the floor.
- Gently draw your ribs down so your lower back stays in light contact with the floor, and take a relaxed breath.
- On an inhale, slowly slide your right arm out to the side and up toward overhead, keeping the palm and back of the arm in contact with the floor the entire way.
- Stop the slide when you feel a mild stretch across your chest or the front of your shoulder, keeping the shoulder blade from shrugging up toward your ear.
- Hold the end position for one or two calm breaths, letting the chest soften into the stretch.
- Exhale and slide the arm back down along the same arc until it returns beside your body.
- Complete the desired repetitions on the right side, then switch to the left arm and repeat.
- Between reps, briefly relax the arm at your side and check that your ribs and lower back are still resting on the floor before starting the next slide.
Tips & Tricks
- The most common mistake is letting the shoulder shrug toward the ear as the arm rises; keep the shoulder blade heavy against the floor so the stretch reaches the pec instead of jamming the top of the shoulder.
- If the ribs flare and the lower back arches near the top of the arc, you have outrun your range; shorten the slide slightly and rebuild from that shorter, clean path.
- A bent elbow usually means the chest is too tight to allow a straight-arm slide, so keep the arm as long as comfortable rather than forcing full extension.
- Do not chase the overhead position by pressing the hand hard into the floor; a light contact is enough to guide the path and protect the shoulder joint.
- Warm the area first with a minute of arm circles if you come to this drill cold, since a cold shoulder tends to stop early and feel tighter than it is.
- Breathe out slowly during the slide instead of holding your breath; holding tension in the ribcage shortens the range the chest will release.
- Compare sides before deciding on reps; the tighter side usually benefits from one or two extra slow slides rather than a longer hold.
- If one spot along the arc feels pinchy rather than stretchy, back off a few centimeters below it and work there; the usable range typically grows with consistent easy reps.
- Keep the movement quiet and smooth throughout; a slide that speeds up on the way down is a sign you are dropping the arm instead of controlling it.
Frequently Asked Questions
Which muscles does the Lying Arms Slide target?
It primarily stretches and mobilizes the chest, with the front of the shoulder and the lats assisting as the arm travels overhead. The muscles on the highlighted side of the demonstration reflect this chest-and-front-shoulder emphasis.
Is the Lying Arms Slide a strength exercise or a stretch?
It is best treated as a mobility and stretching drill, since the floor guides the arm and there is no external load. It works well as a warm-up before pressing or as a cooldown afterward.
Why must the arm stay in contact with the floor during the slide?
Floor contact keeps the shoulder moving through its true available arc and prevents you from swinging or compensating with the trunk. Losing contact usually means the range has exceeded what the chest and shoulder can control.
Can beginners do the Lying Arms Slide?
Yes, it is one of the gentlest shoulder mobility drills because the floor sets the range and there is no resistance. Beginners should simply slide only as far as a comfortable stretch and avoid forcing the arm overhead.
How far overhead should my arm go in the Lying Arms Slide?
Only as far as the hand can stay flat on the floor while your ribs stay down and your shoulder stays relaxed. The end point will differ between people and improves gradually with consistent practice.
Why do my ribs lift off the floor at the top of the slide?
That is a compensation for tight chest or lat tissue, letting the torso borrow range from the spine. Stop the slide just below that point and keep the lower back in contact with the floor until the range grows.
Can I slide both arms at the same time instead of one?
You can, and it gives a symmetrical chest stretch, but the single-arm version shown here makes it easier to keep the ribs down and compare sides. Alternating arms is a good way to notice and address differences between the two shoulders.
What can I use if the floor is uncomfortable or my shoulder feels pinched?
Perform the same slide on an exercise mat for comfort, and if pinching occurs, slightly bend the elbow or reduce the arc instead of pushing through it. Persistent pinching is a signal to stop and get the shoulder assessed.
How many reps of the Lying Arms Slide should I do?
Five to eight slow slides per side is a solid starting dose, pausing for a breath at the furthest comfortable point. More important than the count is that every rep stays smooth and contact with the floor is never lost.
When is the best time to use the Lying Arms Slide?
It fits well before upper-body pressing sessions to open the chest and front shoulders, and after long sitting days when the pecs feel shortened. Keep it out of heavy loading contexts and treat it as preparation or recovery, not a work set.