Sitting Lateral Raise On A Chair
The Sitting Lateral Raise On A Chair is a bodyweight shoulder exercise performed seated on an ordinary chair. From an upright sitting position with your arms relaxed at your sides, you raise both arms straight out to the sides until they reach shoulder height, forming a T-shape with your body, then lower them back down with control. Because no dumbbells are required, the resistance comes entirely from the weight of your own arms and the effort you put into the lift, which makes the movement easy to scale by adjusting speed, pauses, and repetitions.
The main muscle at work is the side portion of the deltoid, the rounded cap of the shoulder that gives the joint its width. The front shoulders assist as the arms travel upward, and the upper traps help once the arms approach shoulder level. Sitting on a chair removes the lower body from the equation, so there is no swinging, leaning, or leg drive to borrow from — the shoulders have to do the work on their own. That makes this a surprisingly honest test of deltoid endurance even without added weight.
This setup is especially useful for beginners learning what a lateral raise should feel like, for older adults or anyone returning from a layoff who wants a low-load entry point, and for people training at home or in an office where no equipment is available. It also works well as a warm-up before weighted lateral raises, or as a high-repetition finisher to flush the shoulders with blood at the end of a session.
The chair matters more than it might seem. Sitting tall with your back away from the backrest and your feet flat on the floor locks your torso in place, so the arms must move through a clean arc at your sides rather than drifting forward. Keep your spine long, ribs down, and shoulders pressed gently away from your ears throughout. If your back gets tired, you can lightly brace your core as if bracing for a light push to the stomach.
To execute well, think about leading the lift with your elbows rather than your hands, keeping a soft bend in the elbows the whole time. Raise only to shoulder height — lifting higher shifts the emphasis to the traps and reduces the deltoid work. The lowering phase deserves as much attention as the lift: take two to three seconds to bring the arms down, resisting gravity instead of letting them drop. Because the load is light, the temptation is to rush; slow, deliberate reps with a brief pause at the top will do far more for shoulder endurance than fast flapping.
A few practical points keep the exercise safe and effective. Stop the set when your form changes — shrugging, hunching forward, or losing the arm path are signs the shoulders are done. If you feel pinching at the top of the movement, lower the arms slightly short of shoulder height or rotate your thumbs slightly upward. Anyone with a current shoulder injury should clear the movement with a qualified professional before adding it to a routine.
[ Workout Log & Planner ]
Put your next workout in Fitwill
Keep your plan and training log ready when you are.


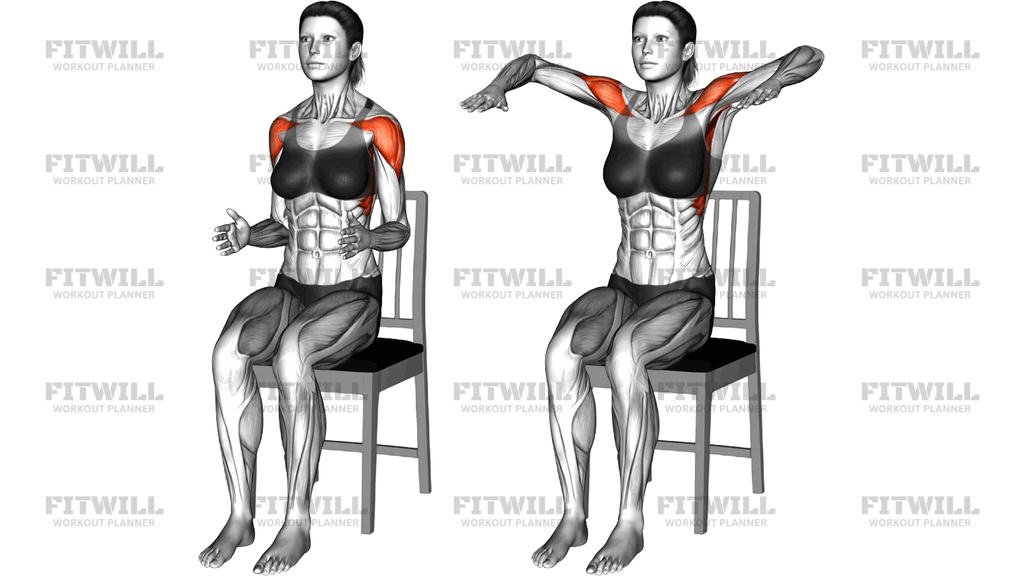
Instructions
- Sit on a sturdy chair with your back upright and not leaning against the backrest, feet flat on the floor about hip-width apart.
- Let your arms hang at your sides with palms facing your thighs and elbows slightly soft, then gently draw your shoulder blades down as if tucking them into your back pockets.
- Brace your core lightly and keep your ribs stacked over your hips so your torso stays still for the entire set.
- Raise both arms straight out to the sides, leading with the elbows and keeping a small bend in each arm.
- Continue lifting until your arms reach shoulder height, forming a straight line from fingertip to fingertip across your shoulders.
- Pause for a beat at the top without shrugging your shoulders up toward your ears.
- Lower your arms slowly along the same sideways path, taking two to three seconds until they are back at your sides with control.
- Breathe out as you raise your arms and breathe in as you lower them.
- Reset your posture between reps if you feel yourself slumping, then continue for your target repetitions.
Tips & Tricks
- If you catch yourself shrugging, it usually means the upper traps are taking over — lower the arms to just below shoulder height and consciously keep the space between your ears and shoulders.
- Resist the urge to swing the arms forward; the path should stay directly out to the sides, in line with the plane of your shoulder blades.
- Because your arms are the only load, tempo is your main tool — try a two-second lift, a one-second pause at shoulder height, and a three-second lower.
- Keep the wrists neutral with fingers relaxed; gripping or tensing the hands adds neck and forearm tension you do not need.
- If your shoulders creep forward at the top, imagine pressing your chest proudly open as you lift to keep the arms tracking backward slightly.
- Sitting away from the backrest is deliberate — leaning back turns this into a front-raise pattern and steals work from the side shoulders.
- For a small increase in difficulty, hold the top position for three to five seconds on the final rep of each set.
- Light pinkies-up rotation can feel smoother for some people; if you feel any pinch in the top of the shoulder, adjust the angle slightly rather than pushing through it.
- Stop the set the moment your torso starts rocking — since the chair anchors your hips, any rocking means the shoulders are finished for that round.
Frequently Asked Questions
Which muscles does the Sitting Lateral Raise On A Chair work?
The side shoulders (lateral deltoids) are the primary movers, with the front shoulders and upper traps assisting as the arms reach shoulder height. The postural muscles of the trunk also work quietly to keep you upright on the chair.
Is the Sitting Lateral Raise On A Chair effective without dumbbells?
Yes, but the resistance is limited to the weight of your arms, so it is best treated as an endurance, warm-up, or rehabilitation-style movement. You can make it harder with slow tempos, pauses at the top, and higher repetitions.
Is this exercise good for beginners?
It is an excellent first lateral raise because the chair stabilizes your torso and the low load lets you focus purely on feeling the side shoulders work. Master the arm path here before picking up dumbbells.
How high should I raise my arms during the Sitting Lateral Raise On A Chair?
Raise only to shoulder height, where the arms form a straight line across the shoulders. Going higher shifts the work to the upper traps and reduces the deltoid emphasis.
Why should I sit away from the backrest?
Leaning against the backrest tilts your torso backward and turns the movement into more of a front raise. Sitting tall keeps the arms traveling straight out to the sides, which is where the side shoulders do their best work.
What is the most common mistake in this exercise?
Shrugging the shoulders toward the ears is the most frequent error, usually happening when someone rushes or tries to lift past shoulder height. Keep the shoulder blades drawn down and lead with the elbows to prevent it.
How many repetitions should I do?
Since the load is light, higher ranges work well — aim for 12 to 20 controlled repetitions per set, or use slower tempos for 8 to 12 reps if you want more of a challenge.
Can I do the Sitting Lateral Raise On A Chair if my shoulders hurt?
Discomfort during a movement is a signal to stop and adjust, not push through. If you have an existing shoulder injury or feel pinching, check with a qualified professional before making this a regular part of your routine.
What can I use instead of a chair?
Any stable seat works — a bench, a sturdy stool, or even sitting on the edge of a bed. The key requirement is a firm surface that lets you sit upright with your feet flat on the floor.
How does this differ from a standing lateral raise?
Standing lets you swing and use body english to get the arms up; the seated position removes that option entirely. Every repetition must come from the shoulders themselves, which makes the seated version stricter but lighter.