Glute Bridge Hip Side Raise
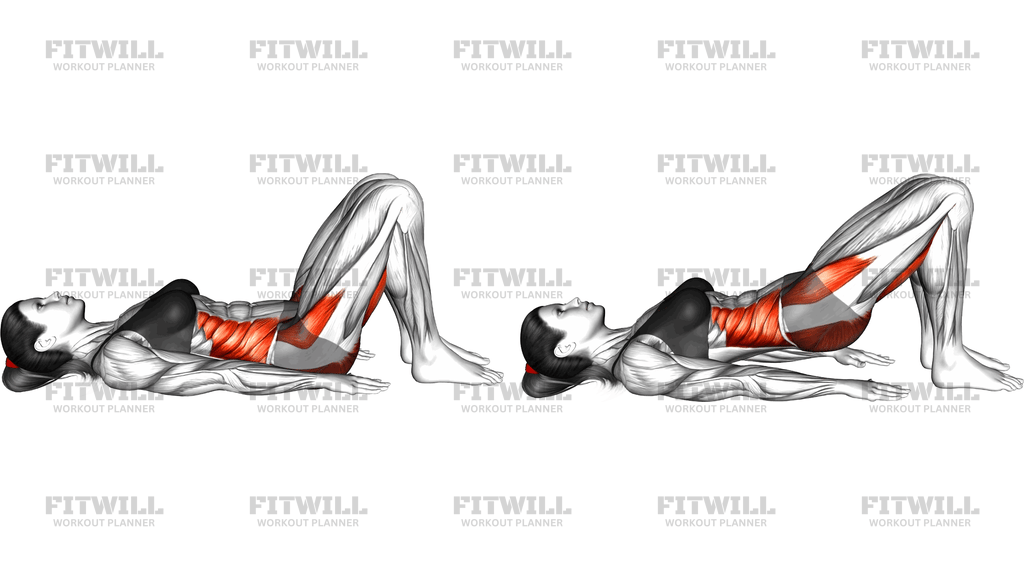
The Glute Bridge Hip Side Raise is a floor-based body weight exercise that combines a standard glute bridge with a lateral hip lift performed at the top of the movement. You lie on your back with knees bent and feet flat, drive your hips up into a full bridge, and then, while holding that elevated position, lift one hip at a time toward the ceiling in a small side-to-side rocking motion. Each lift works the glute on the raised side while the opposite hip and trunk have to stabilize so the pelvis does not simply fall.
This movement is especially useful for anyone whose bridge work has plateaued at the basic up-and-down pattern. The added side raise shifts a meaningful share of the work to the upper glute region — the gluteus medius and surrounding hip abductors — which control the height and level of your pelvis. Those muscles are often undertrained in straight-line exercises like squats and standard bridges, yet they matter a great deal for single-leg balance, walking, running, and keeping the knees tracking well.
The setup matters more than it might seem. Because your feet stay planted while your hips move sideways, your torso and shoulders become the fixed base of support. If your feet are too narrow or your bridge is too high and shaky, the side raise turns into a wobble that trains nothing specific. A shoulder-width stance, arms relaxed at your sides with palms down, and a bridge height you can genuinely hold give you a stable platform for the lateral motion.
To perform it well, think of the bridge as your home position and the side raise as a controlled tilt, not a big heave. Lift one hip a few centimeters while the opposite hip dips slightly, pause briefly, then transfer smoothly to the other side. The movement should feel like your pelvis is on a shallow arc, driven by the glute of the lifting side. Keep your ribs down and breathe steadily throughout so your core does the job of holding your trunk quiet while the hips move.
This exercise fits well as a second or third glute movement in a home workout, as a warm-up activation before lower-body training, or as a finisher when you want extra hip work without equipment. It is generally suitable once you can hold a comfortable body weight glute bridge for 20 to 30 seconds. If you feel the work in your lower back rather than your hips and glutes, lower your bridge height and reduce the size of each side raise until the effort moves back into the glutes.
[ Workout Log & Planner ]
Put your next workout in Fitwill
Keep your plan and training log ready when you are.


Instructions
- Lie on your back on an exercise mat with your knees bent and feet flat on the floor about hip-width apart, heels roughly a hand's length from your glutes.
- Rest your arms at your sides with palms facing down so your shoulders and upper back form a stable base for the movement.
- Brace your core gently, tuck your pelvis slightly, and press through your heels to lift your hips until your body forms a straight line from shoulders to knees.
- Hold this bridge position as your working position — do not let your hips drop for the rest of the set.
- From the bridge, lift one hip a few centimeters higher while the opposite hip lowers slightly, feeling the glute on the lifting side do the work.
- Pause for a beat at the top of the side raise, then smoothly transfer the motion to the other hip in a controlled side-to-side arc.
- Keep your feet planted the whole time; the pivot happens through your hips and upper back, not through sliding or shuffling your feet.
- Exhale as each hip lifts and inhale as it transfers back down, keeping your breathing continuous rather than holding your breath.
- Keep your ribs down and neck relaxed, with your gaze toward the ceiling, so your trunk stays quiet while the pelvis moves.
- Once the set is finished, lower your hips back to the floor under control, straighten your legs, and rest briefly before the next set.
Tips & Tricks
- If your hips drop between side raises, your bridge is too demanding to hold — reduce the range of each lift or shorten the set so the bridge position stays honest.
- A common mistake is lifting with a sideways shove of the feet, which turns it into a leg press wiggle; keep your heels glued to the floor and initiate each lift from the hip itself.
- Keep the side raise small. If your upper back starts rolling or your shoulders slide across the mat, the motion has gone too far and you are losing your base.
- If you feel each rep in your hamstrings instead of your glutes, bring your heels slightly closer to your body before bridging up.
- Watch for your pelvis twisting toward the floor on the lifting side; imagine a glass of water balanced on your lower stomach that you must not spill.
- Slowing the transfer between sides usually does more than adding reps — the changeover is where the stabilizing glute on the dipping side works hardest.
- If your neck strains against the floor, let the back of your head rest heavier and avoid pushing down with your arms to force the hips higher.
- Place a folded towel under your shoulders or head if the hard floor makes the position uncomfortable, since discomfort there tends to break your focus on the hips.
- Progress by adding a brief pause on each lifted side before adding extra repetitions, so quality of the hold improves before volume does.
Frequently Asked Questions
Which muscles does the Glute Bridge Hip Side Raise work?
The gluteus maximus drives and holds the bridge, while the side raise adds strong work for the gluteus medius and other upper-hip muscles on the lifting side. Your hamstrings, core, and obliques support the position and keep the trunk steady.
How is the Glute Bridge Hip Side Raise different from a normal glute bridge?
A normal glute bridge moves the hips straight up and down, so the front-to-back glute muscles do most of the work. The side raise keeps you in the bridge and tilts the pelvis left and right, which shifts effort toward the upper, outer hip muscles and challenges your ability to control pelvic level.
Is the Glute Bridge Hip Side Raise suitable for beginners?
Yes, as long as you can already hold a comfortable body weight glute bridge for around 20 to 30 seconds. Beginners should use small, slow side raises and fewer total bridges held per set before building up.
Should my feet move during the side raise?
No. Your feet stay planted hip-width apart with heels down for the entire set; if your feet slide or rock, the lift is too large or your bridge has dropped too low.
Why do I feel the Glute Bridge Hip Side Raise in my lower back?
This usually means your bridge is too high or you are arching instead of bracing. Lower your hips slightly, keep a gentle pelvic tuck, tighten the core, and make each side raise smaller until the effort returns to the glutes.
Can I do the Glute Bridge Hip Side Raise instead of a regular glute bridge?
It works best as a progression or complement rather than a replacement, because the isometric hold demands more endurance and control. Start with standard bridges to build the base pattern, then introduce the side raise once the hold feels solid.
How high should I lift each hip during the side raise?
Only a few centimeters above your bridge height — enough to feel the glute on that side contract clearly. If lifting higher forces your shoulders to slide or your trunk to twist, the range is too big.
What can I use if I don't have an exercise mat?
Any firm, non-slippery surface works, such as carpet or a folded towel under your shoulders and head. Avoid very soft beds or cushions, which make it hard to keep your bridge stable.
How many repetitions of the Glute Bridge Hip Side Raise should I do?
Count one repetition per side-to-side transfer, and start with 6 to 10 transfers per bridge hold for 2 to 3 sets. Stop the set when you can no longer keep your hips at bridge height, since a sagging bridge cancels the benefit.
Is it safe to do this exercise every day?
For most people, yes, as long as the volume stays modest and the muscles are not left sore from the previous session. Treat it like any strength movement — include rest days and reduce the work if your hips or lower back feel fatigued.