Standing Single Arm Circle On A Wall
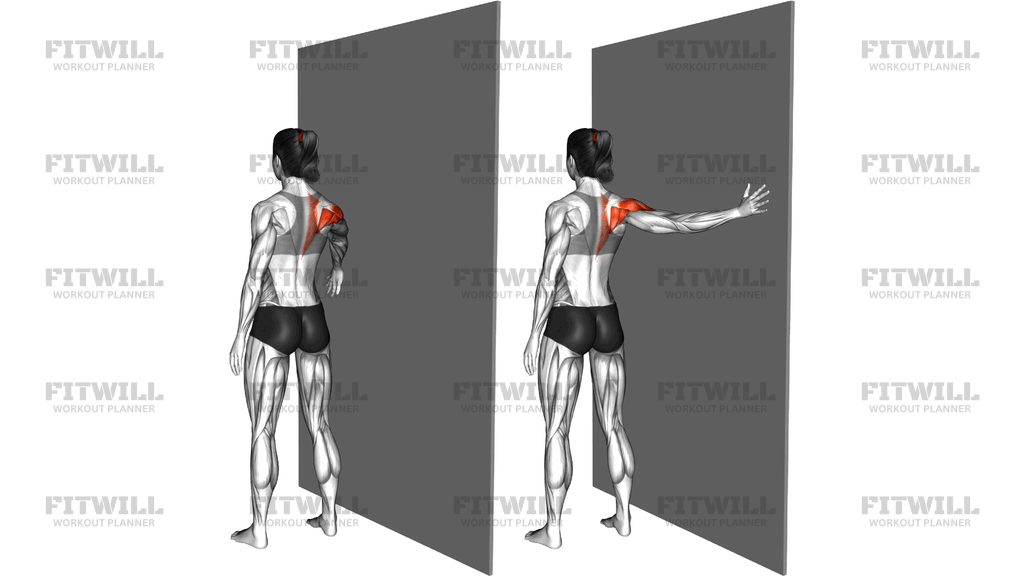
Standing Single Arm Circle On A Wall is a shoulder mobility and control drill where you stand side-on to a wall, raise one arm out to about shoulder height, and draw slow, deliberate circles with the hand close to or lightly touching the wall surface. The wall acts as both a guide and a boundary, keeping the arm traveling in a clean vertical plane and giving you instant feedback if your shoulder starts to hike or drift forward.
The main work happens in the deltoid of the moving arm, while the rotator cuff muscles steer the shoulder joint through each rotation. The trap and upper back muscles on the working side stabilize the shoulder blade so the arm can move smoothly from a steady base. Because only one arm works at a time, it is easy to feel and correct side-to-side differences in range or control.
This movement suits anyone rebuilding shoulder mobility after a layoff, warming up before pressing or overhead work, or spending long hours at a desk with stiff, rounded shoulders. It is gentle enough for beginners and can be scaled by adjusting circle size, speed, and how close the hand stays to the wall. Overhead athletes, swimmers, and racket sport players also use it to keep the shoulder gliding well under fatigue.
The wall setup matters more than it looks. Standing close enough that your fingertips can trace or graze the wall prevents you from swinging the arm or arching the back to finish the circle. It also discourages shrugging, since the shoulder blade has nowhere to hide when the hand is anchored to a fixed plane.
To perform it well, keep the torso tall and still, let the circles grow gradually from small to larger, and move the hand as if drawing on the wall with a marker. Reverse direction after completing your reps one way. The arm stays mostly straight but not locked, and the movement should come from the shoulder joint rather than the elbow or wrist.
As a safety note, keep the circles pain-free and stay well below any point that causes pinching at the front of the shoulder. If your shoulder hikes toward the ear or the trunk leans into each rotation, shrink the circle size until control returns. This drill should feel like smooth work, not strain.
Fitwill
Log Workouts, Track Progress & Build Strength.
Achieve more with Fitwill: explore over 9600 exercises with images and videos, access built-in and custom workouts, perfect for both gym and home sessions, and see real results.
Start your journey. Download today!




Instructions
- Stand side-on to a clear wall with the working arm closest to it, feet about hip-width apart and weight even across both feet.
- Raise the near arm straight out to the side to roughly shoulder height, fingertips lightly touching or hovering a few centimeters from the wall.
- Stand tall with ribs stacked over the pelvis, and brace the trunk lightly so the torso stays quiet throughout the set.
- Begin drawing small circles with the hand, tracing the wall surface like a marker so the arm stays in one vertical plane.
- Gradually enlarge the circles until you reach a comfortable maximum that does not cause the shoulder to hike toward the ear.
- Keep the elbow mostly extended but soft, letting the rotation come from the shoulder joint itself.
- Complete your repetitions in one direction, then reverse and draw the same number of circles the other way.
- Breathe steadily throughout, exhaling on the hardest part of each circle rather than holding your breath.
- Lower the arm with control, pause to notice how the shoulder feels, then switch to the opposite arm and repeat.
Tips & Tricks
- If your shoulder shrugs up toward the ear, that is a sign the circle has outgrown your control — shrink it until the trap stays relaxed.
- Imagine a pen taped to your palm; the goal is a clean round line on the wall, not a wobbling oval pulled in by the trunk.
- Do not let the torso rock or lean into each rotation — if it does, slow the tempo down before reducing the range.
- Keep the fingers soft on the wall; pressing hard shifts effort into the chest and takes it away from the shoulder.
- Start with small clockwise circles and progress to larger ones within a set — this ramps the rotator cuff in gently.
- Compare sides: if one arm fatigues faster or has a smaller clean range, give it an extra set rather than ignoring it.
- A slight forward lean of the whole body toward the wall is fine, but the shoulder blade should not roll forward and round the upper back.
- Use this before bench pressing, overhead pressing, or throwing — the wall keeps the arm honest during a warm-up when form tends to get lazy.
- If you feel a pinch at the front of the shoulder at the top of the circle, lower the ceiling of the circle by a few centimeters instead of pushing through.
Frequently Asked Questions
What muscles does Standing Single Arm Circle On A Wall work?
The deltoid of the moving arm drives the circle, while the rotator cuff controls the rotation and the traps and upper back hold the shoulder blade steady. It is primarily a mobility and control drill rather than a strength builder.
How close should my hand be to the wall during Standing Single Arm Circle On A Wall?
Your fingertips should lightly graze the wall or hover within a few centimeters of it throughout the circle. If the hand drifts away from the wall, the shoulder is usually hiking or the trunk is twisting to compensate.
Is Standing Single Arm Circle On A Wall good for beginners?
Yes, it is one of the safest ways to train shoulder mobility because the wall limits the range and gives immediate feedback on form. Beginners should start with small, slow circles and only grow them once the shoulder stays relaxed.
Should my arm be completely straight during the circles?
Keep the elbow mostly extended but never locked, as a slight softness protects the joint and lets the arm travel smoothly. Bending the elbow turns the drill into an elbow circle and reduces the work at the shoulder.
Why does my shoulder shrug when I do Standing Single Arm Circle On A Wall?
Shrugging means the trap is taking over because the shoulder blade is not stable or the circle is too large. Reduce the circle size, slow the tempo, and consciously keep the shoulder blade settled down and back.
How many reps and sets should I do per arm?
Start with 8 to 10 circles in each direction per arm for one or two sets. Since this is a low-load drill, you can do it daily as a warm-up or between heavier sets.
Can I use this exercise instead of big arm circles as a warm-up?
Yes, and for many people it is better, because the wall constrains the arm to a controlled plane and prevents the whipping, momentum-driven circles that do little for the shoulder. Use it before pressing, pulling, or throwing.
What can I substitute if I do not have a clear wall space?
You can perform the same single-arm circles free-standing, but you lose the plane guidance and feedback the wall provides. Standing very close to a doorway frame or mirror edge works as a similar reference point.
Is it safe to do Standing Single Arm Circle On A Wall with a sore shoulder?
Gentle circles within a pain-free range are commonly tolerated, but stop if you feel pinching, catching, or sharp pain. Persistent shoulder pain should be assessed by a qualified professional before continuing.
Should I do both directions of circle in the same set?
Yes, complete your reps clockwise, then reverse immediately into counterclockwise circles for the same count. Working both directions keeps the rotation balanced around the joint.