Stand To Stand Bridge
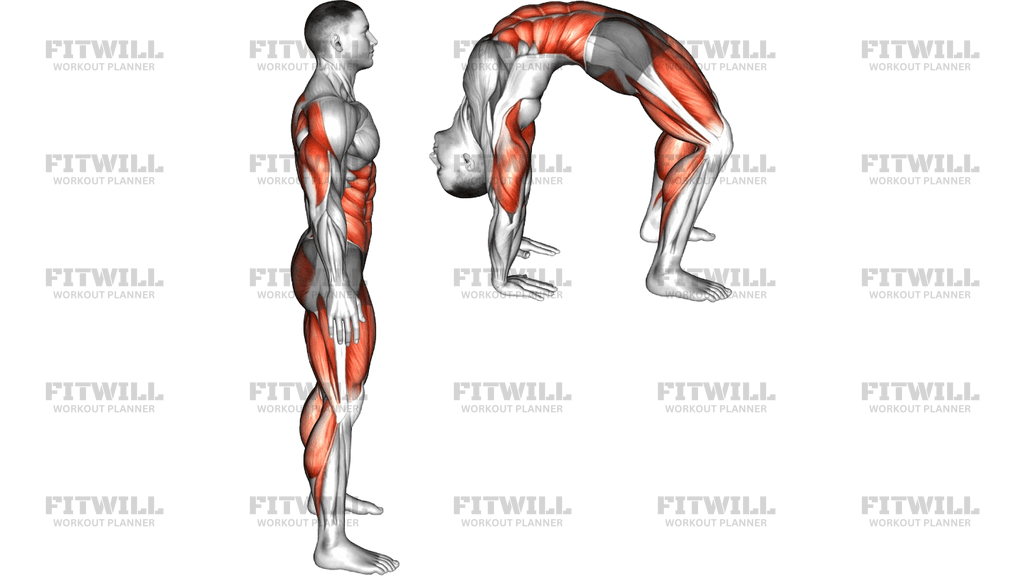
The Stand To Stand Bridge is one of the most demanding bodyweight back exercises you can do: you start standing upright, arch backward under control until your palms reach the floor behind you in a full back bridge, then press back up and uncurl to a standing position. Unlike a standard floor bridge where you simply lift into position and lower down, the Stand To Stand Bridge requires you to travel through the entire range of the backbend both ways, which is why it is often treated as a graduation exercise rather than a starting point.
The movement trains the glutes and lower back as the primary movers while the shoulders, arms, and hamstrings handle significant loading in the deep bridge position. Your core works the entire time, first controlling the descent backward and then driving the hips forward and up as you return to standing. Because the spine moves through a large arch and back out of it, the exercise also builds active spinal mobility, not just flexibility — you have to be strong in the stretched position, not merely able to pass through it.
Setup matters more here than in most floor drills. Your feet need to be far enough apart to give you a stable base, and your hands need to land in a predictable spot, which means the arc of your descent has to be consistent from rep to rep. Practicing in front of a wall or with a spotter is common early on, because the moment when your head passes below your hips is when balance and control are hardest.
To execute it well, think of the descent and the ascent as two separate skills. On the way down, push the hips forward and bend the knees as you arch, letting the movement flow through the whole spine instead of hinging only from the lower back. On the way up, press firmly through the hands, tuck the chin, and drive the hips up and forward so the weight shifts back over your feet as the spine stacks again. Rushing either half usually shows up as a lurching finish or a collapsed bridge.
This exercise suits people who already own a comfortable floor back bridge and want to develop full-body posterior chain strength, shoulder flexibility, and control in deep extension. Use it in small doses with a thorough warm-up, and stop any set before your form degrades — a tired Stand To Stand Bridge is where most sloppy landings happen.
[ Workout Log & Planner ]
Put your next workout in Fitwill
Keep your plan and training log ready when you are.


Instructions
- Stand tall with your feet hip-width apart, toes pointing forward, leaving clear open space behind you where your hands will land.
- Raise your arms overhead with hands about shoulder-width apart, fingers pointing back toward the floor.
- Brace your core, squeeze your glutes, and shift your hips slightly forward as you begin to arch backward from the upper back first.
- Let your head follow the line of the spine and start bending your knees so your hips keep traveling forward over your heels.
- Continue arching and bending until your palms touch the floor behind you, arms straight, forming a full back bridge with your head between your arms.
- In the bridge, press your hands firmly into the floor and push your chest toward your hands, distributing weight between hands and feet rather than hanging on the shoulders.
- To return, press through the palms, tuck your chin toward your chest, and drive your hips up and forward so the weight shifts back over your heels.
- Curl the spine back up segment by segment, letting the arms swing overhead for momentum if needed, until you are standing tall again.
- Exhale as you come up, take a breath at the top, and reset your stance before starting the next repetition.
- Keep the descent and ascent equally controlled; if you cannot lower smoothly or stand back up without collapsing, scale back to an easier bridge variation.
Tips & Tricks
- Warm up the spine and shoulders first with standing backbends and floor back bridges — going into a Stand To Stand Bridge cold is the fastest way to a jarring descent.
- If your heels lift off the floor in the bridge, your ankles or shoulders are tight; work on shoulder flexibility rather than forcing a narrower arch.
- Bending the knees more, not less, makes the descent easier — many people keep their legs too straight and end up dumping all the arch into the lower back.
- A common mistake is letting the hands land too far from the feet, which makes the stand-up nearly impossible; practice the descent in front of a wall until your hand placement is consistent.
- Keep your head in line with your arms instead of letting it hang loose — the neck should support the position, not carry your bodyweight.
- If the descent is fine but the stand-up stalls, practice pressing back to standing from a bridge with your heels close to a wall, or walk your hands down the wall first to build the hip drive pattern.
- Feeling dizzy as the head goes below the hips is common at first; pause between reps, stand fully upright, and breathe before continuing rather than chaining reps quickly.
- Do not chase extra reps once your arms start shaking in the bridge — that is the point where people drop out of the position instead of lowering under control.
- Use a mat or soft surface under your hands and head while learning; a slippery or hard floor changes where your hands land and how confident you feel going backward.
Frequently Asked Questions
What muscles does the Stand To Stand Bridge work?
The glutes and lower back do the main work of arching and standing up, while the shoulders, arms, and hamstrings carry substantial load in the deep bridge. The abs and deep core stay active throughout to control the descent and the return.
Is the Stand To Stand Bridge suitable for beginners?
Not usually as a first exercise. Beginners should build up through glute bridges, floor back bridges, and wall walk-downs before attempting the full stand-to-stand version, which requires both shoulder mobility and strong bridge control.
Why can I get into the bridge but not stand back up?
The stand-up depends on pressing strongly through the hands and driving the hips forward over the heels. If your hands landed too far away or your shoulders lack pressing strength, the return becomes a dead lift with no leverage — narrow your arc and practice stand-ups from a bridge against a wall.
How far apart should my hands and feet be in the Stand To Stand Bridge?
Aim for hands roughly shoulder-width apart and feet hip-width apart, with the hands landing about a foot or slightly more in front of where they would be if you simply fell backward. The closer the hands and feet, the shorter and easier the bridge, so adjust by bending the knees during the descent.
What is the most common mistake in the Stand To Stand Bridge?
Arching almost entirely from the lower back while keeping the hips and knees stiff, which overloads the lumbar spine and produces a cramped, short bridge. Push the hips forward, bend the knees, and spread the arch across the whole spine.
Can I use a wall to learn the Stand To Stand Bridge?
Yes — walking your hands down a wall into a bridge and back up is the standard progression. It lets you control the depth and practice the stand-up drive before committing to a free backward descent.
How many reps of the Stand To Stand Bridge should I do?
Low reps with full control beat high reps with fatigue. Most people do well with 3 to 5 quality repetitions per set, stopping as soon as the descent gets rushed or the stand-up starts to stall.
Is it safe to do the Stand To Stand Bridge every day?
It is a demanding strength and mobility skill, not just a stretch, so daily heavy sessions usually lead to tight or achy shoulders and lower back. Two to four focused sessions per week with easier bridge work on other days is a more sustainable approach.
What can I substitute if the Stand To Stand Bridge is too hard?
Floor back bridge holds, bridge push-ups, and wall walk-downs all train the same pattern at a lower demand. Once you can hold a solid back bridge with straight arms and comfortable shoulders, the stand-to-stand version is the next step.