Band Single Leg Hip Lift
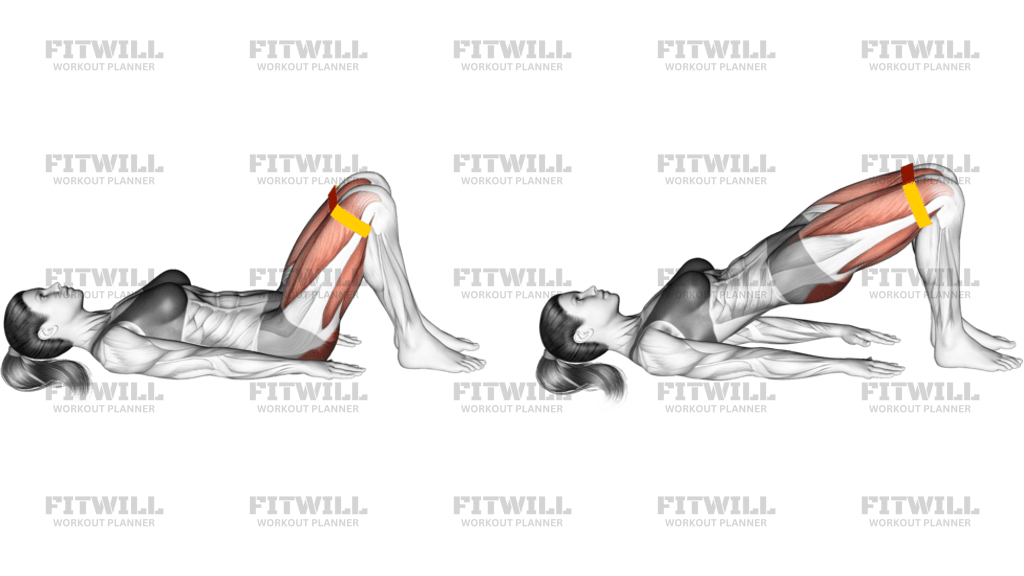
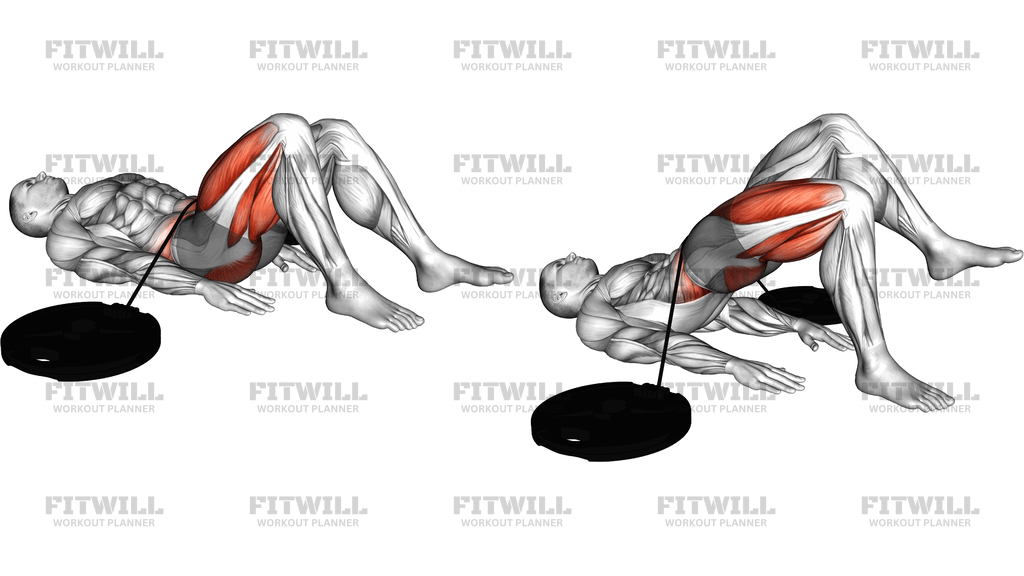
The Band Single Leg Hip Lift is a floor-based glute exercise where you lie on your back with one foot planted, loop a resistance band around your hips, and anchor the band behind you to a low point or heavy object. Because the band pulls your hips toward the floor, your working leg has to push harder through every inch of the lift, turning a bodyweight single-leg bridge into a genuinely demanding hip extension drill. The non-working leg stays off the floor, which removes any chance of the stronger side quietly helping out.
This movement suits almost anyone who wants stronger, more responsive hips. It is especially useful for people who feel back-dominant during regular bridges or deadlifts, since the single-leg stance forces the glute of the working side to do the job on its own. Runners, cyclists, and lifters recovering lower-body balance after time off also get a lot from it, because it exposes and then corrects side-to-side differences in hip strength.
The main muscles at work are the glutes, particularly the gluteus maximus of the supporting leg, with the hamstrings assisting as you drive the hips upward. The gluteus medius on the standing side works hard to keep your pelvis level, and your core braces continuously to stop the torso from rotating or sagging. The band adds resistance that peaks as your hips rise, which matches the point in the range where the glutes are strongest.
Setup matters more here than in a standard bridge. The band needs to sit across the crease of your hips, not your waist or thighs, and the anchor point should be far enough behind you that tension stays fairly even through the whole rep. Your planted foot should be close enough to your hips that your shin is roughly vertical at the top. If the foot drifts forward, the hamstrings take over and the glutes lose their leverage.
To perform it well, drive through the heel and mid-foot of the working leg, squeeze the glute, and lift until your shoulder, hip, and knee form a straight line. Pause briefly at the top without letting the band pull you into an overextended lower back, then lower under control until your hips lightly touch down. Keep the lifted leg still throughout so it acts as a counterweight rather than a helper.
Use this exercise as a warm-up activation before squats or deadlifts, as a main glute movement in home workouts where no barbell is available, or as an accessory on lower-body days to attack hip strength unilaterally. Start with a light band and higher reps to learn the balance demands, then increase band tension once you can complete your sets without the hips tilting or dropping.
[ Workout Log & Planner ]
Put your next workout in Fitwill
Keep your plan and training log ready when you are.


Instructions
- Lie on your back on an exercise mat with your knees bent, then loop the resistance band around both hips, just below the hip crease.
- Anchor the band to a low, secure point or heavy object behind your feet so the band runs along the floor and pulls your hips downward when taut.
- Bring one foot in close to your hips so the shin is roughly vertical, and press that foot flat into the floor; lift the other leg and hold it bent or extended off the ground.
- Grip the band or rest your arms at your sides on the floor to stay stable, and brace your core as if preparing for a light punch to the stomach.
- Exhale and drive through the heel and mid-foot of the planted leg, squeezing the glute to raise your hips toward the ceiling against the band's pull.
- Stop when your shoulder, hip, and knee form one straight line; your lifted leg should travel up with your pelvis, staying level and parallel to the floor.
- Pause for one to two seconds at the top, keeping tension in the glute rather than arching the lower back past neutral.
- Inhale and lower your hips slowly back toward the mat, resisting the band all the way down until your hips hover just above or lightly touch the floor.
- Complete all reps on one side, then reposition and switch so the other leg works against the band.
- Between sets, release the band tension fully before standing up to avoid it snapping upward off your hips.
Tips & Tricks
- If the band slides up toward your waist during the lift, it is positioned too high; move it down to the hip crease so it resists the actual hinge of the hips.
- A common mistake is pushing through the toes, which shifts work to the quads and calves; press the whole foot down and imagine dragging it slightly toward you.
- Watch for the pelvis dropping toward the unsupported side at the top; this means the gluteus medius is tiring, so shorten the set rather than tilting.
- Do not let the lower back arch beyond neutral at the top of the lift; the range ends when your torso and thigh line up, not when you can lift no higher.
- If your hips sway side to side, widen your base slightly by angling the planted foot a few degrees out and keep both hands on the floor for balance.
- Start with a lighter band than you think you need; the single-leg position multiplies the challenge compared to a two-legged band hip thrust.
- Keep the lifted leg from swinging or extending as you press up; it should move only because your pelvis moves.
- Place the anchor point directly behind your working foot's line so the band pulls straight down, not diagonally across your body.
- If your neck strains from pressing into the mat, let your head rest heavy and keep your gaze straight up rather than tucking or lifting your chin.
Frequently Asked Questions
What muscles does the Band Single Leg Hip Lift work?
The gluteus maximus of the planted leg is the primary driver, with the hamstrings assisting the hip extension. The gluteus medius stabilizes the pelvis and the core works to keep your torso from rotating under the band's pull.
Why use a band instead of doing a plain single-leg bridge?
The band adds downward resistance across the hips, so the glutes must work much harder, especially at the top of the lift. It lets you load the movement progressively without needing a barbell or bench.
Is the Band Single Leg Hip Lift suitable for beginners?
Yes, if you start with a light band and master the two-legged band hip lift first. The single-leg balance and anti-rotation demands are significant, so build up gradually.
Should the non-working leg be bent or straight?
Either works. Keeping it bent with the thigh tucked toward the chest makes it easier to keep the pelvis level, while extending it increases the challenge for core stability.
How far should my planted foot be from my hips?
Close enough that your shin is roughly vertical at the top of the lift. Too far away and the hamstrings dominate; too close and you lose range and may feel cramping in the glute.
What should I anchor the resistance band to?
A low, secure anchor directly behind you works best, such as a heavy dumbbell or plate, a band peg, or a sturdy object that will not slide. Always test the anchor under light tension before loading up.
Why do my hamstrings cramp during this exercise?
Cramping usually means the foot is set too far from the hips or the glutes are not initiating the lift. Bring the foot closer and focus on squeezing the glute first before the hips rise.
Can I substitute the Band Single Leg Hip Lift with something else?
A single-leg glute bridge on the floor, a single-leg hip thrust with shoulders on a bench, or a cable pull-through all train similar hip extension. The band version is unique in combining unilateral loading with anti-rotation core demand.
How many reps and sets should I do?
Two to four sets of 8 to 15 reps per side works well, starting with lighter band tension. Because each side works alone, always match the weaker side's rep count rather than the stronger one.
Is it safe for people with lower back sensitivity?
The floor-supported position is generally gentle on the back, but avoid arching past neutral at the top and keep the brace firm throughout. If any movement causes discomfort, reduce band tension or consult a qualified professional before continuing.