Resistance Band Psoas Walk
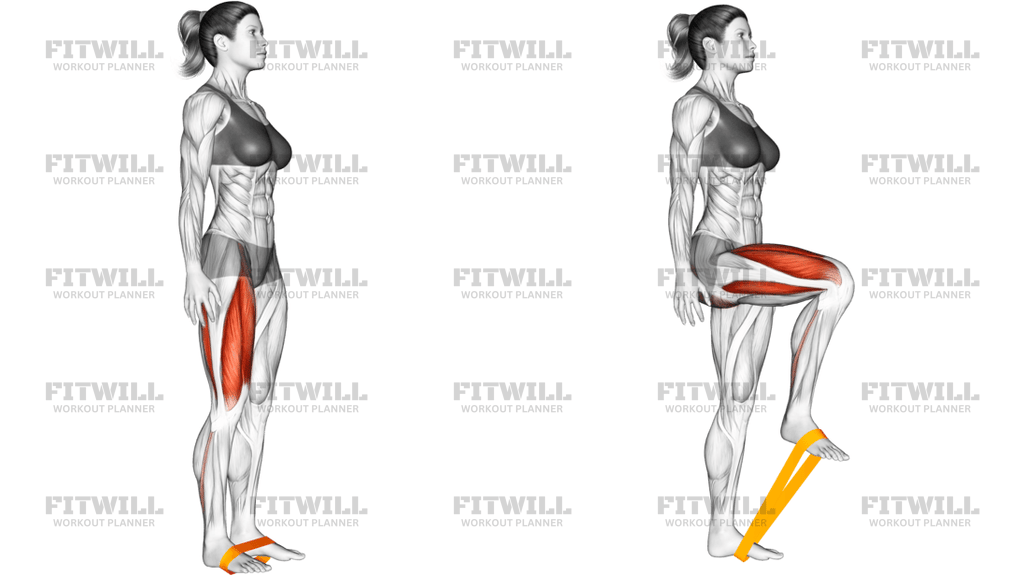
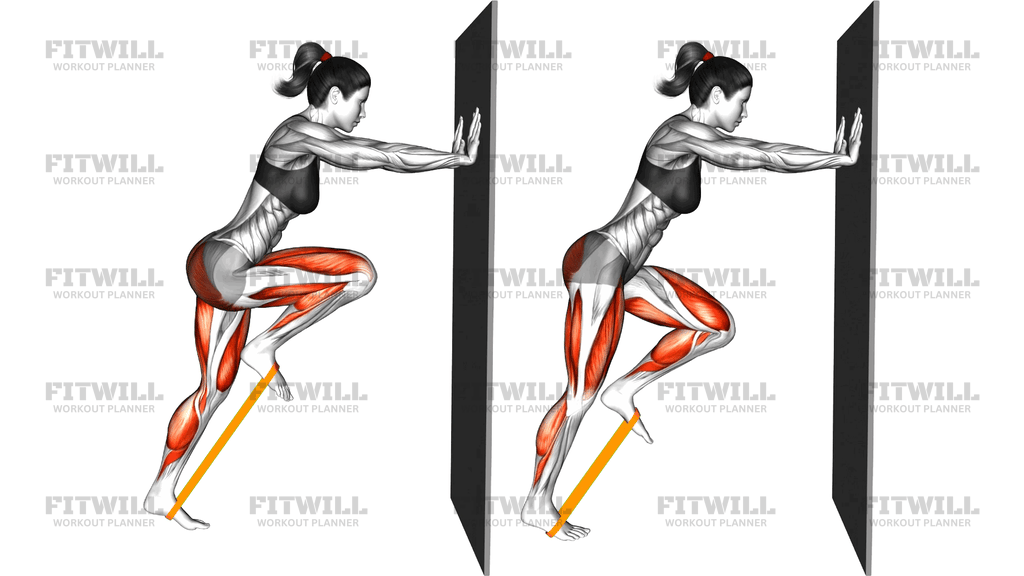
The Resistance Band Psoas Walk is a standing hip flexor drill performed against a wall with a resistance band looped around both feet. You anchor the band under your rear foot, place your hands on the wall for balance, and drive the banded knee up toward your chest against the band's pull, then lower it back under control. The movement gets its name from the psoas — the deepest of the hip flexors, running from the lower spine through the pelvis to the thigh — which is the prime mover when you lift the knee against resistance.
This drill is especially useful for runners, sprinters, and anyone whose training involves repeated knee drives, because it trains hip flexion in an upright, single-leg stance that closely matches how the psoas actually works during gait. Most gym work for the hips focuses on extension — squats, hinges, bridges — while the muscles that lift the leg get little direct loading. The band changes that, adding tension that peaks as the knee rises and challenges the hip flexor through the top of the range.
The wall support is not just a convenience; it shapes the whole exercise. Leaning into the wall with straight arms lets you stay tall through the trunk and prevents the torso from collapsing forward as the knee drives up, which is the most common compensation when hip flexors are weak. It also frees you from worrying about balance, so you can put full intent into the lift rather than stabilizing.
Beyond the psoas and the other hip flexors like the rectus femoris and tensor fasciae latae, the standing leg works hard isometrically. The glutes and calf of the anchored foot keep you from being pulled backward as the band stretches, and the deep core braces to hold the ribcage and pelvis aligned. This makes the drill a genuine stability exercise for the whole lower body, not just an isolated hip flexor movement.
Because the resistance comes from a band rather than a weight, the drill is easy to scale. A lighter band or a looser loop suits beginners and people rehabbing general hip stiffness, while a stronger band or a slower tempo challenges well-trained athletes. Keep the reps moderate, move with control, and stop if you feel any pinching at the front of the hip.
[ Workout Log & Planner ]
Put your next workout in Fitwill
Keep your plan and training log ready when you are.


Instructions
- Loop a resistance band around the ball of your rear foot so it presses flat against the floor, then stretch the other end up and over the top of your front foot so it sits snugly across the instep or ankle.
- Face a wall and step back into a split stance, roughly arm's length away, with your rear leg extended behind you and the band pulled taut before you begin.
- Place both palms flat on the wall at shoulder height, arms straight, and lean your weight slightly into your hands with your body in one long line from head to rear heel.
- Brace your trunk and keep your pelvis level — avoid letting the same-side hip drop as you prepare to lift.
- Drive the banded knee up and forward toward your chest until the thigh is at or above parallel to the floor, pulling directly against the band's tension.
- Pause briefly at the top with the knee high, keeping the foot relaxed and the torso tall against the wall.
- Lower the leg slowly back toward the floor, resisting the band's pull the whole way down until the foot is close to but not resting on the ground.
- Exhale as you drive the knee up, inhale as you lower it back down.
- Complete all reps on one side, then re-set the band on the opposite feet and work the other leg.
Tips & Tricks
- If the band slips off the top of the moving foot, switch to a thinner flat band or loop it twice — a loose loop is the most common setup failure in this drill.
- Watch for the torso buckling toward the wall as the knee rises; if it does, think of pushing the wall away slightly while you lift, which keeps the trunk engaged.
- Do not let the standing foot roll inward or the rear knee bend as the band pulls you back — press that foot firmly into the floor to hold your anchor.
- Keep the driving knee tracking straight ahead; if it caves toward the midline, reduce the band tension before anything else.
- A slow lowering phase matters more than a fast lift here — the band accelerates your leg downward, so fight it for a two- to three-second descent.
- If you feel a pinch at the front of the hip at the top, lift the knee slightly less high rather than pushing through the discomfort.
- Start each set with the band tension already on, not slack, so the first rep matches the last in difficulty.
- Because each side uses a fresh band setup, do all reps on one leg before switching — alternating feet mid-set means re-rigging the band every rep.
Frequently Asked Questions
What muscles does the Resistance Band Psoas Walk work?
The primary movers are the hip flexors, led by the iliopsoas, along with the rectus femoris and tensor fasciae latae. The standing leg's glutes and calf work isometrically, and the deep core stabilizes the trunk against the band's pull.
Why is the band looped around both feet instead of anchored to a fixed point?
With the band under the rear foot, the resistance travels with you and stays taut through the entire knee drive, including the top of the lift. It also removes the need for a rack or anchor point — just the band, the floor, and a wall.
Is the Resistance Band Psoas Walk suitable for beginners?
Yes, provided you start with a light band and use the wall for full support. The main challenges are balance and keeping the trunk tall, both of which the wall handles, so a beginner can focus purely on lifting the knee with control.
How close should I stand to the wall?
Stand about arm's length away so your palms rest flat on the wall with straight arms when you lean in. Too close and you will be overly upright with no room to drive the knee; too far and you will over-reach and lose the wall's support.
Why do my hamstrings cramp during this exercise?
The rear leg's hamstrings work hard to hold the split stance against the band pulling you backward. Shorten your stance slightly, ease the band tension, and make sure you are not locking the rear knee.
How many reps and sets should I do?
Two to three sets of 8 to 12 controlled drives per side works well for most people. Because the psoas responds better to quality than volume, stop the set when the knee stops reaching full height.
Can I do the Resistance Band Psoas Walk without a wall?
You can, but you lose the trunk support that makes the drill effective, and balance becomes the limiting factor instead of hip strength. A sturdy chair back or railing at hip-to-chest height is a reasonable substitute if no wall is available.
What is the most common mistake with this movement?
Leaning the torso forward and collapsing into the wall as the knee drives up, which turns a hip flexor exercise into a half-hearted leg lift. Keep the arms straight and imagine pushing the wall away slightly while the knee rises.
Is this exercise safe if I feel tightness in the front of my hip?
Mild stretching sensation is normal, but a pinching or catching feeling at the front of the hip is a signal to back off. Reduce the height of the knee drive or the band tension, and if the pinch persists, have it assessed before continuing.
How is this different from a hanging knee raise?
The Resistance Band Psoas Walk is done standing with wall support, so it trains hip flexion in the same upright posture used for running and walking, and the standing leg gets stability work. A hanging knee raise removes the stance leg and adds significant core and grip demands from the hang.