Half Kneeling Hamstrings Stretch
The Half Kneeling Hamstrings Stretch is a body-weight flexibility drill that targets the hamstring of the back leg by taking it from a bent-knee position into a long, straightened position behind you. You begin in a classic half-kneel with one foot planted forward and the opposite knee resting on the floor, hands clasped in front of your chest for balance. From there, you shift your weight slightly back, lift the rear knee off the ground, and extend that back leg behind you until you feel a clean stretch along the underside of the trailing thigh.
What makes this version different from a standing or seated hamstring stretch is the kneeling support. Because your front leg and the floor take care of balance, you can concentrate entirely on the quality of the stretch rather than on staying upright. That makes it a smart choice for people who feel unstable in standing forward-fold variations, or anyone whose hamstrings are tight enough that bending over at the hips pulls them out of position.
The primary tissue being lengthened is the hamstring group of the extended leg, especially the biceps femoris on the outer back of the thigh. As the knee straightens, the stretch also runs into the calf of the same leg, and you will typically feel a gentle opening across the front of the kneeling hip. The front leg works quietly the whole time as a stabilizer, and your trunk has to stay tall, which gives the core some low-level postural work without turning the stretch into a workout.
Setup matters more here than most people expect. If your front shin is not roughly vertical, or if the front knee drifts past the toes as you extend the back leg, the pelvis tucks and the hamstring loses its length. Keeping the torso upright, ribs stacked over the hips, and the hips pressed gently forward preserves the position of the pelvis so the stretch lands where it belongs instead of in the lower back.
This stretch fits well into lower-body warm-ups before squats, lunges, or running, and it is equally useful in cooldowns after leg training or long periods of sitting. Athletes with sprinting and jumping demands, desk workers with chronically shortened posterior-chain muscles, and lifters who struggle to hit depth because of tight hamstrings all tend to benefit from spending thirty to sixty seconds per side on it.
Move into the stretch gradually and breathe steadily throughout. The goal is a firm but comfortable pulling sensation, never sharp pain behind the knee or in the back of the thigh. Ease out of the position with control, reset your stance, and repeat on the other side, keeping the time under stretch equal on both legs.
[ Workout Log & Planner ]
Put your next workout in Fitwill
Keep your plan and training log ready when you are.


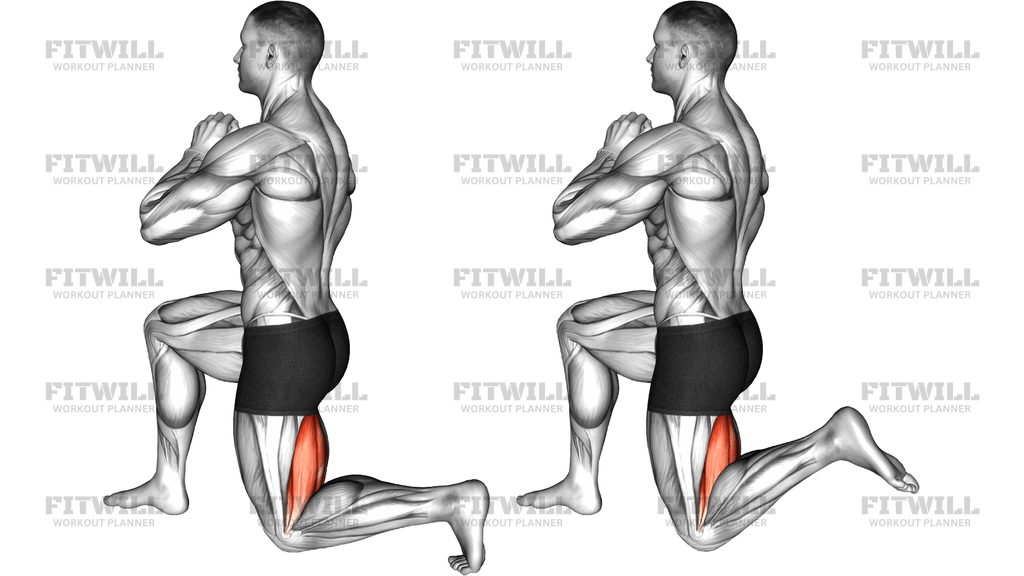
Instructions
- Kneel on the floor with your right knee down directly under your right hip and your left foot flat on the floor in front of you, left knee bent to about ninety degrees.
- Clasp your hands together at chest height and let them rest there lightly; this gives you a reference point for keeping your torso tall.
- Tuck your back toes under so the ball of the right foot contacts the floor, and check that your left shin is close to vertical with your weight spread across the whole left foot.
- Brace your trunk lightly and squeeze the glute of the kneeling leg to set your pelvis in a neutral, forward-facing position.
- Press the floor away with your hands lightly or your clasped fists, shift your hips back a few centimeters, and slowly straighten your right knee, sliding the right foot back behind you.
- Keep lifting the back knee away from the floor until you feel a solid stretch along the back of the right thigh and calf, stopping well short of any sharp or pinching sensation.
- Hold the end position for twenty to forty seconds, breathing slowly and letting the range increase a small amount on each exhale.
- Bend the right knee again and lower it back down to the floor under control rather than dropping it.
- Reset your stance, switch sides, and repeat the same sequence with the left knee down and the right foot forward.
Tips & Tricks
- If the stretch hits the back of the knee instead of the middle of the thigh, you have straightened the leg too aggressively; back off a few degrees and let the hamstring lengthen at the belly of the muscle.
- A common mistake is letting the pelvis tuck under as the back leg extends, which kills the hamstring stretch and dumps stress into the lower back. Keep the glute of the kneeling leg engaged and imagine your tailbone pointing at the wall behind you.
- Do not let the front knee travel forward past the toes when you shift your weight back; drive the front heel into the floor and keep the front shin vertical so the front leg acts as a brace.
- Keep your hands clasped at chest level rather than leaning forward for balance. Leaning the torso over the front thigh shortens the hamstring you are trying to lengthen.
- If kneeling directly on the floor is uncomfortable, place a folded mat or pad under the down knee. Comfort in the kneeling joint lets you relax into the stretch instead of guarding it.
- Point your extended foot with the toes tucked and the heel reaching back to add calf length; if the calf cramps, bend the knee slightly and let the calf relax before deepening again.
- Warm muscles stretch better than cold ones, so use this after a short general warm-up or at the end of a leg session rather than as the very first thing you do.
- Avoid bouncing at the end range. If you want more range, come out slightly, take a breath, and ease back in rather than pulsing the knee up and down.
- Watch for hips rotating away from square. Both hip points should face the same direction as your front knee; if the kneeling-side hip swings open, narrow your stance slightly.
Frequently Asked Questions
Which leg is being stretched in the Half Kneeling Hamstrings Stretch?
The back leg is the stretched side. As you lift the rear knee and straighten that leg behind you, the hamstring and calf of the trailing leg lengthen, while the front leg mainly provides a stable brace.
How long should I hold the Half Kneeling Hamstrings Stretch?
Twenty to forty seconds per side works well for most people, and one to two rounds each side is enough. Hold longer, up to about a minute, if you are using it as a cooldown stretch.
Can beginners do the Half Kneeling Hamstrings Stretch?
Yes. The kneeling base makes balance much easier than in standing hamstring stretches, so beginners can focus on the stretch itself. Place a pad under the down knee and keep the range modest at first.
Why does my lower back bother me instead of my hamstring during this stretch?
That usually means your pelvis is tucking under as the back leg extends. Re-engage the glute of the kneeling leg, keep your torso tall with hands clasped at chest height, and reduce how far you straighten the back leg until the stretch returns to the thigh.
Should my front knee be at ninety degrees in the Half Kneeling Hamstrings Stretch?
Roughly yes. A front shin that stays close to vertical keeps the pelvis in a good position. If the knee drifts well past the toes, widen your stance or shift your hips slightly further back.
What can I use instead if kneeling hurts my knee?
Pad the kneeling knee with a folded mat, or switch to a standing hamstring stretch with the heel on a low step. You lose a little of the balance convenience but keep the same hamstring lengthening effect.
Is it normal to feel the Half Kneeling Hamstrings Stretch in my calf too?
Yes. Straightening the back knee with the toes tucked lengthens the gastrocnemius along with the hamstring. If the calf sensation dominates or cramps, ease the knee bend slightly until the calf settles.
Should I do this stretch before or after training?
It works in both slots. Before training, use shorter holds around fifteen to twenty seconds to open up the posterior chain; after training or on rest days, use longer holds of thirty to sixty seconds for flexibility work.
How do I know if I am stretching too far in the Half Kneeling Hamstrings Stretch?
A useful stretch feels like a firm pull through the back of the thigh. Sharp pain behind the knee, grabbing in the hamstring, or any pinching in the hip or lower back means you should bend the knee a little and shorten the range.