Resistance Band Toe Side Walk
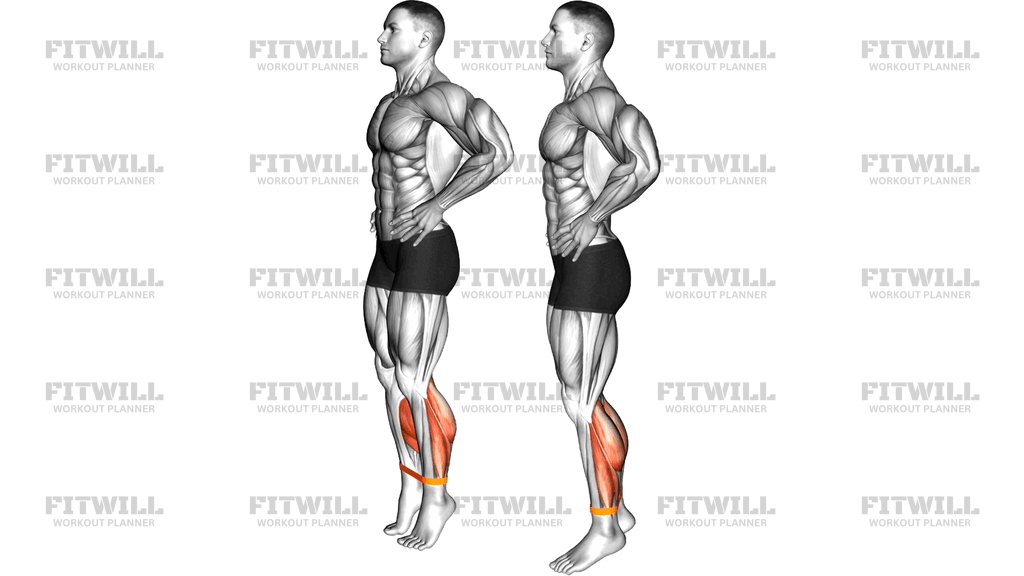
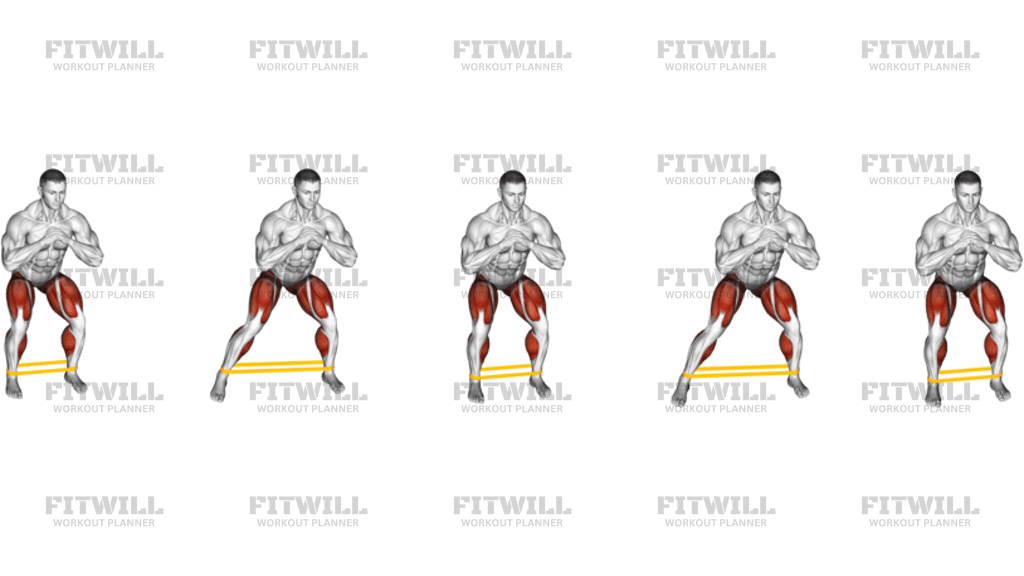
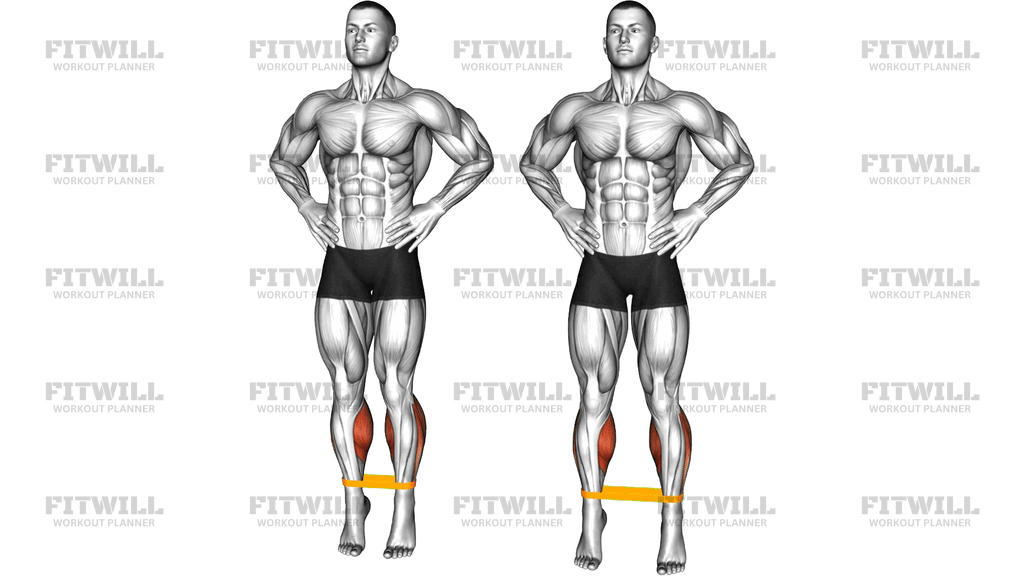
The Resistance Band Toe Side Walk is a standing lower-leg drill that combines two challenges at once: staying up on the balls of your feet while stepping sideways against the pull of a band looped around your ankles. You start tall with hands on your hips, rise onto your toes, and then take small, controlled side steps while keeping your heels off the floor for the entire set. The band adds constant tension pulling your feet toward each other, so every step forces your ankles and lower legs to work to hold your alignment.
This movement is especially useful for anyone building calf endurance, ankle stability, and the small stabilizing muscles along the outside of the lower leg. Runners, court-sport players, and hikers benefit from it because those activities demand repeated ankle control on uneven ground and during lateral pushes. It is also a common rehabilitation and prehabilitation drill for the peroneal muscles, which help prevent the ankle from rolling inward, and it fits well into warm-ups before squats, lunges, or running sessions.
The primary work comes from the calf complex — the gastrocnemius and soleus hold you up on the balls of your feet for the whole set — while the peroneus longus and other ankle stabilizers fight the band's inward pull with each step. Because you are moving sideways, the hip abductors on the outer hips assist with controlling the leg as it reaches and plants, so you may feel light engagement there as well. The isometric calf demand is significant: instead of a short raise-and-lower, your calves stay under continuous tension.
Setup matters more than it looks. The band should sit flat around both ankles, low enough that it pulls against the bones rather than sliding up the calf, and it should be snug in the starting stance without forcing your feet together. Stand tall with your ribs stacked over your hips and hands on your hips for balance. If the band is too heavy, your first few steps will drag your stance narrow and you will lose the tall, on-your-toes position; a lighter band lets you own the movement before progressing.
To execute it well, rise onto the balls of both feet, then step sideways about shoulder-width, lead with the toe, and follow with the other foot at the same controlled tempo. Keep your heels hanging just off the floor between steps and your ankles stacked over your toes — do not let your feet roll outward or inward. Walk a fixed number of steps in one direction, then cover the same distance back so both sides get equal work. Breathe steadily throughout and reset your stance at each end before changing direction.
The most common errors are dropping the heels mid-set, taking steps that are too long, and letting the torso lean or sway to cheat the band. Shorter sets with strict heel height beat long sloppy sets every time. Because the exercise loads the calves and ankles in a sustained isometric hold, stop the set when your position breaks down rather than pushing through cramping or wobble, and build volume gradually over weeks.
[ Workout Log & Planner ]
Put your next workout in Fitwill
Keep your plan and training log ready when you are.


Instructions
- Loop a resistance band around both ankles so it sits flat against the ankle bones and is snug when your feet are about hip-width apart.
- Stand tall with your hands on your hips, feet hip-width apart, and weight spread evenly across both feet.
- Brace your core lightly and rise up onto the balls of both feet, lifting your heels off the floor.
- Keep your chest up and ribs stacked over your hips; do not lean forward or look down at your feet.
- Step sideways with the lead leg about shoulder-width, toe landing first, while the band pulls against the lead ankle.
- Bring the trailing foot sideways to a hip-width stance, keeping both heels off the floor the entire time.
- Continue taking small, controlled side steps for your target number of steps, maintaining the band's tension throughout.
- At the end of the distance, pause with both feet planted on the balls of your feet, then walk back the same number of steps to train the other side evenly.
- Breathe steadily through the nose and mouth — inhale on the brace, exhale naturally with each step — never holding your breath.
- When finished, lower your heels slowly to the floor, step out of the band, and shake out your calves before the next set.
Tips & Tricks
- If your heels keep dropping after three or four steps, the band is too heavy — switch to a lighter band rather than shortening the range with a heavy one.
- Keep steps short, roughly shoulder-width; long reaching steps pull your hips out from over your ankles and turn the drill into a balance struggle.
- Watch for your feet rolling outward at the ankles under the band's pull; press through the base of the big toe to keep the foot neutral.
- Hands on hips is your feedback tool — if your torso starts tipping sideways toward the trailing leg, your hip control is fading and it is time to end the set.
- A slight knee bend is fine, but avoid sinking into a squat; the point is calf and ankle work from a tall stance, not a leg press.
- Do this drill in bare feet or flat-soled shoes so you can feel pressure shift across the ball of the foot with each step.
- Cramping in the soleus is common on early sets because of the long isometric hold — stop, stretch the calf, and use shorter distances until it adapts.
- Match the number of steps in each direction so both sides face identical band tension; lopsided sets build lopsided stability.
- Place this early in a lower-body warm-up with a light band to wake up the ankles before running, jumping, or squatting.
Frequently Asked Questions
What muscles does the Resistance Band Toe Side Walk work?
The gastrocnemius and soleus of the calves do the main work by holding you on the balls of your feet for the whole set. The peroneus longus and other ankle stabilizers fight the band's inward pull, and the outer hip muscles assist as you step sideways.
Why should my heels stay off the floor during the Resistance Band Toe Side Walk?
Keeping your heels up turns the exercise into a sustained isometric calf hold, which builds endurance in the calf complex and ankle stabilizers. Every time a heel touches down, that tension is lost and the set becomes far easier.
Where exactly should the resistance band sit?
Place the band flat around both ankles, right against the ankle bones. If it rides up the calf, tension changes and it can slip; if it is too low on the foot, it may slide off during the steps.
Is the Resistance Band Toe Side Walk suitable for beginners?
Yes, provided you start with a light band and short distances of five to eight steps per direction. Beginners should prioritize keeping the heels up and the torso tall over covering more ground.
My ankles wobble on each step — is that a problem?
Some wobble early on is normal because the drill directly trains ankle stabilizers, but the wobble should decrease within a few sessions. If your feet roll sharply inward or outward, reduce the band tension and slow your step tempo.
How is this different from a regular band lateral walk?
A standard lateral walk is done with flat feet and targets the outer hips, while the toe version keeps you on the balls of your feet so the calves and ankle stabilizers carry the load. The sideways stepping stays, but the emphasis shifts to the lower legs.
Can I substitute the Resistance Band Toe Side Walk if I have no band?
You can perform slow toe walks sideways without any equipment, though the ankle stabilizers get less sideways pull to resist. Slow-marching in place on your toes is another reasonable substitute with less lateral demand.
How many steps and sets should I do?
Start with two to three sets of eight to ten steps in each direction, resting about 45 seconds between sets. Progress by adding steps or band tension, not by letting your heels drop to squeeze out extra distance.
Is it safe if my calves cramp during the exercise?
Cramping usually signals that the sustained toe position is new for your calves. Stop the set, gently stretch the calf, and return with a lighter band or shorter distance, building volume gradually over several weeks.
Should I put this exercise before or after my main workout?
It works best early in a warm-up with a light band to prime the ankles and calves for running, jumping, or squatting. Using it as a finisher with moderate tension is also effective when the goal is calf and ankle endurance.