Lever Wrist Curl
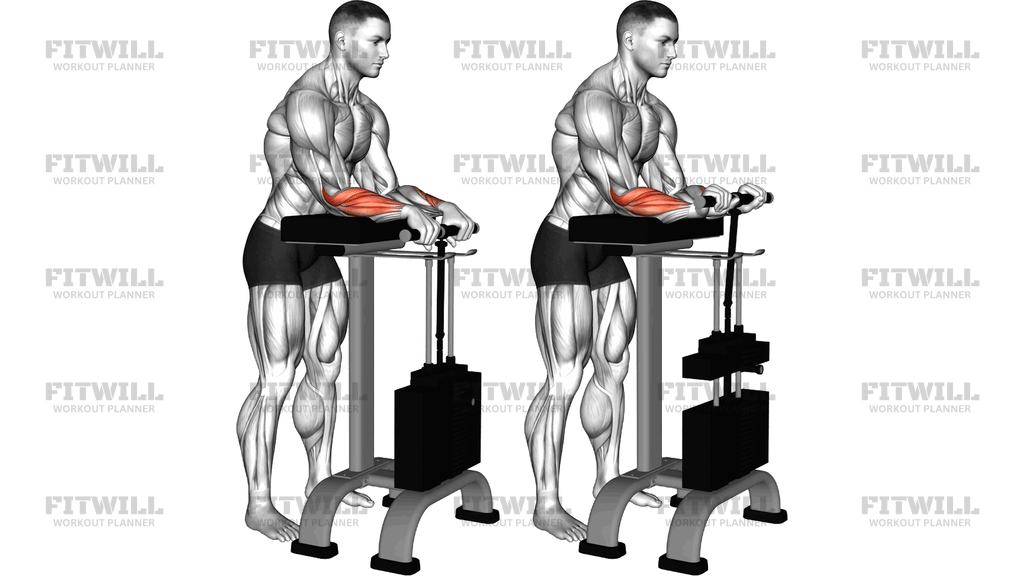
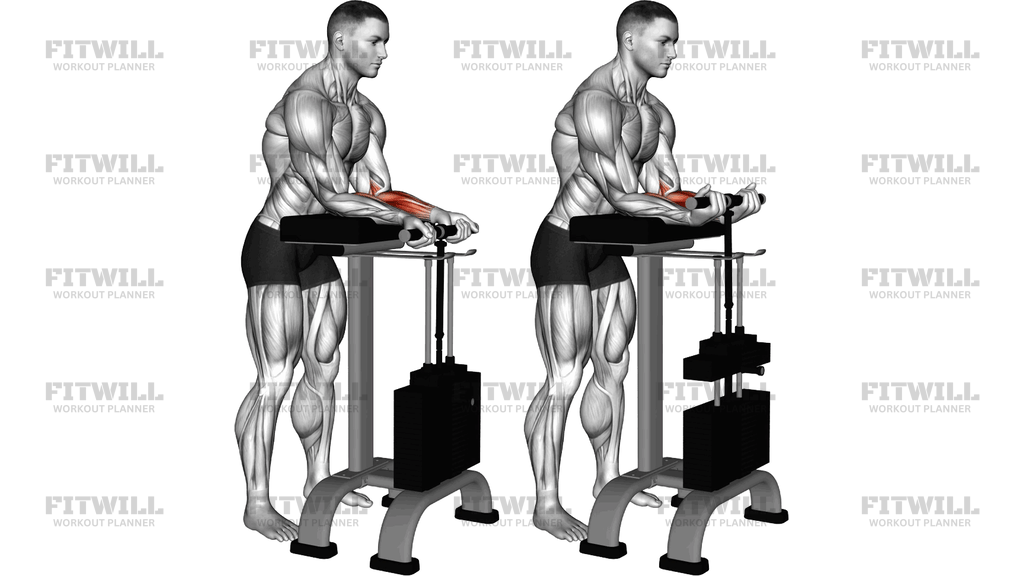
The Lever Wrist Curl is a machine-based forearm exercise performed on a dedicated lever station with a padded arm rest and a pair of handles mounted to a pivoting lever arm. You stand behind the machine, rest your forearms across the pad, and curl your wrists upward against the resistance of the weight stack or lever load. Because the movement is driven entirely by the wrist joint while the elbows and shoulders stay fixed, the forearm flexors on the underside of the forearm do nearly all of the work.
This exercise is especially useful for lifters who want focused forearm development without the balance demands of a barbell or dumbbell wrist curl. The machine stabilizes the lever path and provides consistent resistance through the full range of motion, which makes it easier to feel the target muscles and to progress in small, measurable jumps. It suits beginners learning what a proper wrist curl should feel like, as well as experienced lifters who want a strict, isolated finisher after heavier pulling or gripping work.
The primary muscles trained are the wrist flexors, the group running from the inner elbow down to the hand. Your grip muscles work hard as well, since you have to keep hold of the handles as the lever pulls down. The brachioradialis and smaller stabilizers around the wrist and elbow assist to a lesser degree, but the intent of the exercise is isolation, so do not treat it as a mass-builder for the whole arm.
Setup matters more here than most people expect. Your forearms should rest fully on the pad with your wrists just past the front edge, free to flex and extend without the pad blocking them. If your wrists sit too far back on the pad, the pad limits your range; if you drift too far forward, your elbows lift and tension leaks into the upper arm. Your torso stays tall and leaned slightly over the pad, with feet planted under your hips.
To perform the movement, hold the handles with your palms facing forward, let your wrists bend down toward the floor to stretch the forearms, then curl your knuckles up and back toward you as high as the range allows. Pause briefly at the top, squeeze the forearms, and lower the lever slowly rather than letting it drop. Keep the motion confined to the wrists so the elbows stay planted on the pad throughout.
The Lever Wrist Curl fits well at the end of an upper-body or arm-focused session, typically for sets of 12 to 20 controlled reps. Use it to build forearm size, support grip strength for deadlifts and pulls, and strengthen the wrists for sports that demand strong hands. Because the wrist is the moving joint, start light, respect the stretch position, and never bounce the weight out of the bottom.
[ Workout Log & Planner ]
Put your next workout in Fitwill
Keep your plan and training log ready when you are.


Instructions
- Stand facing the lever machine and set the arm pad so your forearms can rest across it with your elbows bent and your torso leaned slightly over the top.
- Grip the two handles with your palms facing forward and your hands about shoulder-width apart, then rest your forearms flat on the pad with your wrists hanging just past the front edge.
- Plant your feet under your hips, brace your core, and settle your shoulders so they are relaxed and down, not hunched toward your ears.
- Allow your wrists to bend downward toward the floor until the forearms feel a mild stretch along the underside.
- Curl your wrists upward by pulling the backs of your hands toward your forearms, driving the handles up and back as far as your range allows.
- Squeeze the forearm flexors for a beat at the top of the curl, keeping your elbows glued to the pad.
- Lower the lever slowly and under control until your wrists return to the fully flexed starting position, resisting the weight on the way down instead of dropping it.
- Exhale as you curl the wrists up and inhale as you lower them back down.
- Complete all repetitions with the motion staying strictly at the wrist joint, then release the handles one at a time and step back from the machine before adjusting the load.
Tips & Tricks
- Keep your elbows pressed into the pad for every rep; when the elbows lift, the biceps and shoulders start helping and the forearm flexors lose tension.
- Check your wrist position on the pad before starting. Wrists should be just past the edge so the pad never blocks them at the bottom of the stretch.
- Do not let the lever crash down out of the top. The lowering half is where most of the forearm-flexor tension is earned, so take two to three seconds to return.
- A common mistake is turning this into a hammer-curl by flexing the elbows. If your forearms rise off the pad, the weight is too heavy.
- Use a full but pain-free range. Partial reps from the mid-position to the top shorten the work the flexors do at the stretched end.
- If your grip gives out before your forearms do, use a lighter load for more reps or finish with strict lower-range reps instead of loosening your hold.
- Avoid jerking the handles up with a body lean or shrug. Keep your torso leaned over the pad and still so the wrists remain the only moving joint.
- Warm the wrists up with a few light, slow reps before your working sets; cold wrist joints under lever resistance are easy to aggravate.
- Progress in small load jumps. The wrists respond better to steady, moderate overload than to sudden jumps in weight.
Frequently Asked Questions
What muscles does the Lever Wrist Curl work?
It primarily targets the wrist flexors on the underside of the forearm, with strong involvement from the grip muscles as you hold the handles. The brachioradialis and small wrist stabilizers assist, but the exercise is meant to isolate the forearms.
Is the Lever Wrist Curl good for beginners?
Yes, it is one of the friendliest wrist curl variations to learn because the machine fixes the path and the pad stabilizes your forearms. Start with a light weight and focus on feeling the forearms curl and stretch.
How far should my wrists hang off the pad?
Just past the front edge, enough that the pad does not stop your wrists from bending downward. If the pad blocks the bottom of the range, slide your hands forward slightly; if your elbows lift, slide back.
Why do my elbows keep lifting off the pad during the Lever Wrist Curl?
That usually means the load is too heavy or you are trying to help with the upper arms. Reduce the weight and cue yourself to press the elbows into the pad while only the wrists move.
Can I replace barbell wrist curls with the Lever Wrist Curl?
Yes, it is a solid substitute with a fixed path and no balance requirement, which many lifters find more comfortable on the wrists. A barbell wrist curl over a bench works similar muscles if you do not have access to the machine.
How many reps should I do on the Lever Wrist Curl?
Higher reps suit this joint-sensitive movement well, so 12 to 20 controlled reps per set is a good range. Use two to four sets at the end of an upper-body or arm session.
Why does my grip fail before my forearms feel worked?
The handles demand constant gripping while the lever pulls down, so the hands can fatigue first. Drop the load slightly, or hold each top squeeze briefly so the forearms get more time under tension per rep.
Should my wrists bend all the way down at the bottom of the Lever Wrist Curl?
Lower to a comfortable full stretch, not a forced one. A controlled descent into a mild stretch builds the flexors through the whole range, but yanking into the extreme bottom position under load is how wrists get aggravated.
Is the Lever Wrist Curl safe for the wrist joint?
When performed with light-to-moderate loads, controlled tempo, and a pain-free range, it is generally well tolerated. Stop and reassess your setup if you feel sharp or pinching discomfort, and avoid bouncing the weight at the bottom.
Where should this exercise go in my workout?
Put it near the end of your session, after heavy pulling, deadlift, or arm work. Forearm isolation works best as a finisher rather than before exercises that depend on a fresh grip.