Weighted Backpack Walking
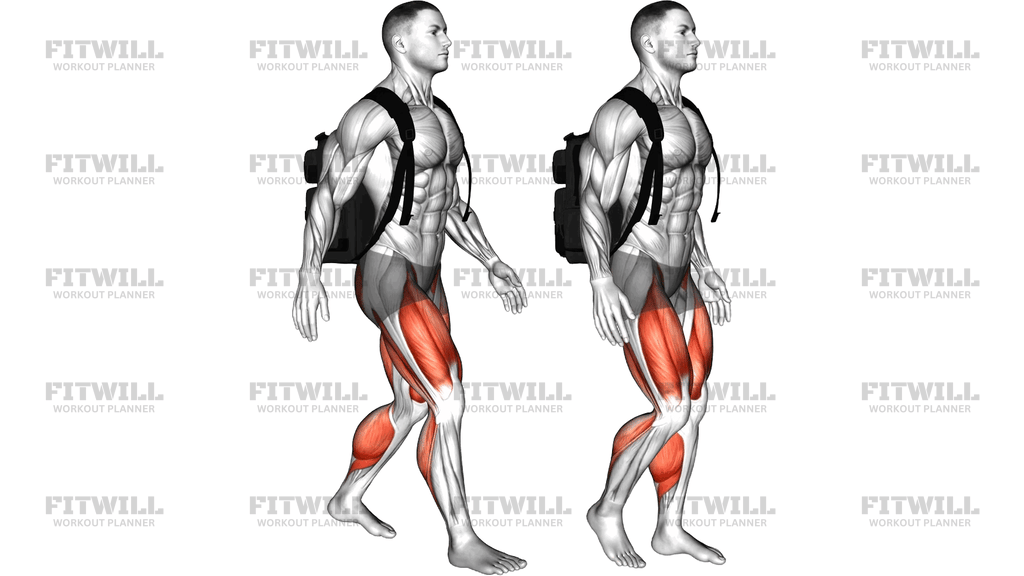
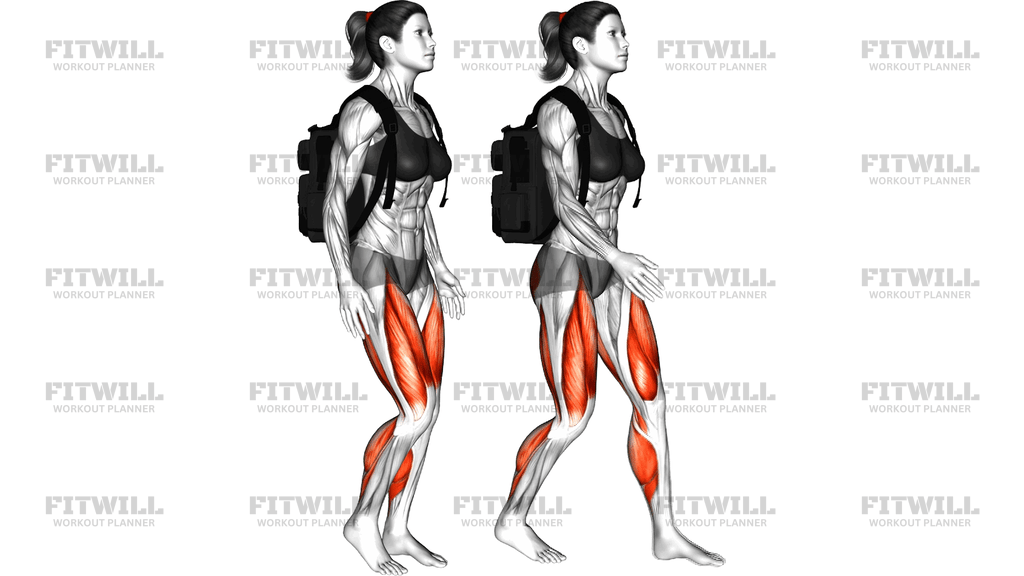
Weighted Backpack Walking is one of the most accessible ways to add real resistance to a plain walk. You load a backpack with weight, put it on with both shoulder straps snug against your back, and walk with normal, upright mechanics. The image shows the essentials: the pack sits high and close to the torso, the chest stays tall, and the legs drive through ordinary stepping and pushing motions, with the quads and calves doing most of the visible work.
This movement is useful for almost anyone. Hikers use it to prepare for uphill trails with a loaded pack, tactical and rucking athletes use it as their core conditioning tool, and everyday lifters use it to add low-impact volume to their leg training without the joint stress of running. It is also a smart option for people who find traditional cardio boring, because walking is something you can do outdoors, on a treadmill, or around a track while still accumulating meaningful load.
The main work comes from the quadriceps, which straighten the knee on every stride, and the calves, which push the heel off the ground through each step. The glutes and hamstrings extend the hip and control the leg as it lands, while the entire trunk has to brace continuously to keep a loaded pack from pulling you backward or side to side. Because the load is carried on your back rather than in your hands, your posture and core endurance get trained just as much as your legs.
Setup matters more than most people expect. A pack that hangs low or sags away from your spine turns every step into a small strain on your lower back, while a snug, high-riding pack lets the weight travel through your skeleton the way it was designed to. Even weight distribution inside the bag keeps you from unconsciously leaning or rotating, which is where most aches start.
To execute well, walk tall with your shoulders over your hips, strike with your mid-foot, and push fully through the ground on every stride. Keep your stride length natural rather than overreaching, and let your arms swing freely for balance. Start with a load you could carry for a long hike, not one that crushes you within five minutes, and build distance or weight gradually across weeks rather than days.
The most common use case is steady-state work: 20 to 60 minutes of continuous walking at a pace where you can still breathe through your nose or hold a short conversation. Progress by adding a small amount of weight, a few minutes of duration, or gentle incline, and treat any persistent lower back or knee discomfort as a signal to reduce load and check your posture rather than push through.
[ Workout Log & Planner ]
Put your next workout in Fitwill
Keep your plan and training log ready when you are.


Instructions
- Choose a sturdy backpack and place your weight low and centered inside it, wrapping plates or sandbags in a towel so nothing shifts or presses against your back.
- Put the pack on using both shoulder straps, then tighten them and adjust any sternum or hip straps so the bag sits high and sits flat against your upper back without swaying.
- Stand tall with your feet hip-width apart, and take a moment to feel the weight stacked over your hips rather than pulling your shoulders back.
- Brace your trunk lightly, as if bracing for a gentle nudge, and lift your chest so your shoulders stay stacked over your hips.
- Begin walking at a brisk, sustainable pace, landing each step with your mid-foot under your body rather than reaching far forward with your heel.
- Push fully through the ground on each stride, letting your back leg finish its push so your calves and glutes contribute on every step.
- Keep your arms swinging naturally at your sides for balance, and avoid gripping your straps or hunching your shoulders up toward your ears.
- Breathe in a steady rhythm through your nose and mouth, matching your breath to your stride rather than holding it during harder efforts.
- Walk for your planned time or distance, checking your posture every few minutes to make sure you have not started leaning forward into the load.
- When you finish, stop walking first, loosen the shoulder straps, and take the pack off by setting it down in front of you rather than twisting to drop it off one shoulder.
Tips & Tricks
- The most common mistake is letting the pack ride low and sag away from the spine, which multiplies the leverage on your lower back; re-tighten the straps until the bag feels like part of your torso.
- If you catch yourself leaning forward as you tire, it usually means the load is too heavy for your current posture endurance, not that you need to try harder to stand up straight.
- Shorten your stride before you slow your cadence when the walk gets hard; overreaching steps under load are a frequent cause of knee and hip irritation.
- Uneven loading is easy to miss: if the bag pulls you to one side over the course of a walk, stop and redistribute the contents symmetrically before continuing.
- Build with one variable at a time. Add weight OR distance OR incline in a given week, not all three, so your legs and lower back adapt without a cumulative overload.
- Hard, flat pavement returns a lot of force through loaded joints, so grass, a track, a trail, or a treadmill with slight incline can be a friendlier surface while you are still building tolerance.
- Do not hold the shoulder straps while walking; it locks your arms, raises your shoulders, and removes the natural arm swing that keeps you balanced under load.
- If your calves cramp early in a session, slow the pace for the first five minutes and treat that time as a specific warm-up for the loaded stride pattern.
- Check your shoes: a worn heel or soft, mushy sole feels fine unloaded but becomes a problem once every step carries extra bodyweight.
Frequently Asked Questions
What muscles does Weighted Backpack Walking work?
The quadriceps and calves do most of the visible work on every stride, with strong support from the glutes and hamstrings during hip extension. Your core and lower back also work continuously to hold the loaded pack in an upright posture.
How much weight should I start with in the backpack?
Start with something you could comfortably carry on a long hike, often around 5-10% of your bodyweight for beginners. If your posture breaks down or your lower back feels strained before your legs do, the load is too heavy.
Should the backpack sit high or low on my back?
High and snug, with the bag flat against your upper back. A low, sagging pack increases the lever arm on your spine and makes every step harder on your lower back without adding any training benefit.
Is Weighted Backpack Walking better than regular walking for fat loss?
It burns more calories per minute because you are moving a heavier total load, and it adds muscular demand that plain walking lacks. That said, consistency matters most, so choose the version you will actually do regularly.
Can beginners do Weighted Backpack Walking, or should they walk unloaded first?
Most beginners can start with a very light load immediately, since walking is a natural pattern. If you are completely new to exercise, spend a couple of weeks walking unloaded at a brisk pace first, then add small amounts of weight.
Why do my shoulders and traps feel sore after Weighted Backpack Walking?
The shoulder straps concentrate the load through your upper trapezius area, especially if the pack is loose or you are shrugging to stabilize it. Tighten the straps, use a hip belt if your pack has one, and consciously relax your shoulders down.
What can I use instead of a backpack if I do not have weight plates?
Water bottles, bags of rice or sand, or books wrapped in a towel all work as long as they are packed evenly and cannot shift. A dedicated weighted vest is a good alternative because it distributes load around your torso more evenly.
How long should a Weighted Backpack Walking session last?
Twenty to forty minutes is a solid starting session, and experienced carriers often go sixty minutes or more. Increase duration before weight so your legs, calves, and trunk adapt to time under load first.
Is walking with a weighted backpack safe for my knees and lower back?
For most healthy people it is low-impact and well tolerated, especially with a snug pack, a natural stride, and a sensible progression. If you have a history of knee or spine issues, start with very light loads and stop if pain develops rather than working through it.
Can I use a treadmill for Weighted Backpack Walking?
Yes, and a slight incline is a great way to increase the demand on your glutes and calves without adding more weight. Just skip running while loaded, since the impact on landings rises sharply when the treadmill belt moves faster.