Dumbbell Bird Dog Row
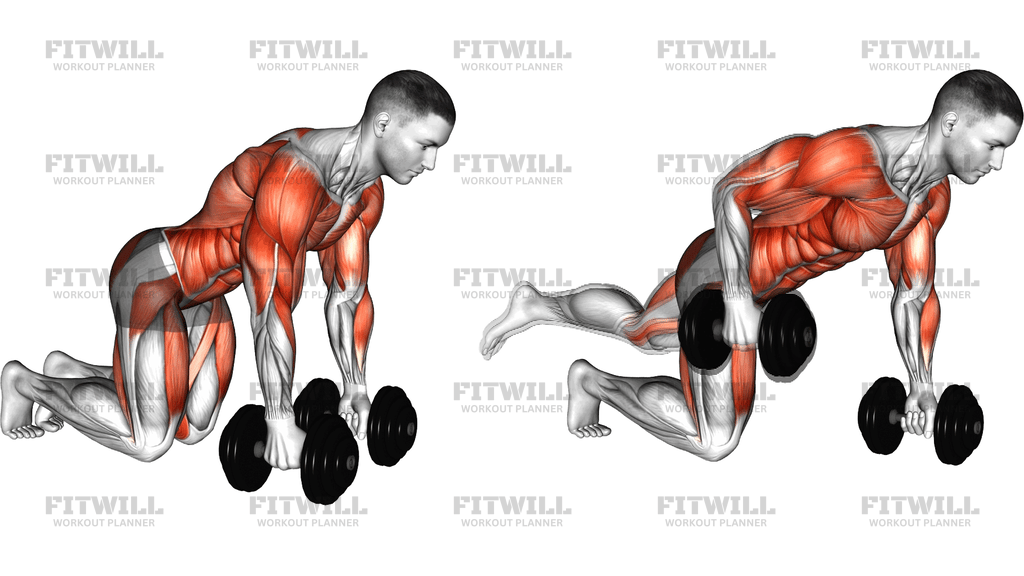
The Dumbbell Bird Dog Row takes the classic bird dog stability drill and adds a rowing load to it, which changes the challenge completely. You start on hands and knees with a dumbbell in each hand, extend one leg straight behind you so only three points contact the floor, and then row the dumbbell on the opposite side toward your hip. The extended leg and the rowing arm work against each other, so every rep forces your trunk to resist rotation while your upper back and lats pull.
This combination makes the lift valuable for two groups at once. Lifters who want a stronger rowing pattern get a version that highlights lats and mid-back without a bench for support, and anyone working on trunk control gets a loaded anti-rotation stimulus that is hard to replicate with planks or cables. It is especially useful for desk workers and lifters whose lower backs grumble during traditional bent-over rows, because the quadruped base keeps spinal shear low while still demanding real bracing strength.
The setup is where most of the difficulty lives. Both dumbbells must rest on the floor directly under your shoulders so your joints are stacked before you move, and your working knee should sit under your hip with the shin relaxed behind you. When you extend the leg, the goal is a straight line from the heel of that foot through your head, with the glute on the extended side doing the work of holding the hip level. If that hip drops or swings out, the row will feel unstable no matter how strong your back is.
Execution should look like one smooth row, not a yank. Pull the dumbbell up beside your ribcage, driving the elbow back toward the ceiling and keeping the shoulder blade of the working arm pulled in toward the spine. Pause briefly at the top, then lower the dumbbell back to the floor under control. Breathing matters here: exhale as you pull, keep the brace constant, and avoid holding your breath through the entire set.
Because the movement is self-limiting, the weight on the floor tells you immediately when your brace has failed. If the dumbbells wobble, your hips twist, or the extended leg drifts downward, that is your signal the load is too heavy for the current control you have. Start lighter than you think you need, master the contralateral pattern, and only then progress the load. Most people do well with two to three sets of six to ten rows per side, resting long enough between sides to reset the brace.
[ Workout Log & Planner ]
Put your next workout in Fitwill
Keep your plan and training log ready when you are.


Instructions
- Place two dumbbells on the floor about shoulder-width apart and set up on your hands and knees with each hand gripping a dumbbell directly below its shoulder.
- Position your knees under your hips with your toes tucked or the tops of your feet resting on the floor, and check that your wrists stay stacked under your shoulders.
- Brace your abdominals and squeeze your glutes slightly so your pelvis is level before anything moves.
- Extend one leg straight back behind you until it is roughly level with your torso, keeping the foot relaxed and the hip of that leg from opening out to the side.
- Row the dumbbell on the opposite side of your body by driving the elbow up toward your hip, keeping it close to your ribs rather than flaring it wide.
- Pull until the dumbbell is beside your lower ribs and squeeze the shoulder blade back toward your spine, holding that top position for a beat.
- Lower the dumbbell back to the floor slowly so it does not crash down, keeping your torso square to the ground the whole way.
- Breathe out on the pull and in on the lowering phase, keeping your core braced without holding your breath.
- Complete all reps on one side or alternate sides, then bring the extended leg back down to the starting quadruped position before switching legs.
- Set both dumbbells down carefully once finished, avoiding any twisting of the lower back while still holding a weight.
Tips & Tricks
- If your hips rotate toward the rowing arm, lighten the weight first and focus on pressing the opposite hand down into its dumbbell, as that downward grip tension stabilizes the trunk more than extra bracing effort does.
- An extended leg that sinks toward the floor usually means the glute on that side is not working; squeeze that glute hard before starting the row and keep it active through the whole set.
- Keep the rowing elbow within a few degrees of your ribs. Elbows that flare wide shift the work toward the rear shoulder and turn the drill into a different, less stable row.
- Do not look up mid-set. Your neck position drives your spine position in this exercise, so keep the head in line with the extended leg and eyes down toward the floor.
- A common mistake is letting the dumbbell slam back to the floor between reps. The brief support it gives you on the ground is fine, but stay tense through the arm so the reset does not break your brace.
- If your wrists ache, angle the dumbbells slightly or use hex dumbbells instead of adjustable ones, because a rolling plate under a loaded grip is a real instability problem in this position.
- Film yourself from the side occasionally. From above or behind you cannot see whether your extended leg is truly level or drifting downward, which is the most common silent form break.
- Start with a leg extension and hold only, no row, for your first session or two if you have never trained bird dogs loaded. Adding the row before the three-point hold is solid wastes the drill.
- Keep the working shoulder from sagging into its socket. Think of pushing the floor away with the support arm while the other arm rows.
Frequently Asked Questions
What muscles does the Dumbbell Bird Dog Row work?
The rowing action primarily trains the lats and mid-back muscles like the rhomboids, while the three-point stance loads the core, lower back, and the glute holding the extended leg. Biceps and rear shoulders assist the pull.
Why does the Dumbbell Bird Dog Row use the opposite arm and leg?
The contralateral pairing is what creates the anti-rotation demand. When you row on one side while extending the opposite leg, the two forces naturally want to twist your torso, and resisting that twist is the core-building part of the exercise.
Is the Dumbbell Bird Dog Row suitable for beginners?
Yes, as long as the weight starts light. Beginners should first be able to hold the three-point bird dog position steady for a full breath before adding the row, and should use a load they can control for slow reps without hip movement.
How heavy should the dumbbells be for the Dumbbell Bird Dog Row?
Choose a weight you could row for around ten controlled reps in a supported position, then drop it further, because the unsupported stance makes the same load feel much harder. If your hips twist at all, the dumbbells are too heavy.
My lower back feels strained during the Dumbbell Bird Dog Row. What should I check?
Most often the hips are sagging or rotating because the brace and glute squeeze have relaxed, or the extended leg has dropped. Bring the leg slightly lower than horizontal, re-squeeze the glute on that side, and reduce the rowing weight until the trunk stays square.
Can I do the Dumbbell Bird Dog Row on one knee with a bench instead?
That would make it a supported single-arm row, which is a fine exercise but a different one. The whole point of this movement is that no bench supports your torso, so the core has to hold the position while you pull.
How does the Dumbbell Bird Dog Row differ from a regular dumbbell row?
A regular row uses a bench or bent-over stance to anchor the torso, so the back muscles do most of the work. Here the trunk and hips must stabilize a three-point position at the same time, so you train anti-rotation and hip control alongside the rowing pattern.
How many sets and reps should I use for the Dumbbell Bird Dog Row?
Two to three sets of six to ten rows per side works well, with the leg held extended for the whole set on that side. Rest long enough between sides to re-establish your brace before the next set of rows.
Should I keep the extended leg level with my torso in the Dumbbell Bird Dog Row?
Roughly level is the target, but a leg held slightly lower is safer than one cranked above hip height, which tends to arch the lower back. The important thing is that the leg stays straight and the hips stay square to the floor.