Forward Backward Hop
The Forward Backward Hop is a bodyweight plyometric drill where you hop over an imaginary or marked line on the floor, alternating between a forward jump and a backward jump with both feet leaving and landing at the same time. It looks simple, but it trains one of the most athletic qualities you can develop: the ability to absorb force, reset quickly, and produce force again in the opposite direction. Because there is no equipment needed, you can do it almost anywhere, from a gym floor to a hallway or backyard.
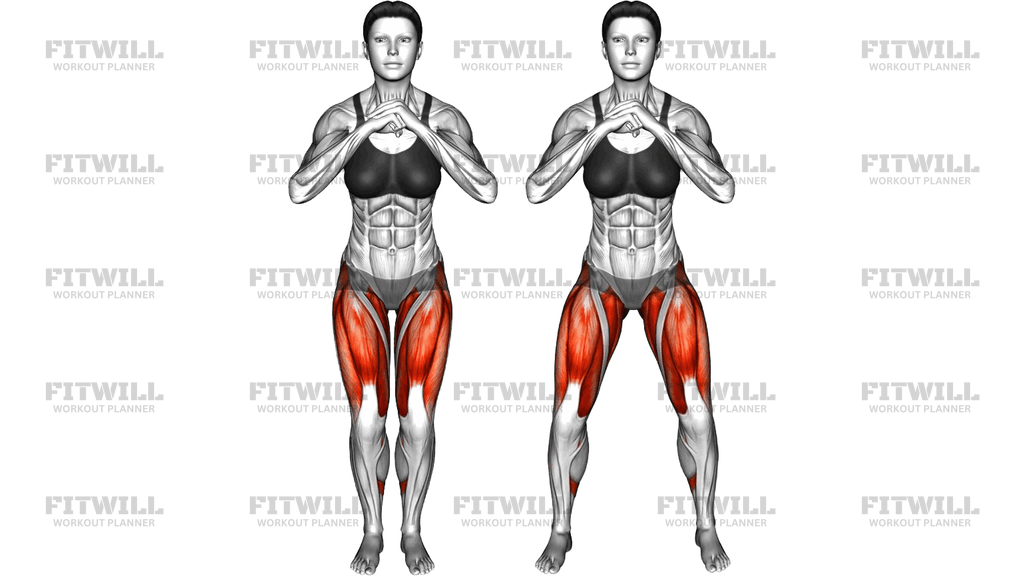
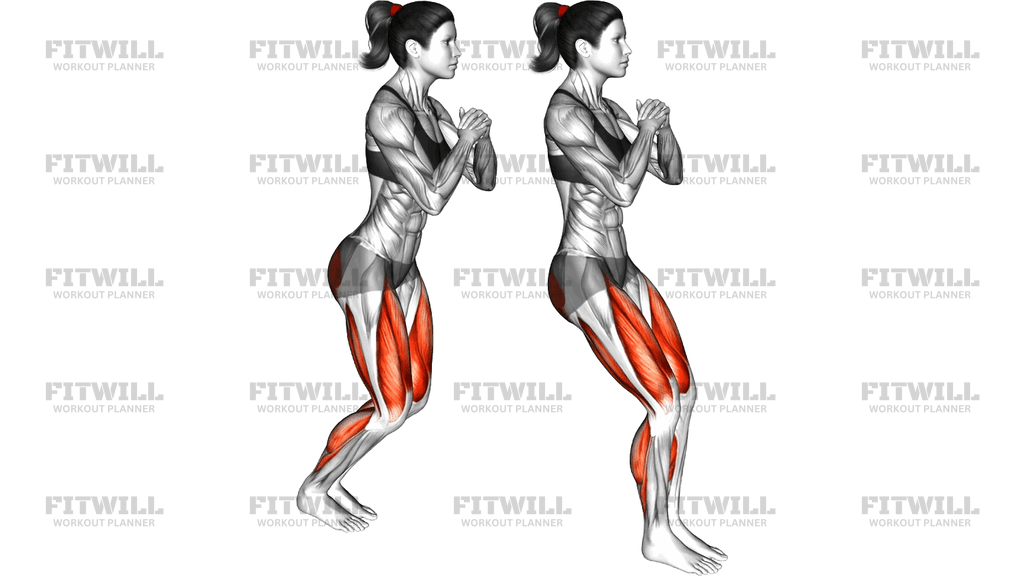
This movement primarily works the quadriceps, which drive the takeoff and control the landing, along with the glutes and hamstrings, which extend the hips and stabilize you each time your feet hit the ground. The calves and ankle stabilizers work constantly, since every landing has to be cushioned through the foot and ankle before the next hop begins. Your core stays quietly busy as well, keeping your torso upright and preventing you from pitching forward or backward as you shift direction.
Setup matters more than most people expect. A clear, level surface with a visible line or marker gives you a consistent target to clear, and your body position — hands clasped in front of your chest, knees softly bent, torso leaning slightly forward — determines whether your landings are quiet and controlled or sloppy and loud. If your feet drift sideways or your knees cave inward on landing, you are leaking power and adding unnecessary stress to your joints.
To execute the Forward Backward Hop well, think about quality of landing before quantity of hops. Push off through the whole foot, clear the line by a modest height — a few centimeters is plenty — and land on the balls of your feet with your knees tracking over your toes, hips back, and chest up. Then immediately spring back over the line the other way. The rhythm should feel springy and rhythmic, not frantic.
This drill is a staple in warm-ups for jumping and sprinting sports, in agility circuits, and in general conditioning workouts where you want a low-skill way to raise your heart rate while training your legs. It is also a useful reintroduction to impact for people returning from time away from training, since the hop distance and speed can be scaled down easily.
A few practical points keep this safe: start with short sets of ten to twenty seconds or eight to twelve hops, stay on a forgiving surface like a gym floor or grass rather than concrete when possible, and stop the set as soon as your landings get heavy or your knees start drifting inward. Fatigue turns a good plyometric drill into a noisy, joint-pounding mess very quickly.
Fitwill
Log Workouts, Track Progress & Build Strength.
Achieve more with Fitwill: explore over 9600 exercises with images and videos, access built-in and custom workouts, perfect for both gym and home sessions, and see real results.
Start your journey. Download today!




Instructions
- Place a line, strip of tape, or small marker on a flat, non-slip floor and stand facing along it, with the line running side to side beneath the balls of your feet.
- Set your feet about hip-width apart, clasp your hands together in front of your chest, and unlock your knees so you are in a shallow athletic stance with your weight on the balls of your feet.
- Brace your core lightly and keep your chest up with a slight forward lean from the hips, not from rounding your lower back.
- Bend your knees a little more, then push through both feet to hop forward over the line, keeping the jump low and quick rather than high.
- Land on the balls of both feet with your knees bent, hips back, and knees tracking in line with your toes, absorbing the landing without slapping your heels down.
- Without pausing, immediately hop backward over the line to return to the starting side, using the stretch in your calves and thighs to spring the return.
- Continue alternating forward and backward hops in a steady rhythm, staying centered over the line so your feet land on the same spot each time.
- Exhale sharply on each takeoff and inhale during the brief reset between hops; if you lose the rhythm, stop, reset your stance, and restart.
- Finish the set while your landings are still quiet and controlled, then step away from the line and rest before the next set.
Tips & Tricks
- Land quietly — a loud heel slap means you are landing stiff-legged; sink into the knees and hips a little more on each landing.
- Keep the hop low. The goal is clearing the line quickly, not jumping for height; big vertical hops slow the rhythm and pile stress onto the knees.
- Watch for knees collapsing inward on landing, a common giveaway of weak hip control; cue yourself to spread the floor with your feet and press your knees slightly out.
- If your feet drift forward or backward along the line instead of straight over it, shorten the hop distance until you can land in the same footprint every time.
- Keep your hands clasped at your chest rather than flailing your arms — this keeps your torso stable and makes hip and leg timing more obvious.
- Use your arms minimally for balance, but if you find yourself swinging them hard, it usually means your core is not braced enough to stay centered.
- Start at a moderate tempo and only speed up once every landing looks identical; rhythm and repeatability beat raw speed in this drill.
- If you feel it mostly in your shins or knee joints rather than your thighs and calves, reduce the set length and soften the surface before continuing.
- Do this drill early in a workout while fresh, since plyometric quality drops fast once you are tired.
Frequently Asked Questions
What muscles does the Forward Backward Hop work?
The quadriceps do most of the pushing and shock absorption, supported by the glutes and hamstrings at the hip. The calves and ankle stabilizers are highly involved because every landing and takeoff passes through the foot and ankle.
Is the Forward Backward Hop suitable for beginners?
Yes, as long as you start with small, low hops and a moderate pace. Beginners should focus on landing softly with knees tracking over the toes before trying to increase speed or set length.
Do I need a marked line to perform the Forward Backward Hop?
A line is not required, but a piece of tape, a floor marking, or even a shadow on the ground gives you a consistent target and helps you notice when your hops drift. Without one, it is harder to judge whether you are landing in the same spot.
Why do my knees hurt when doing the Forward Backward Hop?
Knee discomfort usually comes from landing stiff-legged with heels slapping down or from knees caving inward on each landing. Soften your landings, sit back into the hips, and keep your knees aligned over your toes, and reduce volume if it persists.
How long should a set of Forward Backward Hops last?
Start with 10 to 20 seconds or 8 to 12 continuous hops per set. Stop the set as soon as your landings become heavy or noisy, since plyometric quality fades quickly with fatigue.
Can I do the Forward Backward Hop every day?
It can be used frequently in short doses, such as in warm-ups, but treat it as impact training. If your calves, shins, or knees feel beat up, give them a day of recovery between higher-volume sessions.
What is a good substitute if hopping is too intense for me?
Step quickly back and forth over the line with the same athletic stance, or do fast bodyweight squats to a shallow depth. Both train similar positions and muscles without the landing impact.
Should I swing my arms during the Forward Backward Hop?
Keep your hands clasped at your chest and your arms mostly quiet. This drill is about leg rhythm and controlled landings, and big arm swings usually signal that your core is not braced and your body is compensating.
What surface is best for the Forward Backward Hop?
A flat, non-slip surface with some give, such as a gym floor, rubber matting, or grass, is ideal. Avoid uneven ground and very hard concrete, especially at higher volumes.
How is the Forward Backward Hop different from a lateral line hop?
In the Forward Backward Hop you jump front to back over the line while facing along it, which loads the thighs and hips in a sagittal plane and mimics sprinting and jumping patterns. A lateral hop crosses side to side and challenges the outer hips and side-to-side stability more.