Bodyweight Heel Elevated Squat
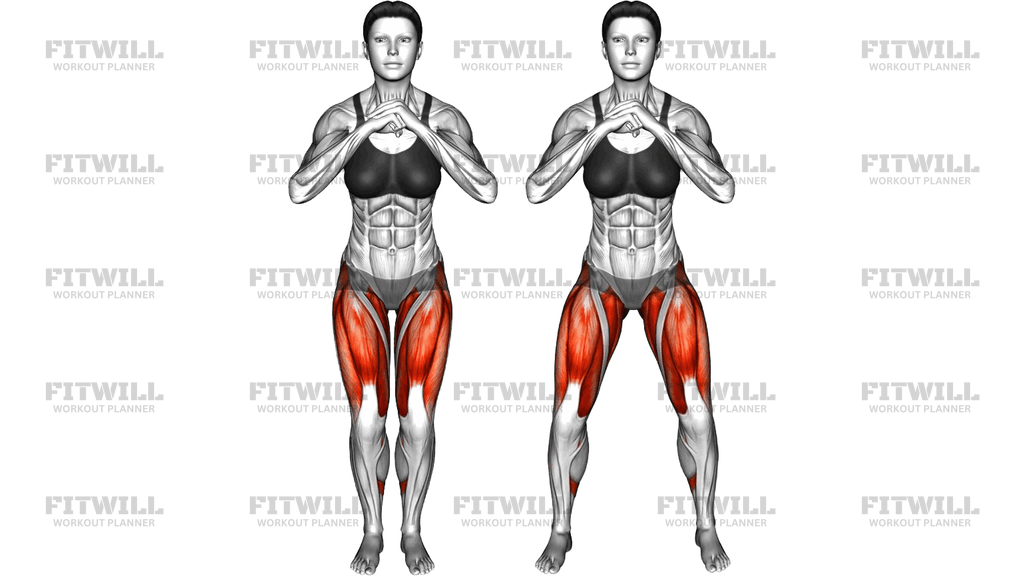
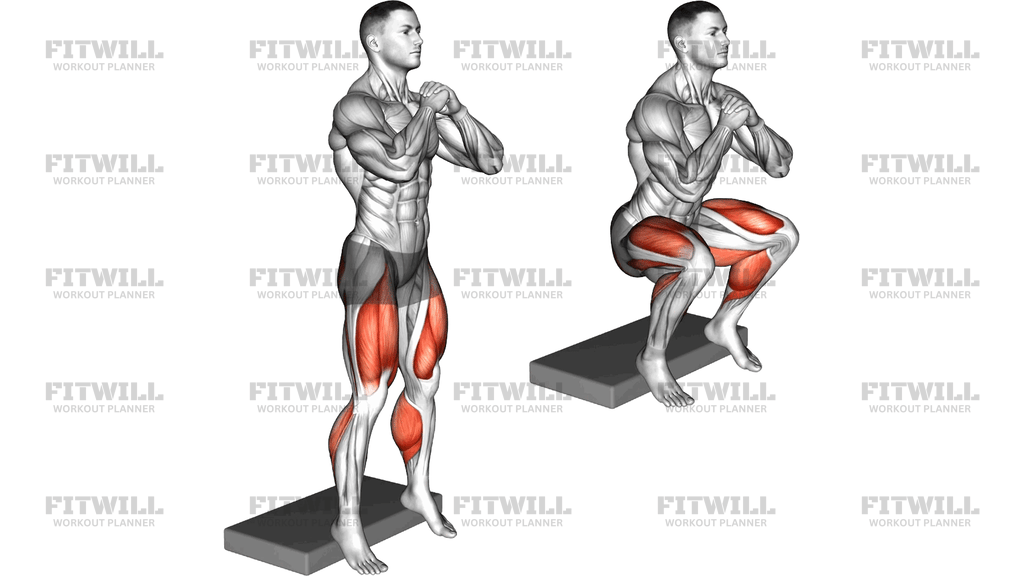
The Bodyweight Heel Elevated Squat is a simple but highly effective squat variation where you place your heels on a raised surface, such as a weight plate, low step platform, or thin board, while your feet and toes stay flat on the floor. With hands clasped at chest height and no external load, you lower into a deep squat and drive back up. Elevating the heels shifts your center of mass slightly forward and effectively increases ankle range of motion, which lets you sit deeper into the squat while keeping your torso more upright than in a standard bodyweight squat.
This movement is especially useful for people with limited ankle mobility who struggle to squat deep without their heels lifting or their torso collapsing forward. It is also a favorite among lifters who want to emphasize the quadriceps: the upright torso and deep knee flexion place considerable demand on the quads through a long range of motion. Because the setup requires no equipment beyond something stable to elevate the heels, it works well as a warm-up, a home workout staple, or a teaching tool for groove a solid squat pattern.
The setup matters more than it might seem. The elevation should be low and stable, typically one to three centimeters for most people, and both heels must rest fully on the surface with the whole foot in contact throughout the rep. If the platform is too high or wobbles, you lose balance and the knees can drift inward. Keep your feet roughly shoulder-width apart with the toes turned out slightly, which matches the natural path of the knees and hips as you descend.
To perform it well, brace your midsection, clasp your hands in front of your chest for counterbalance, and push your hips back and down while letting the knees travel forward over the toes. Descend until your thighs are at least parallel to the floor or as deep as you can control, then drive through the midfoot to stand tall. Move slowly enough that your knees track in line with your toes and your heels never lift off the platform.
Common use cases include building quad strength and size at home, improving squat depth before barbell work, and rehabbing or prehabbing around stiff ankles. Because the load is only your body weight, the exercise is generally joint-friendly, but you should still progress gradually, using tempo, pauses, or higher repetitions to increase the challenge rather than rushing into deep, fast reps.
A few practical safety points: choose a firm, non-slip surface for the heel elevation rather than something soft or unstable, keep the working area clear, and stop the set if you feel pinching at the knees or lose your balance. Controlled reps with full ownership of the bottom position deliver far better results than bouncing out of depth.
[ Workout Log & Planner ]
Put your next workout in Fitwill
Keep your plan and training log ready when you are.


Instructions
- Place a stable, low platform such as a weight plate, flat board, or step platform on the floor, then position your heels on top of it so both heels are fully supported.
- Set your feet about shoulder-width apart with toes turned out slightly, arms relaxed at your sides to start.
- Clasp your hands together in front of your chest at about sternum height and raise your elbows slightly forward to act as a counterbalance.
- Take a breath and brace your core, keeping your chest tall and your gaze forward.
- Push your hips back and bend your knees, letting the knees travel forward over the toes while your heels stay planted on the platform.
- Descend under control until your thighs reach at least parallel, or as deep as you can maintain without your lower back rounding.
- Pause briefly at the bottom, keeping your weight distributed across the whole foot.
- Drive through your midfoot and heels to stand back up, exhaling as you rise, and finish with your hips and knees fully extended.
- Reset your brace at the top, then repeat for the desired number of repetitions, stepping off the platform carefully when finished.
Tips & Tricks
- Start with a low heel elevation of one to three centimeters; raising the heels too aggressively shifts the load sharply to the knees and can throw off your balance.
- If your heels rock or lift off the platform at the bottom, the elevation is too high or your stance is too narrow, so widen slightly or reduce the height.
- Keep the knees tracking over or slightly outside the toes; if they cave inward, cue yourself to spread the floor with your feet as you descend.
- Do not let your lower back tuck under at the deepest point, a common mistake when chasing extra depth; stop at the depth where your spine stays neutral.
- Use the hand clasp at your chest deliberately, pulling your elbows slightly forward as you descend to counterbalance and keep the torso vertical.
- Slow the lowering phase to two or three seconds to make the bodyweight version challenging enough for strength and muscle without added load.
- A brief pause at the bottom removes momentum and forces the quads and glutes to work through the full range.
- Do this exercise barefoot or in flat, flexible shoes so you can feel your feet pressing evenly into the platform and floor.
- If you feel knee pinching at the bottom, check that your shins are not collapsing forward suddenly and that your weight is not shifted entirely onto the toes.
Frequently Asked Questions
What muscles does the Bodyweight Heel Elevated Squat work?
The quadriceps are the primary movers, since the upright torso and deep knee bend demand a lot from the front of the thigh. The glutes, adductors, and calf muscles assist, and the core works to keep your torso stable.
Why elevate the heels instead of doing a regular bodyweight squat?
Elevating the heels compensates for limited ankle mobility, letting you squat deeper with a more upright torso and your heels staying down. This shifts more of the work to the quadriceps and makes depth accessible to people who otherwise lean forward or lift their heels.
How high should the heel elevation be?
Start with one to three centimeters, such as a thin plate or board. Use only as much height as you need to squat deep with balance and control, and avoid stacking multiple plates under the heels.
Is the Bodyweight Heel Elevated Squat good for beginners?
Yes, it is an excellent teaching squat because the heel elevation makes it easier to reach proper depth with an upright torso. Beginners should master slow, controlled bodyweight reps here before adding load or returning to flat-footed squats.
Can this exercise replace a barbell squat?
It can build strength and muscle, especially in the quads, but it is limited by your body weight as resistance. To keep progressing, add tempo, pauses, higher repetitions, or eventually external load such as a kettlebell held at the chest.
Why do my knees drift inward during the squat?
Inward knee travel, or valgus, usually comes from weak or inactive glutes and adductors or simply a lack of attention. Deliberately spread the floor with your feet and keep the knees tracking over the toes; slower reps make this easier to control.
What can I use to elevate my heels at home?
A stable weight plate, a low step platform, a thick flat book, or a purpose-built slant board all work. Whatever you choose must be firm and non-slip so it cannot slide or compress under your heels mid-rep.
Should I do the Bodyweight Heel Elevated Squat before or after heavy squats?
It works well as a warm-up to groove depth and activate the quads before loaded squatting, or as a finisher for extra quad volume afterward. Avoid doing high-rep sets to fatigue right before heavy lifting, as tired quads can compromise your heavier sets.
Is it safe for my knees?
For healthy knees, deep knee flexion under bodyweight load is generally well tolerated and can even support knee health when progressed sensibly. If you have a current knee issue or feel sharp pain or pinching, reduce the depth and elevation and consult a qualified professional.