Crocodile Crawl
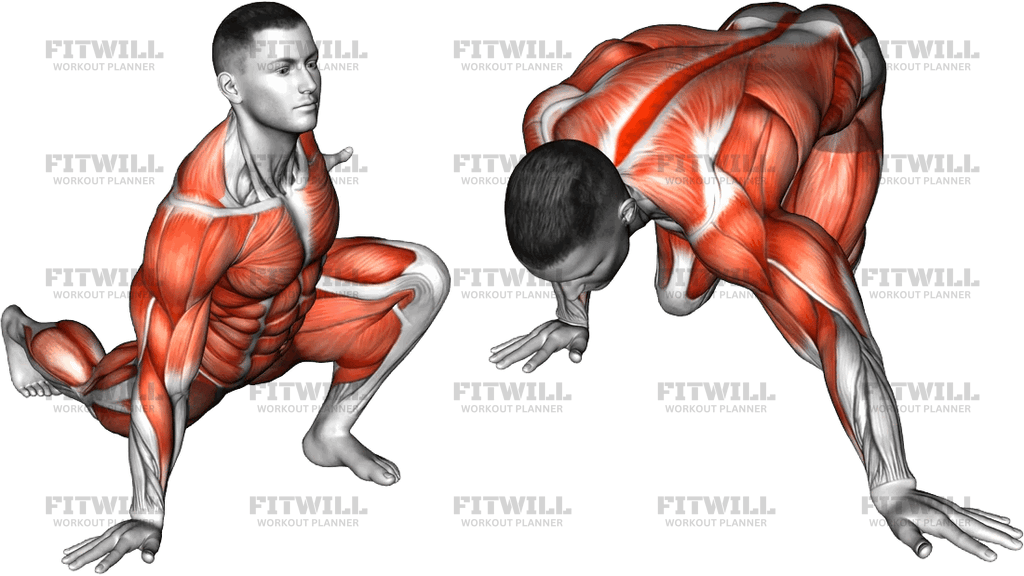
The Crocodile Crawl is a ground-based crawling drill that gets its name from the low, predator-like body position you hold while moving. You start in a deep crouch with one hand planted on the floor, torso angled forward, and you travel by stepping the opposite hand and opposite foot together in a coordinated diagonal pattern while staying only inches off the ground. It looks simple, but the moment you try to hold your hips low without letting your knees or belly drop, you understand why crawls have become a staple in strength and conditioning programs.
This movement is useful for almost anyone who wants a stronger, more resilient trunk. Because you move on a diagonal, your obliques and deep core have to resist rotation with every step, which is exactly the kind of control that transfers to lifting, sprinting, and change-of-direction sports. The shoulders, chest, and triceps handle the upper-body support work, while the quads and hip flexors drive the leg steps from that deep, compressed stance. Wrists and forearms take a fair share of load too, so it doubles as genuine grip and wrist-conditioning work.
Setup matters more than most people expect. Your hand position, your foot placement, and how low you keep your hips all determine whether this becomes a smooth, coordinated crawl or a sloppy bear crawl with your backside in the air. The goal is to keep your torso parallel-ish to the floor, your weight spread across the planted hand and lead foot, and your spine long. If you let the low back sag or the head poke forward, the core stops doing its job and the joints pick up the slack.
To execute it well, think in opposites: right hand steps forward, left foot steps forward, then swap. Stay flat, stay quiet, and stay low. Small, deliberate steps beat big lunging strides, especially when you are learning. Breathe shallow but steady rather than holding your breath, and expect your shoulders and trunk to fatigue before your legs do.
You will see the Crocodile Crawl in athletic warm-ups, military and combat-sport conditioning, and functional training circuits, usually for 10 to 30 meters per set or 20 to 40 seconds of work. Because it requires no equipment and only a few meters of open floor, it travels well to garages, parks, and turf strips. Start with short distances, keep your knees brushed just above or barely grazing the floor as you learn the pattern, and stop the set the moment your hips start to rise or your lower back starts to sway, since that is the point where the exercise stops building control and starts teaching bad habits.
Fitwill
Log Workouts, Track Progress & Build Strength.
Achieve more with Fitwill: explore over 9600 exercises with images and videos, access built-in and custom workouts, perfect for both gym and home sessions, and see real results.
Start your journey. Download today!




Instructions
- Find an open stretch of smooth floor or turf at least 10 meters long and clear of obstacles.
- Drop into a low crouch: plant your right hand flat on the floor with fingers spread, bend both knees deeply, and place your left foot flat near your left hand so you are hovering just above the ground, torso angled forward.
- Brace your trunk as if bracing for a light punch, keep your hips only a few inches off the floor, and look slightly ahead of your hands rather than straight down.
- Step your right hand forward a short distance while simultaneously stepping your left foot forward to match it, keeping both moves timed together.
- Shift your weight over the new base of support, then repeat the pattern on the other side: left hand forward, right foot forward.
- Continue this opposite hand-and-foot pairing for your target distance or time, keeping your shoulders stacked over the planted wrist on each step.
- Keep your steps small and controlled so your torso stays level and your knees stay low; avoid rising up into a high bear-crawl position.
- Breathe in a steady, shallow rhythm through your nose and mouth instead of holding your breath as you crawl.
- When you finish the set, stand up carefully by pushing through both feet, then reset your crouch position before starting the next rep in the opposite direction.
- If you need a rest mid-distance, lower your knees gently to the floor rather than collapsing hips-first.
Tips & Tricks
- The most common breakdown is the hips creeping upward until you are doing a bear crawl; fix it by filming yourself from the side or crawling next to a mirror and keeping your backside at roughly the height of your shoulders.
- If your wrists ache, spread your fingers wide and grip the floor slightly with your fingertips, or crawl on closed fists on a mat to keep the wrist neutral.
- Steps that are too long force a lunge and rotate your hips; shorten your stride until your knee tracks close to the same-side elbow without touching it.
- Keep your planted shoulder active by pressing the floor away slightly instead of sinking into the joint, especially near the end of a set when fatigue sets in.
- Crawling backward is a legit progression and regression tool: forward crawling emphasizes the drive step, while reverse crawling forces you to feel the floor with your feet before committing weight.
- If your lower back sways as you tire, that is your cue to end the set; crawling past that point trains a sagging spine pattern instead of trunk control.
- Try placing a small object or towel on your mid-back during practice reps; if it slides off, your torso is twisting or rising too much.
- Rest at least 60 to 90 seconds between sets if you are crawling hard, since the shoulder and trunk fatigue from this drill builds quickly and degrades coordination.
- Warm up your wrists and shoulders with a minute of arm circles and wrist rocks before your first set, since they take load before your core even feels it.
Frequently Asked Questions
What muscles does the Crocodile Crawl work?
The core, especially the obliques and deep trunk muscles, does the main stabilizing work as you resist rotation with each diagonal step. Your shoulders, chest, triceps, and forearms support your upper body, while the quads and hip flexors drive the low stepping pattern.
Is the Crocodile Crawl good for beginners?
Yes, provided you start with short distances and accept a learning phase for the coordination. Beginners can also crawl on a mat with knees hovering just above it, which reduces the strength demand while they groove the hand-and-foot pattern.
How is the Crocodile Crawl different from a bear crawl?
A bear crawl keeps the knees under the hips and the body relatively high, while the Crocodile Crawl drops the torso much closer to the floor with deep knee bends and opposite hand-foot coordination. The lower position increases the core, shoulder, and leg demands considerably.
How far or how long should I crawl?
Start with 10 to 15 meters or 15 to 20 seconds per set and stop the set as soon as your hips rise or your low back sags. Quality of position matters far more than distance on this drill.
Why do my wrists hurt during the Crocodile Crawl?
The wrists take sustained extension load while supporting your body weight. Spread your fingers, press through the base of the palm, grip the floor lightly with your fingertips, or crawl on fists on a soft surface if discomfort persists.
Should my knees touch the floor?
Ideally they hover just above the floor, but light grazing is acceptable while you learn the pattern, especially on a mat. Letting the knees fully rest on the ground turns it into a different, much easier drill.
Can the Crocodile Crawl replace planks for core training?
It can complement or substitute for planks in many programs, because it trains the same anti-extension and anti-rotation control but adds dynamic movement. Many people find crawling more engaging and more transferable to sports.
What can I use if I do not have space to crawl forward?
Crawl in place by alternating the diagonal steps without traveling, or crawl forward and backward over a short distance of two to three meters. Both versions preserve the core and shoulder demands.
Is the Crocodile Crawl safe for people with lower back issues?
The low, braced position can actually be manageable because the trunk stays supported, but anyone with an active back problem should get clearance from a qualified professional first. Keep sets short and stop immediately if the position provokes symptoms.