Tabletop Plank Raise And Reach
The Tabletop Plank Raise And Reach is a body-weight core exercise performed from a reversed tabletop, sometimes called a crab position. You sit with your hands planted behind you, bend your knees, place your feet flat on the floor, then drive your hips upward until your torso and thighs form a straight, elevated line. From that lifted position, you extend one arm up and back over your head, rotating through the upper back while your hips stay high and level.
This movement trains the deep and superficial trunk muscles isometrically, meaning the abs and glutes work hard simply to hold the hips up while one point of support is removed. Lifting one hand cuts your base of support in half and adds a rotational demand, so the obliques and stabilizers around the shoulder and hip have to work overtime to keep you from twisting or sagging. The reaching arm also takes the shoulder through a generous overhead arc, which makes this a useful mobility drill for people who sit at a desk all day.
The setup matters more than it looks. Because your hands are behind you with fingers pointing toward your feet, the shoulders sit in extension and external rotation, which is a demanding position if you rush into it cold. Getting the feet far enough forward and pressing the floor away with a long spine keeps the wrists and shoulders comfortable and lets the glutes, not the lower back, do the lifting.
To execute it well, think of your body as a table top: hips lifted until the front of your body is roughly parallel to the floor, knees stacked over ankles, and the head in line with the chest rather than dropped back. The reach should come from the ribcage rotating, not from the hips dropping or swiveling. Move slowly enough that you could pause at the top of each reach.
This drill fits well in warm-ups, core circuits, and cool-downs. It is especially practical for home training because it needs only floor space, and it pairs naturally with planks, bird dogs, and glute bridges. People recovering general strength after a layoff, desk workers opening up the front of the shoulders, and athletes who need anti-rotation trunk control all get good value from it.
Keep the reps modest and quality high. If your hips drop, your wrists ache, or you feel the work shifting into your lower back, come down, reset, and do fewer, cleaner reps. As with any loaded floor position, stop if you feel sharp pain in the shoulders, wrists, or spine.
[ Workout Log & Planner ]
Put your next workout in Fitwill
Keep your plan and training log ready when you are.


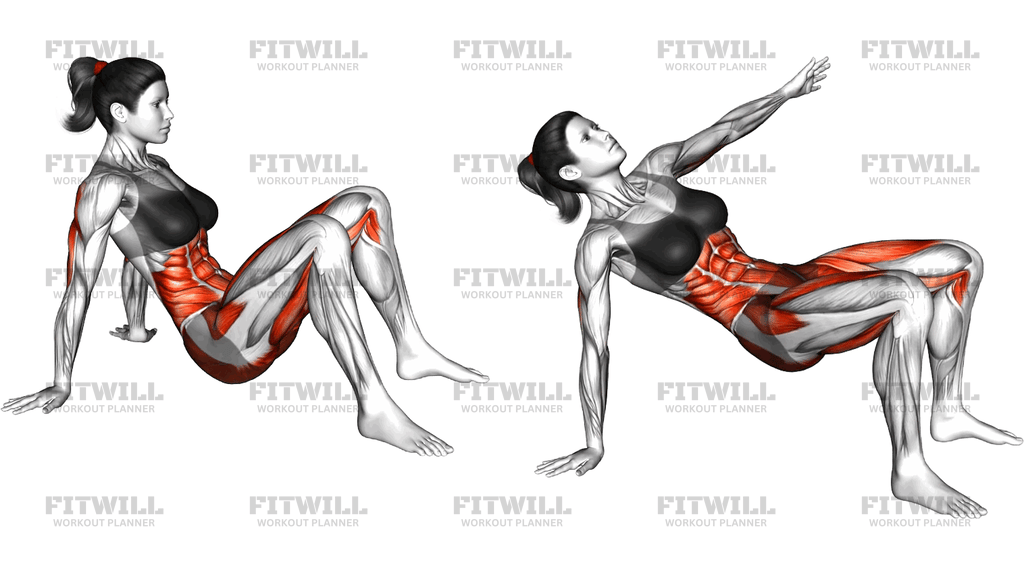
Instructions
- Sit on an exercise mat with your knees bent and feet flat on the floor, about hip-width apart.
- Place your hands on the floor just behind your hips, fingers pointing toward your feet, and set your feet far enough forward that your knees will sit roughly over your ankles at the top.
- Press through your palms and heels to lift your hips off the floor until your torso and thighs form a straight, elevated line — a reverse tabletop position.
- Squeeze your glutes and brace your abdominal wall so your pelvis stays level and your ribs stay down.
- Keeping your hips high and square, reach one arm up and back over your head, letting your ribcage rotate slightly toward the ceiling as your eyes follow your hand.
- Pause briefly at the end of the reach with the supporting arm fully straight and hips still lifted.
- Lower the reaching arm back to the floor with control and re-establish a solid base on both hands.
- Repeat the reach with the opposite arm, alternating sides for the desired number of repetitions.
- Exhale as you lift the hips and reach, and inhale as you return the hand to the floor.
- To finish the set, lower your hips back to the mat under control, shake out your wrists, and reset your hand position before the next set.
Tips & Tricks
- If your wrists complain, spread your fingers wide, grip the mat slightly, and shift a little more weight into your heels rather than dumping everything into your hands.
- Hips sagging mid-reach is the most common fault — check that your feet are far enough forward; when the knees stack over the ankles, the glutes can actually hold you up instead of the lower back hanging on.
- Do not let the lifted hip twist toward the reaching arm. Imagine a glass of water balanced on your pelvis that you cannot spill during the rotation.
- Warm up the shoulders with a few arm circles or wall slides first, since the crab position places the shoulders in extension before the reach takes them overhead.
- Start with a smaller reach and gradually extend further overhead as your thoracic spine and shoulder mobility improve; forcing the arc usually just arches the lower back.
- Keep your neck long by looking at your reaching hand rather than craning the chin backward.
- The reach should feel like it comes from the ribcage turning, not from the arm flinging — slow the tempo down and you will feel the obliques immediately.
- If you cannot hold a stable reverse tabletop yet, practice lifting and lowering the hips with both hands down before adding the single-arm reach.
- Avoid locking the knees hard at the top; a soft knee keeps the hamstrings and glutes engaged and protects the joint.
Frequently Asked Questions
What muscles does the Tabletop Plank Raise And Reach work?
The primary work comes from the abs and glutes holding the reverse tabletop position, with the hamstrings assisting the hip lift. The obliques and shoulder stabilizers take on extra demand because you are supporting yourself on one arm during the reach.
Is the Tabletop Plank Raise And Reach suitable for beginners?
Yes, as long as beginners first learn to hold the hips-up tabletop position with both hands down. Once that feels steady for 15 to 20 seconds, adding a small single-arm reach is a natural progression.
Why are my hips dropping when I reach overhead in the Tabletop Plank Raise And Reach?
Usually the feet are placed too close to the hips, which puts the knees past the ankles and makes the glutes less effective, or the rotation is coming from the pelvis instead of the ribcage. Move the feet forward and keep the reaching motion smaller until the hips stay level.
My wrists hurt in the crab position — what should I change?
Turn your fingers slightly outward, spread your weight across the whole palm, and press the floor away to keep pressure off the wrist joint. If discomfort persists, you can do the movement on fists or with dumbbells resting on the floor as handles.
Can I substitute another exercise for the Tabletop Plank Raise And Reach?
A standard reverse plank with both hands down covers the hip-extension work, and a bird dog or dead bug covers the single-limb anti-rotation demand. Together they approximate what this drill trains, though the combined overhead shoulder arc is unique to it.
How many reps and sets of the Tabletop Plank Raise And Reach should I do?
Two to three sets of 6 to 10 reaches per side works well, performed slowly with a brief pause at the top of each reach. Treat it more like a controlled core drill than a high-rep burner.
Should I do the Tabletop Plank Raise And Reach before or after my workout?
It works well as a warm-up drill because it opens the front of the shoulders and wakes up the glutes, and it also fits into a core finisher. If you use it in a warm-up, keep the effort moderate and save harder core work for the end of the session.
Is it safe for the shoulders to go from a crab position into an overhead reach?
For healthy shoulders with reasonable mobility, the arc is generally well tolerated, but the position does load the shoulders in extension. Warm up first, keep the reach within a comfortable range, and skip the movement if you have an active shoulder impingement or recent injury.
How do I know if I am rotating from the thoracic spine instead of my lower back?
Watch your pelvis: if the hips stay level and square to the front while the ribs and shoulders turn, the rotation is coming from the upper back. If the pelvis tips or swivels toward the reaching arm, you are borrowing from the lumbar spine and should shorten the reach.