Slight Squat Tip Toes
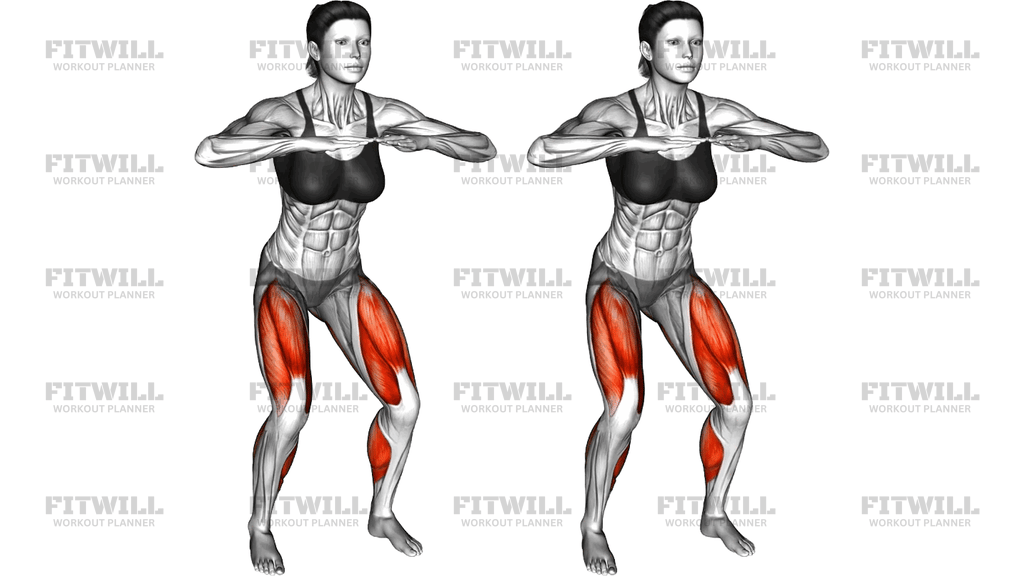
Slight Squat Tip Toes is a body-weight lower-body exercise that combines a shallow squat hold with rising onto the balls of the feet. You settle into a modest knee bend, keep your arms extended in front of you for balance, and then lift your heels off the floor so your weight shifts over the toes and forefoot. The result is a movement that loads the thighs isometrically while the calves and ankles work dynamically through the heel raise.
The highlight of this exercise is how it challenges two areas at once. Holding the slight squat keeps the quadriceps and glutes engaged the entire time, while the tip-toe action drives the gastrocnemius and soleus through their range and forces the small stabilizing muscles around the ankle joint to keep you balanced. Because the knees stay only slightly bent rather than deeply flexed, the position is gentler on the knee joints than a full squat, which makes it a practical choice for warm-ups, rehabilitation-style conditioning, or burnout work at the end of a leg session.
Setup matters more than it might seem. Your stance width, the depth of the squat, and where your arms sit all influence how stable you feel once the heels leave the floor. A stance about hip-width apart with the toes pointing forward or very slightly out gives you a solid base, and extending the arms forward to roughly chest height shifts your center of mass back over the mid-foot, which counterbalances the forward shift that happens when you rise onto the toes.
To execute it well, descend into the slight squat first, then perform the heel raise from that bent-knee position rather than straightening up first. Keep the knees tracking over the toes and avoid letting them cave inward as you come up. The heel lift should be smooth and controlled, with a brief pause at the top before lowering the heels back down under tension. Rushing the lowering phase is the most common way people turn a precise balance drill into a bouncing motion that does very little for the calves.
This movement fits well into several contexts. It works as a warm-up primer before squats or calf work, as a stability and ankle-strength drill for runners and jump-based athletes, and as a high-rep finisher when you want to fatigue the thighs and lower legs without any equipment. It is also easy to scale: beginners can hold a wall or chair with one hand for support, while more advanced trainees can slow the tempo or extend the pause at the top to increase time under tension.
From a safety standpoint, the main points are controlled tempo and honest ankle mobility. If your heels will not lift far without the ankles rolling outward, reduce the height of the raise rather than compensating through the foot. Keep the torso upright with the chest open, and stop the set when your balance starts to deteriorate, since sloppy reps at the end of a set are where ankles and knees tend to wander out of position.
[ Workout Log & Planner ]
Put your next workout in Fitwill
Keep your plan and training log ready when you are.


Instructions
- Stand with your feet about hip-width apart, toes pointing forward or slightly outward, and your weight spread evenly across both feet.
- Extend both arms straight out in front of you at chest height with the hands relaxed, using them as a counterbalance for the movement.
- Brace your core lightly and hinge at the hips and knees together to lower into a slight squat, only a short distance down, keeping your torso upright.
- Hold the squat position with your knees tracking in line with your toes and your weight centered over the whole foot.
- Press through the balls of your feet and lift both heels off the floor as high as your ankle mobility allows, keeping the knees bent at the same angle throughout.
- Pause briefly at the top with your weight balanced over the toes and forefoot, making sure the ankles stay stacked rather than rolling outward.
- Lower your heels back to the floor slowly and under control, keeping the slight squat depth unchanged as the heels touch down.
- Exhale as you rise onto the toes and inhale as you lower the heels back down.
- Complete your repetitions by repeating the heel raise from the held squat, then stand all the way up and reset your stance between sets if needed.
Tips & Tricks
- Set the squat depth before the first heel raise, not during it. If your knees straighten slightly every time you lift the heels, the quadriceps stop doing their isometric job and the set becomes a plain calf raise.
- Do not let the knees drift inward as you come onto the toes. Actively press the knees out over the pinky toes, since the tip-toe position makes inward collapse more likely.
- If you wobble at the top, stand closer to a wall and let one fingertip rest on it for balance instead of widening your stance dramatically, which changes the exercise.
- Keep the heels lowering below a fast pace; a two-second descent on the heels is enough to keep tension in the calves and protect the Achilles from bouncing.
- Spread your toes and grip the floor with the forefoot. Curling or scrunching the toes is a sign your ankle stabilizers are struggling and reduces your balance at the top.
- Check that your shoulders stay relaxed with the arms extended forward. Shrugging or tensing the upper body steals energy and usually means the slight squat is too deep for your current strength.
- If your calves cramp early, which is common in this bent-knee position, reduce the height of the heel raise for the first few sessions and build up gradually.
- Perform the movement barefoot or in flat, flexible shoes so you can feel pressure shift to the forefoot; thick, cushioned heels make balance harder and feedback worse.
Frequently Asked Questions
What muscles does Slight Squat Tip Toes work?
The primary targets are the quadriceps, which hold the slight squat isometrically, and the calves, which lift and lower the heels. The glutes and the stabilizing muscles around the ankles contribute throughout to keep your balance.
Why do the knees stay only slightly bent in Slight Squat Tip Toes?
The shallow bend keeps steady tension on the thighs without loading the knees as heavily as a deep squat hold. It also keeps your center of mass low enough to stay balanced while the heels are off the floor.
Is Slight Squat Tip Toes suitable for beginners?
Yes, because it uses only body weight and a small range of motion. Beginners should start with a very shallow squat and lightly touch a wall or chair for balance until the ankle stabilizers adapt.
How is Slight Squat Tip Toes different from a regular calf raise?
In a regular calf raise the knees are usually straight, which emphasizes the gastrocnemius. Here the knees stay bent, which shifts more work to the soleus and adds a constant isometric demand on the quadriceps and glutes.
Should my arms be raised in front of me during the movement?
Extending the arms forward at chest height counterbalances the backward-to-forward weight shift that happens when the heels lift, making the top position noticeably easier to hold. Lowering the arms is a valid progression once your balance improves.
Why do my calves burn so quickly in this exercise?
The bent-knee position places the calves under continuous tension with no rest between the squat hold and the heel raises. If the burn becomes cramping rather than effortful, shorten the set or reduce the heel height.
What is the most common mistake with Slight Squat Tip Toes?
The most frequent error is letting the squat depth change during the set, either standing up as the heels lift or sinking deeper as fatigue builds. Pick a knee angle you can hold and keep it fixed for every repetition.
Can I use Slight Squat Tip Toes as a warm-up?
Yes, it works well as a warm-up before squats, lunges, or running because it raises the ankles, knees, and thighs through a controlled, low-load range. Keep the reps moderate and the tempo smooth rather than working to fatigue.
How can I make Slight Squat Tip Toes harder over time?
Slow the lowering phase of the heels, extend the pause at the top to two or three seconds, or increase total repetitions. Once those feel easy, you can hold the tip-toe position statically or add light dumbbells in each hand.
Is it safe if my ankles roll outward at the top of the raise?
Rolling ankles indicate the raise is too high for your current ankle control. Limit the lift to a range where the ankles stay stacked over the toes and build height gradually as stability improves.