Seated Heel Slide On Chair
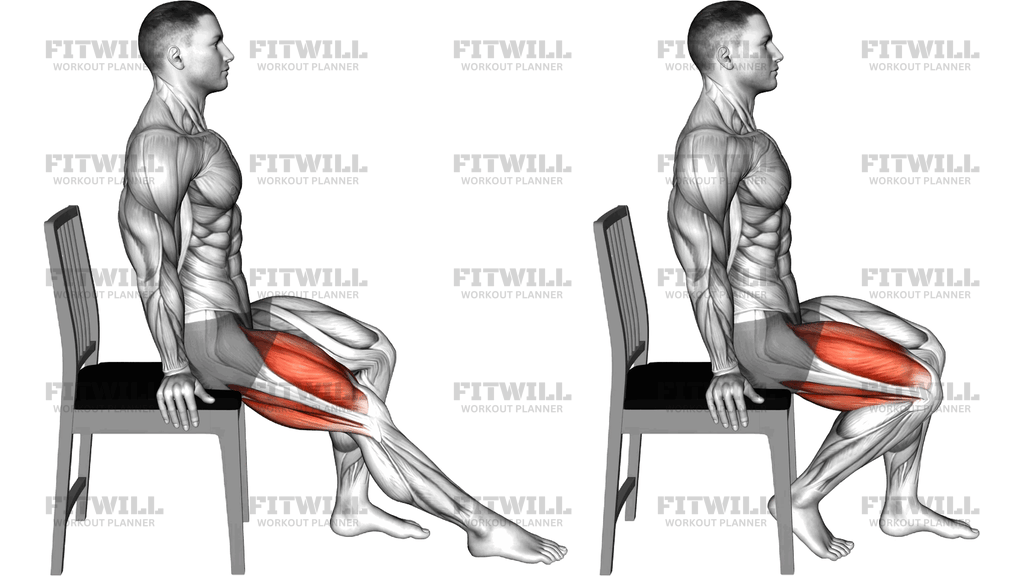
The Seated Heel Slide On Chair is a low-load knee and thigh exercise performed from an upright seated position. You sit on the front edge of a sturdy chair with your hands resting on the seat beside your hips, extend one leg so the heel rests on the floor, then slide that heel forward and back along the ground. The highlighted musculature in the movement is the quadriceps on the front of the thigh, which controls the knee as the leg lengthens and shortens through the slide.
This exercise is especially useful for people rebuilding knee movement and thigh strength after a layoff, for older adults who need a joint-friendly way to work their legs, or as a warm-up before squats and lunges. Because the floor supports the weight of the leg, the knee moves through its range without compressive load, which makes the movement approachable when standing knee exercises feel too demanding. It also gently challenges the hip flexors as the thigh travels relative to the torso.
Setup matters more than it looks. Sitting tall at the front edge of the chair, rather than slumped against the backrest, keeps the torso stable so the leg does the moving. Placing the hands on the seat gives you a quiet point of balance without letting the arms pull or push. If the chair is too low or too soft, your knee sits in a cramped angle and the heel drags instead of gliding, so pick a firm chair that lets your knee bend comfortably with the foot flat.
To execute it well, start with the working foot flat and the knee bent, then slide the heel away from you until the leg approaches straight while keeping the thigh settled on the chair. Pause briefly at the long position, then draw the heel back toward the chair until the foot is under the knee again. The tempo should be slow enough that you could stop the foot at any point in the arc; that control is what wakes up the quadriceps. Keep the toes relaxed and pointing up rather than clenching the foot.
A common use case is performing several smooth slides on one leg, then switching sides, either as a standalone session or as a first exercise in a leg routine. The movement is safe for most people because the range is self-selected, but you should stay within a pain-free arc, keep the kneecap tracking toward the ceiling, and avoid forcing the knee past the point where it moves smoothly. If a chair feels unstable, place it against a wall for extra security.
[ Workout Log & Planner ]
Put your next workout in Fitwill
Keep your plan and training log ready when you are.


Instructions
- Sit upright on the front edge of a sturdy chair with both hands resting on the seat beside your hips for light support.
- Bend your working knee so the foot rests flat on the floor directly below the knee, with the other foot planted a comfortable distance away.
- Brace your trunk lightly and keep your torso tall so your spine stays stacked over your hips throughout the set.
- Slide your heel forward along the floor, straightening the knee until the leg is nearly extended and the thigh stays settled on the chair.
- Pause for a beat at the long position, feeling the quadriceps on the front of the thigh engage.
- Draw the heel back along the same path until the knee returns to its starting bent angle with the foot under the knee.
- Keep the movement smooth and controlled in both directions rather than letting the leg drop into extension.
- Exhale as you slide the heel away, and inhale as you draw it back toward the chair.
- Complete your repetitions on one leg, then reset your posture and switch to the other side.
Tips & Tricks
- If your heel catches or jerks on the floor, you are rushing the slide; slow the tempo until the foot glides continuously in both directions.
- Do not let your hips rock forward and back to lengthen the reach. If your torso tips, the slide has gone past the range your knee and hip can handle together.
- Avoid pointing the toes to reach further. Keep the foot relaxed with the toes pulled slightly up so the knee, not the ankle, drives the motion.
- If the chair slides with you, place it against a wall or choose a heavier chair. Your arms should only rest on the seat, not push it around.
- Keep even pressure through the thigh on the seat. Lifting the thigh to gain range means the knee is doing less and the hip is compensating.
- A slippery floor like tile or hardwood can make the slide too fast. A smooth mat or hard-soled shoe gives you more control of the heel path.
- Work within the arc where the knee glides cleanly. If the end range feels pinchy or rough, shorten the slide slightly and build range gradually over sessions.
- Match both legs before adding anything else. A noticeable difference in range between sides is a better guide than counting reps.
Frequently Asked Questions
Which muscles does the Seated Heel Slide On Chair work?
The quadriceps on the front of the thigh are the primary workers, controlling the knee as it straightens and bends. The hip flexors assist as the thigh travels relative to the torso during the slide.
Is the Seated Heel Slide On Chair suitable for beginners?
Yes. The floor supports the leg and the range is self-selected, so it is one of the most accessible ways to load the knee and thigh. Start with a short slide and a slow tempo before extending the range.
Why should my hands rest on the seat during the Seated Heel Slide On Chair?
The hands give you light balance support so you can stay tall through the trunk while the leg moves. They should not push down or drag the chair; think of them as anchors, not motors.
How far should I slide my heel on the Seated Heel Slide On Chair?
Slide until the knee approaches straight, but only as far as the motion stays smooth and comfortable. Shortening the range slightly is better than forcing a full extension that feels rough or pinched.
What is the most common mistake with this exercise?
Rushing the slide and letting the leg fall into extension. The value comes from controlled movement, so slow down until the heel glides evenly in both directions.
Can I do the Seated Heel Slide On Chair on both legs at once?
This version is performed one leg at a time, which lets you focus on the knee path and compare sides. Single-leg work also keeps your trunk from swaying to help the moving leg.
What can I use if I do not have a suitable chair?
Any firm, stable seat such as a bench that lets your knee bend comfortably with the foot flat will work. Avoid soft or wheeled seats, and place the seat against a wall if it tends to slide.
How many repetitions should I perform?
Start with 8 to 12 controlled slides per leg and adjust from there. Because the load is light, quality of tempo and range matters far more than rep count.
Is the Seated Heel Slide On Chair safe if my knee is sore?
Stay within a pain-free arc and avoid forcing the end range, but check with a qualified professional if you are recovering from an injury or the discomfort persists. The low-load seated position is generally gentle on the joint.