Knee Tuck Push Up
The Knee Tuck Push Up is a combination bodyweight movement that pairs a standard push-up with a forceful knee tuck in the plank position. You move from a full push-up back into a high plank, then drive both knees in toward your chest before extending the legs back out. Each rep therefore trains two skills that are usually practiced separately: upper-body pressing strength and dynamic core control.
This exercise suits intermediate trainees who already own a solid push-up and can hold a plank without the hips sagging. Because the knee tuck demands that you transfer weight briefly toward the hands and then re-extend the legs cleanly, it is a natural progression toward more advanced movements such as mountain climber sprints, burpees, and plyometric push-up variations. It fits well into circuit training, home workouts with no equipment, and conditioning finishers.
The pressing portion loads the chest, triceps, and front shoulders, while the tuck phase works the rectus abdominis and hip flexors as they pull the knees forward against your body weight. Throughout the entire rep, the shoulders, upper back, and deep core stabilize the trunk so the lower back does not dip or arch. That stabilization requirement is a large part of the exercise's value, since the core has to stay rigid while the limbs move.
Setup matters more here than in a plain push-up. Hands placed too far forward make the tuck feel impossible because your hips cannot travel under your body; hands roughly under the shoulders with fingers spread give you a stable base and room to draw the knees through. A straight line from head to heels at the start keeps the tuck honest, and a mat under the knees and toes makes the landing phase more comfortable.
To execute well, think of the rep as three distinct phases: lower the chest to the floor with the elbows at about 45 degrees to the torso, press back up to a strong plank, then snap the knees in toward the chest with the toes lifting off the ground as they approach. Reverse the tuck under control so the feet land softly rather than crashing down. Move the knees straight forward under the hips rather than letting them flare wide.
A few practical safety points keep this movement productive. If your hips drop during the tuck or your lower back starts to arch on the leg extension, slow the tempo down or regress to alternating knee drives. Keep the wrists stacked under the shoulders and spread the load across the whole palm to avoid wrist strain. Stop the set when the plank position deteriorates, because a sloppy tuck trains the wrong pattern and stresses the lower back.
[ Workout Log & Planner ]
Put your next workout in Fitwill
Keep your plan and training log ready when you are.


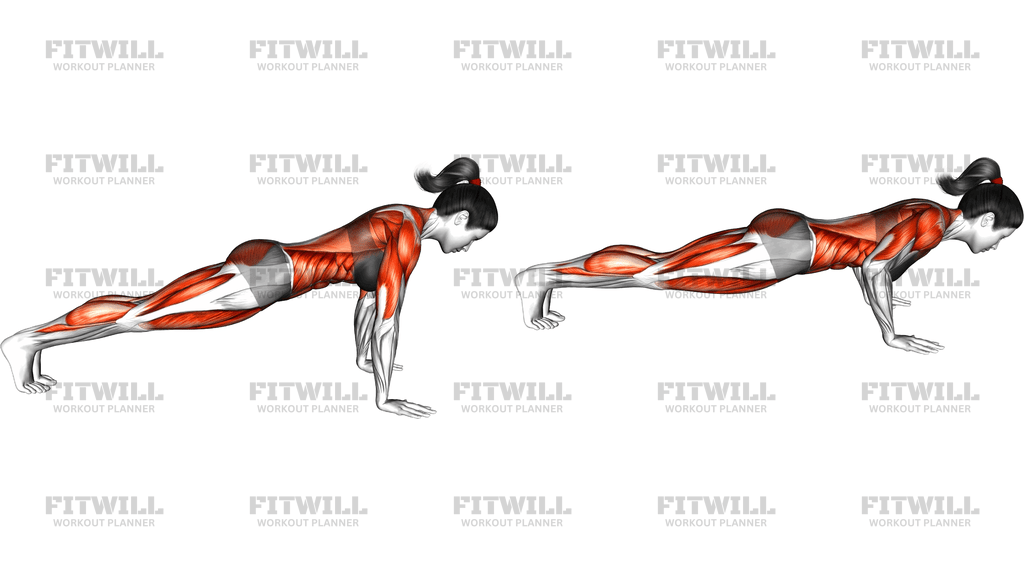
Instructions
- Place an exercise mat on the floor and kneel at the center of it, then set your hands on the mat directly under your shoulders with fingers spread wide.
- Step both feet back one at a time until you are in a high plank, forming a straight line from head through hips to heels with the balls of your feet on the mat.
- Squeeze your glutes, brace your abdominal wall as if bracing for a light punch, and pull your shoulder blades down away from your ears.
- Inhale and bend your elbows to about 45 degrees from your torso, lowering your chest toward the mat until it is a few inches from the floor.
- Exhale and press through your palms to full elbow lockout, returning to the rigid high plank without letting your hips rise or sag.
- From the top of the push-up, shift your weight slightly over your hands and drive both knees in toward your chest at the same time, letting your toes lift off the mat as the knees approach.
- Pause briefly with the knees tucked under your hips, keeping the shoulders stacked over the wrists and the upper back rounded slightly.
- Extend both legs back out in one controlled motion and place the balls of your feet down softly, re-establishing the straight head-to-heel plank line.
- Breathe in as you lower into the next push-up and out on the press and the knee tuck, keeping one steady breath per phase.
- Complete your target reps, then kneel down and shake out the wrists and shoulders before the next set.
Tips & Tricks
- If your knees cannot travel far forward, your hands are probably set too far forward or too narrow — rebuild the plank with hands directly under the shoulders so the hips have a clear path under the body.
- The most common fault is letting the hips pop up into a pike as the knees come in; cue yourself to keep the hips low so the abs, not the hip hinge, do the pulling.
- Do not let the feet slam back down on the leg extension; a quiet landing means your core is controlling the return instead of gravity.
- Keep the elbows at roughly 45 degrees during the push-up rather than flaring to 90 degrees, which stresses the shoulder capsules once fatigue sets in.
- Round the upper back slightly at the tuck so the knees can travel high; a flat spine with retracted shoulder blades limits how far the knees can come through.
- If your wrists ache at the top position, grip the edges of two dumbbells or push-up handles to keep the wrists neutral through the pressing phase.
- Start with fewer reps than your normal push-up max — the tuck phase taxes the core quickly and form tends to break on reps seven and eight before the arms ever give out.
- When the full two-knee tuck is too hard, regress to driving one knee at a time while keeping the other leg extended, then combine the legs as control improves.
- Keep the head in line with the spine; looking up at the top of the tuck usually coincides with the hips dropping and the lower back arching.
Frequently Asked Questions
Which muscles does the Knee Tuck Push Up work the most?
The pressing phase primarily works the chest, triceps, and front shoulders, while the knee tuck targets the abs — especially the lower abs — and the hip flexors. The shoulders and deep core stay active the whole time to hold the plank line.
Can beginners do the Knee Tuck Push Up?
Beginners should first own a full push-up from the toes and a 30-second solid plank. If both are comfortable, start with slow single-knee tucks between push-ups before progressing to the simultaneous two-knee version.
Why do my hips rise when I tuck my knees in the Knee Tuck Push Up?
That pike usually means the hands are placed too far forward or the abs are not braced hard enough. Move the hands back under the shoulders and think about pulling the knees toward the chest rather than lifting the hips toward the ceiling.
How is the Knee Tuck Push Up different from a burpee?
A burpee ends with a jump and often drops the chest to the floor loosely, while the Knee Tuck Push Up keeps the chest lowering under control and swaps the jump for a deliberate knee tuck and quiet leg extension. It is more of a controlled strength and core drill than a maximal cardio burst.
What can I substitute if the knee tuck hurts my wrists?
Use push-up handles or grip dumbbells to keep the wrists straight, or substitute mountain climbers after separate push-ups. Both options keep the pressing and knee-drive patterns while removing wrist extension under load.
How many reps of the Knee Tuck Push Up should I aim for?
Start with 2 to 3 sets of 6 to 10 reps where you can keep the plank line intact on every tuck. Add reps only when the leg extension stays controlled and the lower back does not arch as the feet return to the mat.
Should my knees touch the floor during the tuck?
No — the knees travel through the air under the hips and should not touch down between reps. If they are grounding out, reduce the depth of the tuck or slow down and re-brace before the next rep.
Is it safe for my lower back to do the Knee Tuck Push Up?
It is generally well tolerated when the plank line is held and the legs are extended back under control. The risk comes from letting the lower back arch as the feet land, so stop the set when you notice your hips sagging or your form speeding up.
Where should my breathing rhythm be during the Knee Tuck Push Up?
Inhale on the way down, exhale as you press up, then exhale again on the knee tuck and inhale as the legs extend back. One breath cycle per full rep keeps the trunk braced through both phases.