Sitting Floor Diagonal Knee Raise
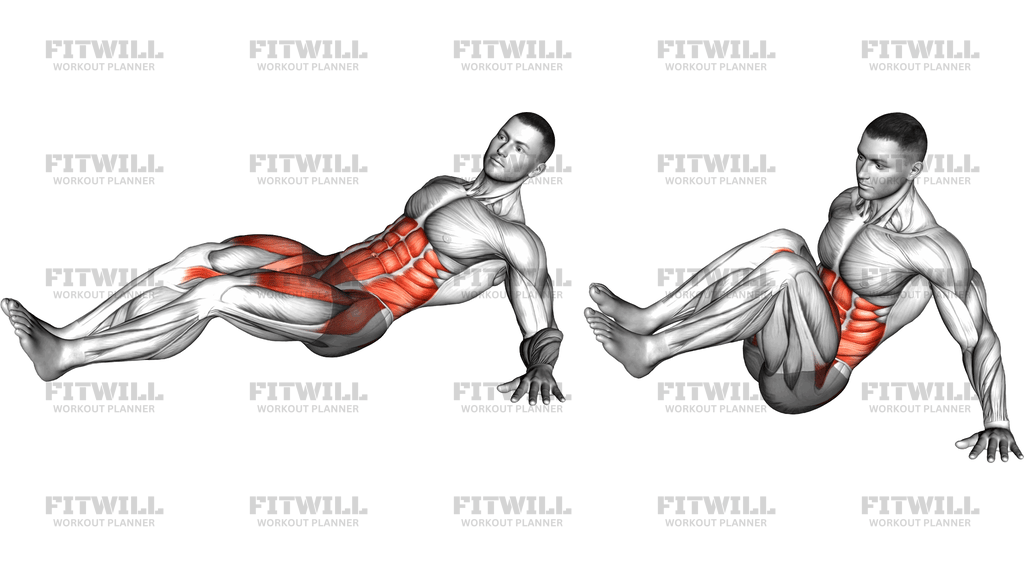
The Sitting Floor Diagonal Knee Raise is a body weight core exercise performed from a seated lean-back position on the floor. You support yourself on your hands behind your hips, extend your legs so they hover just above the ground, then pull your knees up and across your body on a diagonal path toward the opposite shoulder. That angled knee drive is what separates this from a standard seated knee tuck: it forces the lower abs to work together with the obliques as the pelvis rotates slightly at the top of each rep.
Because the hands carry part of your weight, this movement is accessible to people who cannot yet manage hanging knee raises or full floor work without support. It suits beginners building their first layer of core strength, anyone rehabbing back into abdominal training after a layoff, and more advanced lifters who want a high-rep, low-load finisher that hammers the midsection without equipment. It also works well in home or travel workouts since all you need is a patch of floor, ideally cushioned by an exercise mat.
The primary work comes from the rectus abdominis, especially the lower portion, which controls the hover and drives the knees upward. The internal and external obliques rotate the trunk and steer the diagonal path, while the hip flexors assist in lifting the thighs. The shoulders, triceps, and upper back work isometrically the entire time to hold your torso at the lean-back angle, so you will often feel your arms working harder than expected.
Setup quality determines whether this exercise trains your abs or just strains your wrists and lower back. Sit with your hands planted roughly under or just outside your shoulders, fingers pointing toward your hips or slightly outward, and lean back until your torso sits at roughly 45 degrees. Your weight should rest through your palms and the back of your pelvis, not your tailbone. Keeping your chest lifted and shoulders pulled down away from your ears protects the shoulder joints and keeps the ribcage stacked over the pelvis.
From there, execution is about controlled drawing, not speed. Extend your legs out with the heels hovering an inch or two off the floor, brace your abdominals as if bracing for a light punch, then bend both knees and pull them up and across toward the shoulder on the opposite side. Pause briefly when the knees reach their highest point, feel the abdominal wall shorten, then extend the legs back to the hover with the same control. The lowering half is where most of the training effect lives, so resist the temptation to let the legs drop.
A practical caution: if you feel this in your lower back rather than your abdominals, reduce the range by keeping the knees slightly more bent, or raise the hover height a few inches. If your wrists complain, press more through the base of the palm and spread your fingers for a wider base of support. Stop the set when your legs start swinging or your torso begins to rock, because momentum takes the tension off the muscles this exercise is meant to target.
[ Workout Log & Planner ]
Put your next workout in Fitwill
Keep your plan and training log ready when you are.


Instructions
- Sit on an exercise mat with your legs extended in front of you and place both palms flat on the floor behind your hips, fingers pointing toward your body or angled slightly outward.
- Lean your torso back to roughly a 45-degree angle so your weight sits through your palms and the rear of your pelvis, with your elbows soft rather than locked.
- Lift your feet off the floor and extend your legs until your heels hover an inch or two above the mat, toes pointing forward.
- Pull your shoulders down away from your ears, lift your chest, and brace your abdominals to lock your ribcage and pelvis together before moving.
- Exhale and bend both knees, drawing them up and across your body on a diagonal line toward the shoulder on the opposite side, letting the pelvis rotate slightly at the top.
- Squeeze your lower abs and obliques for a beat when the knees reach their closest point to the chest.
- Inhale and slowly extend your legs back out to the hovering start position, fighting the pull of gravity on the way down instead of dropping the feet.
- Complete the desired number of reps pulling toward one side if you are working a single diagonal, or alternate sides rep by rep for balanced development.
- Between sets, rest your heels on the floor and shake out your wrists and shoulders before resetting the lean-back position.
- End the set as soon as your legs swing, your hips sink, or your torso starts rocking, and finish with the quality reps you have already completed.
Tips & Tricks
- If your shoulders creep up toward your ears during the knee drive, consciously press the floor away through your palms between reps to keep space around your neck.
- A common mistake is pulling the knees straight up the middle instead of across the body, which turns this into a plain knee tuck and takes the obliques out of the movement; aim the knees at the opposite shoulder every rep.
- Keep the heels from touching down between reps. Once your feet rest on the floor, the abs lose the constant tension that makes the hover position effective.
- If your wrists ache, grip the edge of a folded mat under each hand or make fists with thumbs up instead of keeping the palms flat and extended.
- Avoid leaning further back as fatigue sets in. When the torso drops, the lower back arches and the hip flexors take over, so hold the same 45-degree angle from the first rep to the last.
- Do not yank the knees up with a burst of speed. A two-second pull with a one-second pause at the top produces far more abdominal work than a fast swing.
- Keep your neck relaxed and your gaze forward. Craning the chin toward the knees does nothing for the abs and only builds tension in the neck.
- If your tailbone feels pinched in the lean-back position, shift slightly more weight into your hands and sit a little further forward on the sit bones rather than the sacrum.
- Progress the exercise by raising the hover height requirement, slowing the lowering phase to three or four seconds, or adding a brief hold with the knees crossed at the top.
Frequently Asked Questions
Which muscles does the Sitting Floor Diagonal Knee Raise work hardest?
The rectus abdominis, particularly the lower fibers, does the main lifting, while the obliques rotate the knees across the diagonal path. The hip flexors assist with raising the thighs, and the shoulders and triceps hold your torso in the lean-back support position throughout.
Why do the knees travel diagonally instead of straight up in the Sitting Floor Diagonal Knee Raise?
The diagonal path adds trunk rotation, which recruits the internal and external obliques on top of the lower abdominal work. A straight knee tuck trains mostly the front of the abs, while the angled version broadens the demand across the whole midsection.
Is the Sitting Floor Diagonal Knee Raise suitable for beginners?
Yes, it is one of the more approachable knee raise variations because the hands support part of your body weight and there is no hanging grip to fail first. Beginners can shorten the range by keeping the knees more bent and letting the hover sit slightly higher off the floor.
My lower back hurts during the Sitting Floor Diagonal Knee Raise. What should I change?
That usually means the torso has dropped too far back or the legs are too heavy to control at full extension. Sit a little more upright, bend the knees more, and reduce the hover height so your abs, not your lumbar spine, control the load.
Can I substitute the Sitting Floor Diagonal Knee Raise with a hanging knee raise?
You can, but the hanging version demands much more grip strength and shoulder stability and is harder to steer on a diagonal. A closer substitute would be a seated knee tuck with a deliberate twist, or a lying reverse crunch paired with a rotation at the top.
How many reps and sets of the Sitting Floor Diagonal Knee Raise should I do?
Two to four sets of 10 to 20 controlled reps per side works well for most people, since this is a low-load movement that rewards quality over weight. Stop each set when your form changes, not when the muscles feel warm.
Do I need a mat for the Sitting Floor Diagonal Knee Raise?
A mat is not mandatory, but it makes the position far more comfortable for your tailbone and palms, especially on hard floors. A towel or carpeted surface can work if you do not have an exercise mat.
Why do my wrists and shoulders fatigue before my abs in this exercise?
Your upper body is bearing a share of your weight for the entire set, which is normal for any supported floor position. Spread your fingers, press through the base of the palms, and keep the elbows soft, and the supporting muscles will usually adapt within a few sessions.
Should I alternate sides or complete all reps on one diagonal at a time?
Alternating rep by rep keeps the workload even and mimics the rotational rhythm most people use in daily movement. Working one side at a time is also fine and makes it easier to feel each oblique working, but do equal work on both sides.
Is it safe to do the Sitting Floor Diagonal Knee Raise every day?
Because it uses only your body weight and a moderate range, frequent practice is generally fine for healthy trainees, and the abdominals tolerate higher frequencies than larger muscle groups. Still, treat it like any strength work and allow a day of easier activity between demanding sessions if your core feels fatigued.