Standing Bent Knee Calf Raise With A Chair Support
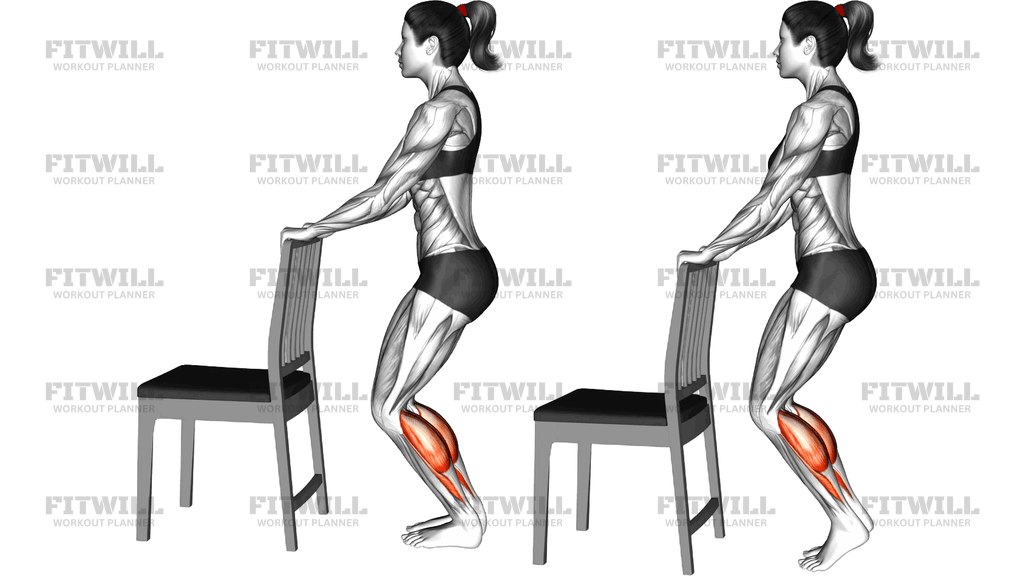
The Standing Bent Knee Calf Raise With A Chair Support is a body weight calf exercise performed with the knees deliberately bent while you hold the back of a sturdy chair for balance. That bent-knee position is the whole point of the movement: when the knee is flexed, the gastrocnemius — the two-headed muscle that crosses both the knee and ankle — is put on slack, which shifts most of the workload down to the soleus, the deeper, flatter calf muscle that sits beneath it. If you want to train your lower legs without letting the gastrocnemius take over, this is the setup that does it.
This variation is especially useful for people who find straight-leg standing calf raises uncomfortable, since bending the knees reduces the pull through the back of the knee and the Achilles. It is also a smart choice for runners, hikers, and anyone who spends long hours on their feet, because the soleus is heavily involved in posture and in absorbing load during walking and running. Because the chair provides balance support, the exercise suits beginners who are still learning to control their ankles, as well as more experienced lifters who want higher reps with clean technique.
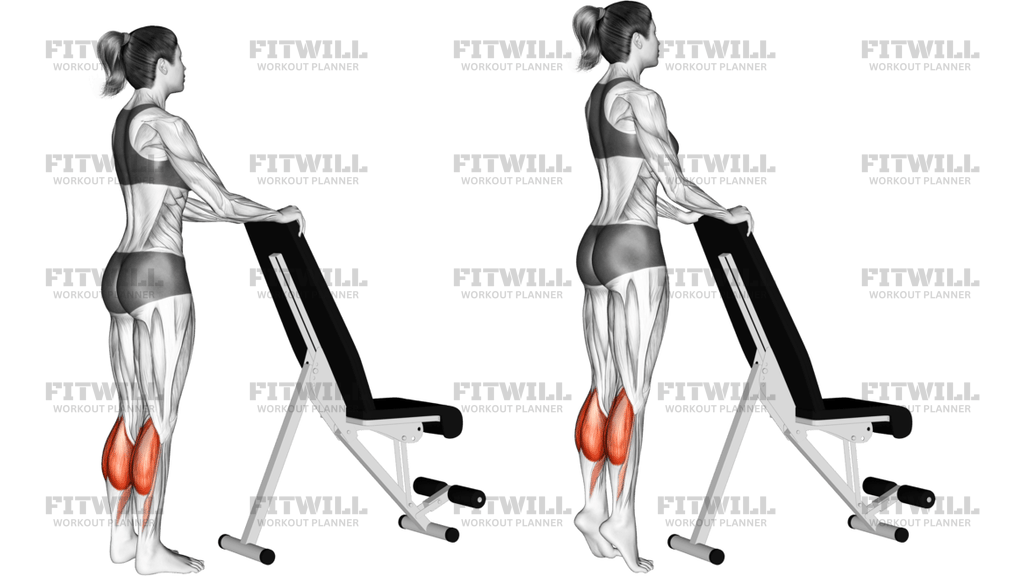
Setup matters here more than it might seem. Stand facing the back of a stable chair with your hands resting lightly on the top of the chair back — hold on for balance, not for lifting yourself. Place your feet roughly hip-width apart, then bend your knees to a comfortable quarter-squat depth and keep that knee angle fixed for the entire set. Your heels should start touching the floor, and your weight should sit over the middle of each foot so the ankles, not the hips, drive the movement.
From there, press through the balls of your feet and lift your heels as high as your ankles allow, keeping the knees bent at exactly the same angle throughout. Pause briefly at the top and squeeze the calves, then lower your heels back down under control until they lightly touch the floor before starting the next rep. Moving slowly, especially on the way down, does far more for this exercise than rushing through a big set.
A few practical points will keep the exercise effective and safe. Keep your torso upright and your shoulders relaxed rather than leaning heavily into the chair. Avoid bouncing at the bottom or letting the knees straighten as you fatigue — either one lets the gastrocnemius and momentum steal work from the soleus. If your balance feels shaky, widen your feet slightly or use a wall instead of a chair. Stop if you feel sharp pain in the ankle or Achilles, and ease into higher volumes gradually, since the soleus can produce significant soreness when it is trained hard for the first time.
[ Workout Log & Planner ]
Put your next workout in Fitwill
Keep your plan and training log ready when you are.


Instructions
- Place a sturdy chair on a non-slip floor and stand facing its back, about half an arm's length away.
- Rest both hands lightly on the top of the chair back for balance, elbows soft, torso upright.
- Set your feet hip-width apart with the toes pointing forward and your weight spread across the whole foot.
- Bend both knees to a comfortable quarter-squat angle and commit to holding that exact knee position for the whole set.
- Brace your core lightly and let your shoulders relax so you are balanced, not leaning your body weight into the chair.
- Press through the balls of your feet and lift your heels as high as possible, keeping the knees bent and the hips level.
- Pause for a moment at the top and squeeze your calves hard.
- Lower your heels slowly until they lightly touch the floor, staying in the bent-knee position the entire way down.
- Exhale as you rise and inhale as you lower, keeping the breathing steady and rhythmic.
- Complete your reps, then straighten the legs and step away from the chair for the next set or to rest.
Tips & Tricks
- The most common breakdown in this exercise is the knees gradually straightening as the set gets hard — check your knee angle on every rep, because straight legs turn it into a standard gastrocnemius raise.
- Do not grip the chair and pull yourself upward; the heels should rise because the calves push the floor away, not because your arms lift your body.
- Keep the heels lowering fully on each rep. Short, shallow reps at the top of the range drastically cut the work the soleus does.
- If your ankles wobble side to side, spread your feet a little wider and consciously press through the base of the big toe on each leg.
- A slow three-second lowering phase is more valuable here than extra reps, since the soleus responds well to time under tension.
- Avoid letting the hips shift backward into a deeper squat as you fatigue; the bend should live in the knees only, with the torso staying upright.
- Barefoot or in flat shoes works best — a cushioned running heel shortens the range and makes it harder to feel the calves working.
- If your Achilles feels tight rather than muscularly fatigued, reduce the depth of the bottom position slightly and build the range back over successive sessions.
- Place the chair against a wall or on a mat if it slides; a moving support hand turns a calf exercise into a balance problem.
Frequently Asked Questions
Why are the knees bent in the Standing Bent Knee Calf Raise With A Chair Support?
Bending the knees slackens the gastrocnemius, which crosses the knee joint, so the soleus has to do most of the lifting. It also takes strain off the back of the knee and makes the movement friendlier for stiff ankles.
Which muscles does the Standing Bent Knee Calf Raise With A Chair Support work?
The soleus is the primary muscle, with the gastrocnemius assisting and the small ankle stabilizers working to keep you balanced. Because the knees stay bent, the contribution from the gastrocnemius is noticeably reduced compared with a straight-leg raise.
Is the Standing Bent Knee Calf Raise With A Chair Support good for beginners?
Yes. The chair gives you something to hold for balance, the range is short and easy to control, and the bent-knee position is gentle on the knee and Achilles. Beginners should start with one or two sets of 10–15 slow reps.
Can I do the Standing Bent Knee Calf Raise With A Chair Support every day?
Light, moderate-rep sets can be done frequently since the calves recover quickly from body weight work. If your calves are still sore from a previous session, take a day off rather than stacking volume on tired muscle.
How deep should I bend my knees in the Standing Bent Knee Calf Raise With A Chair Support?
A quarter-squat depth — roughly a 90 to 120 degree knee angle — is enough to shift emphasis to the soleus. What matters most is holding that angle identically on every rep instead of drifting straighter as you tire.
What is the most common mistake in this exercise?
Letting the knees straighten or the hips sink back as the set gets difficult, both of which turn it into a regular standing calf raise. Recheck your knee angle and torso position each rep, and end the set when you can no longer hold them.
What can I use if I do not have a sturdy chair?
A wall, a countertop, or a squat rack upright works just as well — anything stable at about waist height that you can touch with your fingertips. Avoid anything with wheels or a lightweight back that could tip.
Should my heels touch the floor between reps of the Standing Bent Knee Calf Raise With A Chair Support?
Letting the heels lightly touch the floor gives the calves a brief stretch and a defined bottom position, which is ideal for most people. You can hold the heels just above the floor for a harder continuous-tension version once your control is good.
Is it safe to do this exercise if my Achilles feels tight?
The bent-knee position reduces load on the Achilles compared with straight-leg raises, but you should still work within a pain-free range and stop if you feel sharp or worsening discomfort. Persistent Achilles pain warrants advice from a qualified professional before continuing.