Dish Hold
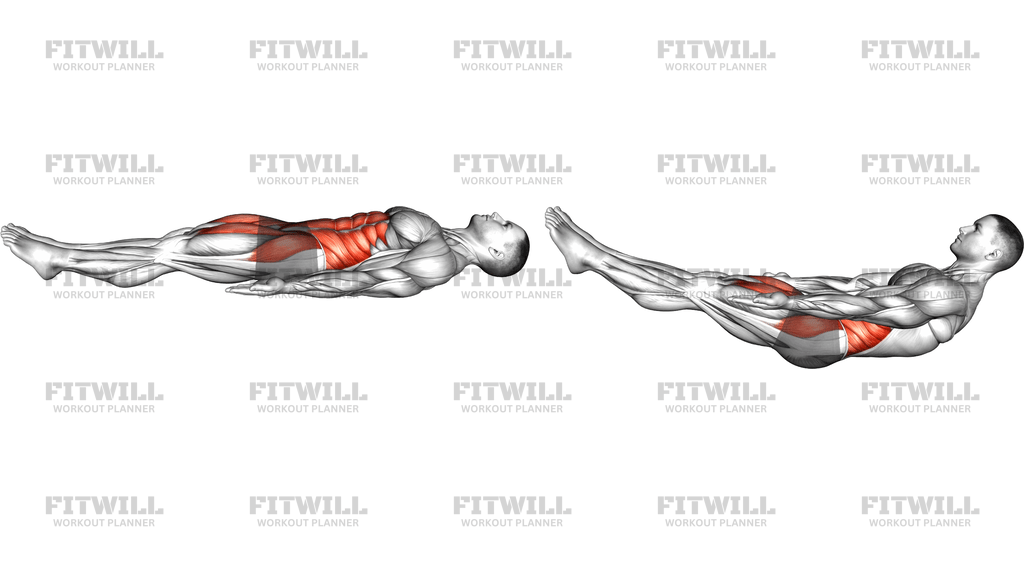
The Dish Hold is a static core hold borrowed from gymnastics, sometimes called the hollow body hold. You lie on your back, press your lower back into the floor, then lift your shoulders and straightened legs so your body forms a shallow banana or dish shape, with only your mid-back and hips contacting the ground. Everything happens with your own body weight, so all you need is a bit of floor space and, ideally, an exercise mat for comfort.
This hold trains isometric strength of the entire anterior core, with the rectus abdominis and deep transverse abdominis doing most of the work to keep your trunk locked in a slightly flexed, rounded position. Your hip flexors work hard to hold the straight legs up, and your quads and glutes stay active to keep the legs long and controlled. The real skill, though, is keeping the lumbar spine glued to the floor for the whole hold, which is what separates the Dish Hold from sloppy leg raises.
The Dish Hold is a foundational position for a lot of athletic movement. Gymnasts use it as the base for swings, handstands, and tumbling; bar athletes carry it into pull-ups, dips, and levers. For general lifters, it teaches you to brace and control your rib cage and pelvis together, which carries over to squats, deadlifts, and overhead pressing. It is especially useful for anyone whose lower back tends to arch or take over during core training.
Setup matters more here than in most ab exercises. Before you lift anything, flatten your lower back against the floor by tilting your pelvis slightly and pulling your ribs down. If you skip this step and lift into the dish with an arched lower back, you will feel it in your lumbar spine rather than your abs, and the hold loses most of its value. The shape should come from the abs shortening and the spine staying long, not from the back straining.
To execute it well, exhale as you lift, slide your shoulders just off the floor with your arms alongside your body, and raise your straight legs to a height you can hold while your lower back stays flat. The higher your legs, the easier the hold; the lower your legs, the harder it gets. Hold for time with steady, shallow breathing, then lower down with control and rest briefly before the next attempt.
Scale it to your current level rather than forcing a textbook shape from day one. Beginners can bend the knees or keep the feet closer to the floor with less leg lift, while advanced trainees can lower the legs, extend the arms overhead, or hold for longer intervals. Expect to feel a burning through the midsection within fifteen to thirty seconds; that is the intended stimulus, not a warning sign. Sharp lower back discomfort, on the other hand, means you should reduce the leverage or stop and reset.
[ Workout Log & Planner ]
Put your next workout in Fitwill
Keep your plan and training log ready when you are.


Instructions
- Lie on your back on an exercise mat with your legs straight and your arms resting alongside your torso, palms facing your thighs.
- Tilt your pelvis slightly and press your lower back firmly into the floor so there is no gap under your lumbar spine.
- Exhale and brace your midsection as if bracing for a light punch, pulling your ribs down toward your hips.
- Lift your shoulders and upper back just off the floor, keeping your chin slightly tucked and your neck relaxed.
- Raise your straight legs together until your feet sit a short distance above the mat, keeping your knees locked and toes pointed.
- Check that only your mid-back, hips, and glutes are touching the floor and that your lower back has not lifted; adjust leg height until it stays flat.
- Hold this dish shape for your target time, breathing in short, shallow breaths without letting the brace collapse.
- Lower your legs and shoulders back to the mat under control on an exhale, then rest for a few seconds before repeating.
Tips & Tricks
- If your lower back arches or lifts off the mat within a few seconds, bring your feet higher and your knees slightly bent until your abs, not your spine, carry the load.
- A common mistake is cranking the head forward to lift the chest; instead, reach your hands a few inches toward your feet so the shoulders rise from abdominal flexion.
- Watch your rib cage, not just your legs. Flared, lifted ribs mean the pelvis has tilted and the dish has collapsed into a back arch.
- Keep your arms glued to your sides in the standard version. Reaching them overhead moves the lever and makes the hold significantly harder, so save that for later.
- Point your toes and squeeze your quads to keep the legs truly straight; soft knees quietly reduce the demand on the hip flexors and shorten the effective shape.
- If you feel the burn shifting into your hip crease or front of the thighs before your abs, shorten the hold time and raise the legs slightly so the midsection stays the limiting factor.
- Start with short sets of ten to twenty seconds and stop the set the moment your lower back begins to lift, rather than holding until form breaks completely.
- Do this hold on a firm surface. A very soft couch or mattress lets the lumbar spine sink and arch, which hides the very position you are trying to train.
- Pair it with slow lowerings after the timed holds: lower your legs a few inches and back up twice before finishing the set to build strength through the range just below your hold height.
Frequently Asked Questions
What muscles does the Dish Hold work?
The Dish Hold is primarily an isometric exercise for the abs, especially the rectus abdominis and deep core, with strong assistance from the hip flexors as they hold the straight legs up. The quads, glutes, and stabilizers around the trunk work to keep the body rigid in the dish shape.
Is the Dish Hold suitable for beginners?
Yes, with reduced leverage. Keep your knees bent, lift your feet only slightly off the floor, and hold for ten to fifteen seconds while keeping your lower back flat. Progress by gradually straightening the legs and lowering them as your control improves.
Why does my lower back hurt during the Dish Hold?
That usually means your lumbar spine is arching and taking the load instead of your abs. Stop, reset the pelvic tilt so your lower back presses into the mat, and hold with your legs higher or knees bent so you can maintain that contact throughout.
How is the Dish Hold different from a hollow body hold?
They are the same position under different names. Hollow body hold is the common gymnastics and coaching term, while Dish Hold is the terminology used in many British and European gymnastics programs for the identical shape.
How long should I hold the Dish Hold?
Aim for sets of fifteen to forty seconds with good form, stopping before your lower back lifts off the floor. Multiple short, clean holds beat one long hold where the dish collapses halfway through.
How do I make the Dish Hold harder?
Lower your straight legs closer to the floor, extend your arms overhead past your ears, or add controlled leg lowerings within the set. Each of these lengthens the lever your abs and hip flexors must control.
Should I hold my breath during the Dish Hold?
No. Keep breathing in short, shallow breaths while maintaining your brace. Holding your breath makes the hold harder to sustain and often causes the rib cage to flare and the lower back to arch as tension drops.
Can the Dish Hold improve my pull-ups and other bar work?
It can help, because the dish position is the body shape you want to maintain during pull-ups, toes-to-bar, and swings. Learning to hold it teaches you to keep the ribs down and pelvis controlled so your core transfers force instead of leaking it.
What can I use instead of the Dish Hold if I do not have a mat?
Any firm, comfortable floor surface works, such as carpet or a towel under the hips and shoulders. Avoid soft beds or couches, since the surface gives way and lets your lower back arch out of the correct position.