Tree Yoga Pose Vrksasana
Tree Yoga Pose Vrksasana is a classic single-leg balance posture in which you stand on one foot, press the sole of the other foot against the inner thigh of your standing leg, and bring your palms together in front of your chest. The bent knee points out to the side, creating the triangular shape that gives the pose its name. Even though it looks calm and static, the whole body is quietly working: the standing leg, the hips, and the deep core are all engaged to keep you upright on a shrinking base of support.
This pose is useful for nearly everyone because balance tends to decline quietly with age and with sedentary routines, and Tree Yoga Pose Vrksasana is one of the simplest ways to test and train it. Runners and lifters benefit from the single-leg stability it builds, office workers benefit from the hip opening on the bent-leg side, and anyone who feels scattered or rushed can use the steady, focused hold as a mental reset. No equipment is required beyond a clear patch of floor, though a mat makes it more comfortable if you practice barefoot.
The main physical demand falls on the standing leg. The quadriceps and calf keep the knee and ankle steady, the muscles around the outer hip, especially the gluteus medius, keep the pelvis level, and the small stabilizers of the ankle make constant micro-adjustments. The bent leg adds its own work: placing the foot high on the thigh requires hip external rotation, and pressing the foot into the leg while the leg presses back creates an isometric squeeze through the inner thigh. Meanwhile, the arms in prayer position and the lifted chest train upper-body posture without any load.
Setup matters more than most people expect. Where you place the bent-leg foot changes both the difficulty and the safety of the pose. The sole belongs on the inner thigh, above or below the knee joint, never directly on the knee. Pressing against the knee forces the joint to twist sideways, which it is not built to do under load. A solid, evenly weighted standing foot is the other foundation: spread the toes, root down through the ball and heel, and let that connection feed upward into a tall spine.
To execute the pose well, fix your eyes on a still point at eye level before you lift the foot, then move slowly rather than hopping into position. Once set, lengthen through the crown of the head, relax the shoulders away from the ears, and breathe steadily. A little sway is normal and actually useful, because it is how the stabilizers learn; the goal is not to be perfectly frozen but to return to center each time you drift.
Common uses include warming up the ankles and hips before lower-body training, cooling down after a run, adding a balance block to a home yoga session, and practicing near a wall or chair when recovering confidence after an injury or a long break. If you lose balance, simply step the foot down with control, reset your gaze, and try the other side. Treat falls as part of practice rather than a failure, and keep both sides equal in time and effort.
[ Workout Log & Planner ]
Put your next workout in Fitwill
Keep your plan and training log ready when you are.


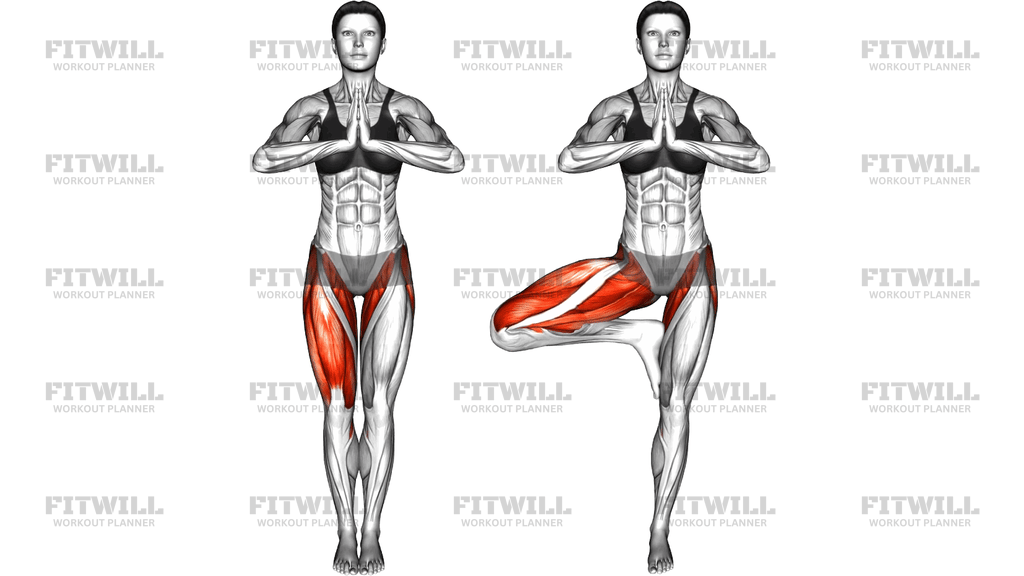
Instructions
- Stand tall on an exercise mat or firm floor with your feet together or hip-width apart, arms relaxed at your sides, and distribute your weight evenly across the standing feet.
- Shift your weight fully onto your left foot, spreading the toes and rooting down through the ball and heel while keeping the left knee soft but not bent.
- Bend your right knee and lift the right foot, first touching the toes to the floor beside the standing foot, then bring the sole of the right foot to the inner left thigh, above or below the knee but never on the knee joint.
- Press the right foot into the left thigh and simultaneously press the thigh back into the foot, creating a firm, opposing contact through the inner thigh.
- Bring your palms together in front of your chest in prayer position, letting the elbows drop so the shoulders stay relaxed and away from the ears.
- Fix your gaze on a single still point at eye level, lengthen through the crown of the head, and draw the lower belly gently in to support the spine.
- Hold the position, breathing slowly and evenly through the nose, letting the bent knee drift open to the side without letting the standing hip jut outward.
- To release, lower the right foot to the floor with control, stand evenly on both feet for a breath or two, then repeat the full sequence standing on the right foot.
Tips & Tricks
- Most people lose balance because their eyes wander; choose a fixed spot on a wall or floor mark before lifting the foot and return to it the moment you wobble.
- If the knee of the bent leg drifts forward and inward, use your hand to guide the knee out to the side and keep pressing the foot into the thigh rather than letting the leg just rest there.
- Placing the foot directly on the standing knee is the most common setup error; if you cannot reach the thigh comfortably, lower the foot to the inner calf instead.
- A leaning, jutting hip on the standing side means the outer hip muscles have switched off; consciously pull the standing hip back under the shoulder and firm the outer hip toward the midline.
- Practicing near a wall with one fingertip touching it is a legitimate progression, not a shortcut; reduce the fingertip contact over weeks until you balance free.
- Gripping the floor with curled toes is a sign of panic balance; deliberately spread the toes, then relax them while keeping weight spread across the ball and heel.
- If you keep falling toward the bent-leg side, check that your weight has not shifted to the outer edge of the standing foot; re-root the big toe base.
- Start with 20 to 30 second holds and match the time exactly on each side; imbalance between sides is common and worth noticing rather than hiding.
- Avoid locking the standing knee straight; a soft, active knee protects the joint and keeps the leg muscles engaged throughout the hold.
Frequently Asked Questions
What muscles does Tree Yoga Pose Vrksasana work?
The standing leg does most of the work through the quads, calves, and ankle stabilizers, while the outer hip muscles, especially the gluteus medius, keep the pelvis level. The bent leg adds an isometric squeeze through the inner thigh, and the deep core supports the upright torso.
Can beginners do Tree Yoga Pose Vrksasana?
Yes, and it is one of the best starting balances for beginners. Keep the toes of the bent leg resting on the floor with just the heel pressed against the standing ankle or calf, and stand near a wall for light support until confidence grows.
Where exactly should the bent foot rest in Tree Yoga Pose Vrksasana?
The sole goes on the inner thigh, either above or below the knee, never directly on the knee joint itself. Pressing on the knee pushes the joint sideways, which it is not designed to handle.
Why do I keep falling to one side in Tree Yoga Pose Vrksasana?
Falling usually means the weight has drifted to the outer edge of the standing foot or the gaze has started moving. Re-root the base of the big toe, pick one fixed point to stare at, and make sure the standing hip is tucked back under the shoulder.
How long should I hold Tree Yoga Pose Vrksasana?
Twenty to thirty seconds per side is a solid starting target, building up to a minute as your balance improves. Always match the time on both sides, even if one side feels noticeably shakier.
What can I use instead of Tree Yoga Pose Vrksasana if my hips are too tight?
A useful substitution is a figure-four standing balance, where the bent ankle crosses over the opposite thigh and you hinge slightly forward, or a reclined hip stretch on the floor. Both open the outer hip without demanding the same external rotation.
Should I keep my eyes open or closed in Tree Yoga Pose Vrksasana?
Keep them open and fixed on a still point, especially while learning. Closing the eyes removes the main balance reference and makes the pose far harder; save that variation for when open-eyed holds feel steady.
Is it safe to do Tree Yoga Pose Vrksasana with knee or ankle problems?
The pose is generally gentle, but foot placement is critical: keep the bent foot off the knee joint and step down if the standing ankle aches or wobbles sharply. Anyone recovering from a lower-leg injury should practice near support and stop if the joint complains.