Suspender Headstand
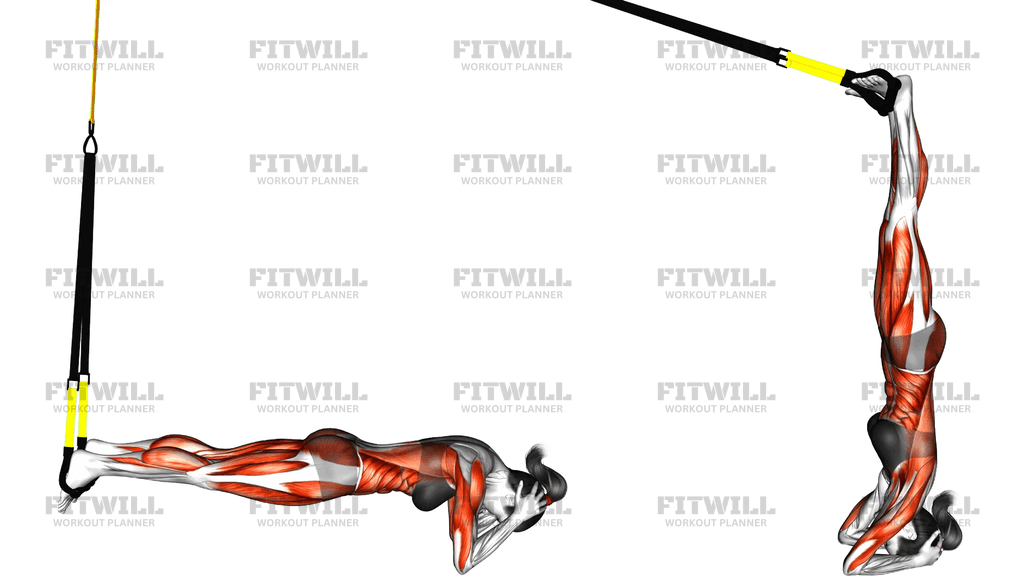
The Suspender Headstand is an inversion strength exercise performed with your feet supported in the cradles of a suspension trainer. You set up in a supported pike with the crown of your head lightly on the floor and your hands clasped behind your head, then draw your hips up over your shoulders until your legs rise to a vertical position, held steady by the straps. The suspension trainer acts as a spotter for your legs, which lets you own the inverted position without having to balance a freestanding headstand right away.
This movement is most useful for two groups: people building toward a freestanding headstand or handstand who need a safe way to accumulate time upside down, and experienced trainees who want loaded overhead work for the shoulders and upper back without pressing a weight. Because your legs are anchored in the straps, you can focus entirely on stacking your hips, pressing the floor away, and keeping your neck quiet.
The primary demand lands on the shoulder girdle — the deltoids, trapezius, and serratus anterior all work to keep your head and arms stable as your bodyweight loads through them. Your deep core and hip flexors control the pike-to-vertical transition, and once you are stacked, your trunk stays braced the entire hold. It is far more of a stability and positioning exercise than a dynamic one; the quality of the hold matters more than how long you stay up.
Setup is what makes or breaks this exercise. The straps must be even, the anchor point secure, and your feet seated firmly in the cradles before any weight shifts over your head. Because the head bears some of your load, treat the crown-of-head contact as a light tripod point alongside your hands, not a pivot. If you feel pressure building in your neck, come down rather than pushing through it.
In practice, you will see this used in calisthenics progressions, gymnastics-strength classes, and yoga-adjacent training where inversions are developed gradually. Expect your first holds to be short — five to fifteen seconds is plenty while you learn the stacking. Always train it on a non-slip surface, clear the area around you, and have a wall or a partner nearby when you first try the full vertical position.
[ Workout Log & Planner ]
Put your next workout in Fitwill
Keep your plan and training log ready when you are.


Instructions
- Anchor the suspension trainer securely overhead and adjust both straps to equal length so the foot cradles hang a few inches above the floor.
- Kneel down facing away from the anchor, slide one foot into each cradle from underneath so the instep of each foot rests firmly in its strap, and shake the legs gently to confirm the feet will not slip out.
- Clasp your hands behind your head with your elbows wide, lower the crown of your head lightly to the floor, and form a stable tripod of head and hands.
- Lift your knees off the floor and walk your hips back and up until you are in an inverted pike — feet in the straps, hips high, shoulders stacked over your hands and head.
- Brace your abdominals and press your forearms, hands, and the crown of your head into the floor as if pushing the ground away from you.
- Slowly draw your hips over your shoulders, letting the straps slide as your legs rise; keep the movement smooth rather than swinging or kicking into the vertical.
- At the top, squeeze your glutes, point your toes, and hold a straight line from head to feet, breathing steadily through your nose.
- Hold the vertical position for a controlled count — start with five to ten seconds — then reverse the path by hinging at the hips and lowering back into the pike.
- Bend the knees if needed to release one foot from its cradle, then the other, and rest on your knees for a moment before standing back up.
Tips & Tricks
- Most failed attempts come from kicking the legs up to reach vertical. Let the straps and a deliberate hip drive do the work — if you need to kick, your hips are not stacked over your shoulders yet.
- Keep the weight on the tripod of your hands and the very top of your head. If you feel the load shifting toward your forehead or the back of your skull, reset the position rather than adjusting mid-hold.
- Do not let your elbows flare wide and collapse as you tire. Squeezing the elbows slightly inward keeps the shoulder girdle rigid and protects the neck.
- In the pike position, avoid letting the lower back round into a slack curve. A long, neutral spine in the pike is what makes the transition to vertical controlled.
- Check the cradles before every set — feet that are only half-seated in the straps tend to slip exactly when you are fully inverted, which is the worst possible moment.
- Exhale as your hips rise and keep a steady breathing rhythm at the top. Holding your breath under inversion raises internal pressure and makes the hold feel far harder.
- If your hips drift past your head at the top, you have over-travelled; the straps will catch you, but pull the position back so your ankles sit directly over your hips.
- Scale the difficulty with strap height and hold time before trying anything fancier — shorter holds with clean stacking beat long, wobbly ones every time.
- Train this early in a session when your shoulders are fresh, and stop the set the moment your head position starts to wander.
Frequently Asked Questions
Which muscles does the Suspender Headstand work most?
The shoulders, trapezius, and serratus anterior carry the bulk of the load through the head-and-hands tripod, while the deep core and hip flexors control the pike-to-vertical transition. Once stacked, the whole body works isometrically to hold the line.
Is the Suspender Headstand suitable for beginners to inversions?
It is one of the safer ways to learn a headstand because the suspension straps anchor your legs and remove the balance requirement. Beginners should still start with short holds and keep a wall or partner nearby.
How much weight should rest on my head in the Suspender Headstand?
Treat the crown of the head as a light tripod point alongside your hands — most of your bodyweight should load through the arms and shoulder girdle. If you feel pressure building in the neck, come out of the hold.
How should my feet sit in the suspension straps?
Slide each foot into its cradle from underneath so the instep rests in the strap, then shake the leg gently to confirm it is secure. Half-seated feet are the most common setup failure on this exercise.
How is the Suspender Headstand different from a freestanding headstand?
The straps take over the balancing job, so you can focus on stacking, bracing, and pressing the floor away without worrying about tipping over. It works well as a progression step before trying the freestanding version.
What is the most common mistake in this movement?
Kicking or swinging the legs up to reach the vertical position instead of drawing the hips over the shoulders. Kicking shifts weight suddenly onto the head and neck, so keep the rise slow and controlled.
How long should I hold the top position of the Suspender Headstand?
Start with five to ten seconds and build toward thirty as your shoulder endurance improves. Quality of the stacked line matters more than total time under tension.
Can I substitute the Suspender Headstand if I do not have a suspension trainer?
A wall-supported headstand is the closest replacement — walk the feet up the wall from a pike instead of using straps. Avoid attempting a freestanding headstand as a substitute until you have earned it with supported holds.
Who should avoid the Suspender Headstand?
Anyone with neck issues, uncontrolled blood pressure, glaucoma, or recent shoulder or spinal injuries should skip inverted loading and consult a professional first. Discomfort in the neck, dizziness, or vision changes are all reasons to come down immediately.