Bird Dog Crunch Yoga Pose
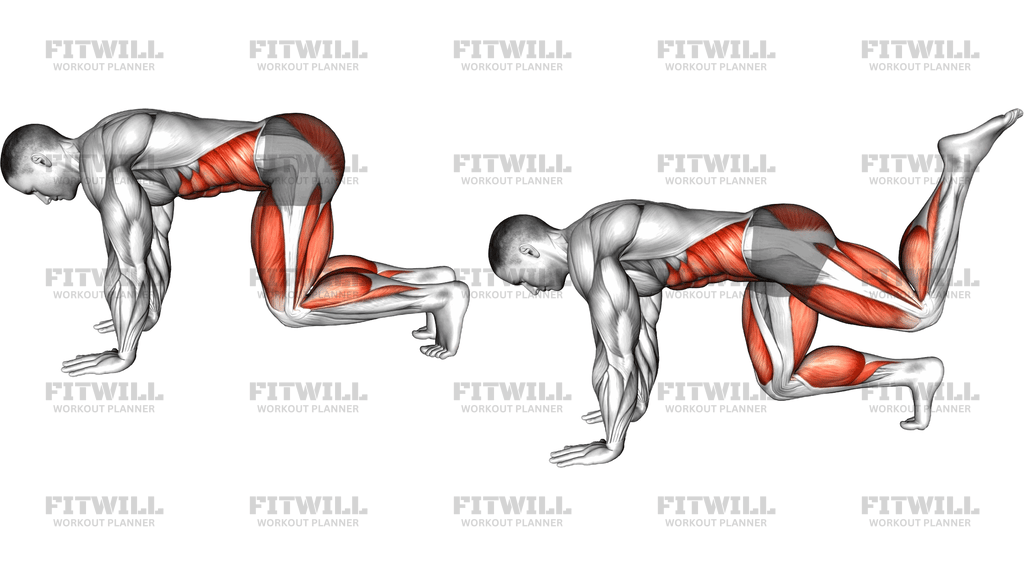
The Bird Dog Crunch Yoga Pose is a two-phase core exercise that starts from a hands-and-knees tabletop position. You first extend one arm forward and the opposite leg back into the classic bird dog hold, then draw the elbow and knee together underneath your torso in a tight crunch before extending back out. Because you move between full-body length and a compressed tuck on one side at a time, your trunk has to stay braced and level the entire way through.
This movement earns its place in almost any core routine because it trains control rather than raw flexion. The extension phase lights up the glutes, hamstrings, and lower back extensors while the supporting shoulder and hip work to hold you square. The crunch phase pulls the deep core and obliques into the picture as you fold the knee toward the elbow without letting your spine round or your hips twist. It is essentially an anti-rotation and anti-extension drill disguised as a simple pose.
It suits a wide range of people. Beginners use it to learn how to brace the trunk while a limb moves, desk workers use it to wake up sleepy glutes and spinal stabilizers, and lifters use it as a warm-up before squats, deadlifts, or overhead work. It is also a staple in yoga flows and physical therapy settings precisely because it demands coordination without heavy load.
The setup matters more than it looks. Hands stacked under shoulders and knees stacked under hips create the neutral baseline; if your start position is already sagging or hiked up, every rep that follows reinforces that pattern. Spreading the fingers, pressing the floor away, and finding a long, flat back before you move gives the limbs a stable platform to reach from.
To execute well, move slowly enough that you could pause at both ends of the rep. Reach the arm and leg until they are level with your torso, not cranked higher, then pull them together so the elbow and knee touch or nearly touch under your ribs. Exhale as you crunch, inhale as you extend, and keep the working-side hip from swinging outward. If your balance wobbles, that is normal at first; narrow your focus to one spot on the floor and let the core, not momentum, do the work.
A mat under the knees makes the exercise comfortable, and quality beats reps every time. Eight to ten slow, steady repetitions per side will do far more for your trunk stability than twenty rushed ones where the hips rock and the low back arches.
[ Workout Log & Planner ]
Put your next workout in Fitwill
Keep your plan and training log ready when you are.


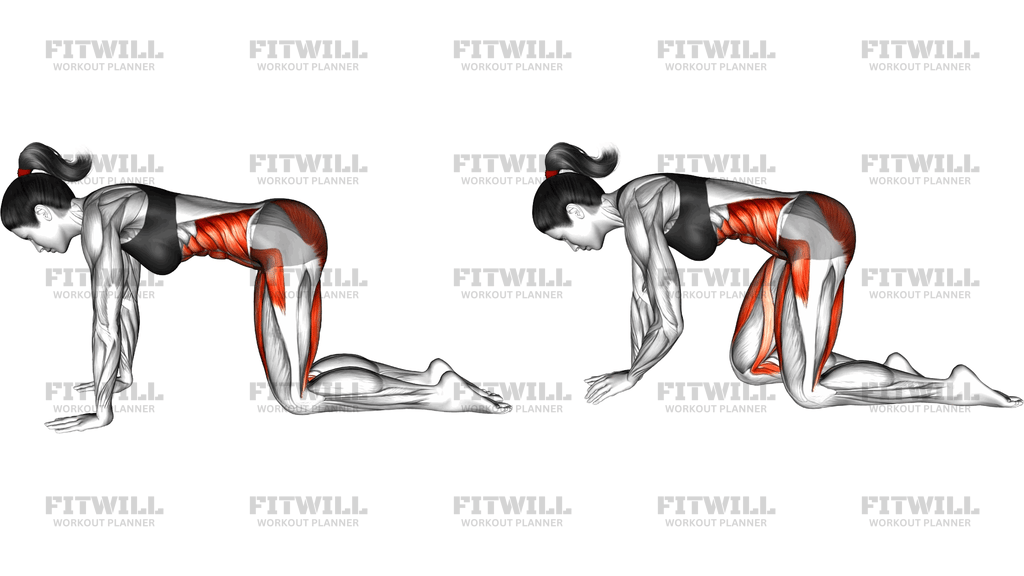
Instructions
- Kneel on an exercise mat and place your hands on the floor directly under your shoulders, knees directly under your hips, with toes tucked or the tops of your feet flat on the mat.
- Spread your fingers wide, press the floor away, and flatten your back so your head, spine, and hips form one long tabletop line; gaze down at the mat between your hands.
- Brace your core lightly as if bracing for a poke, and shift a little weight into your left hand and left knee, which will become your support side.
- Inhale and extend your right arm straight forward and your left leg straight back until both are roughly level with your torso, palm facing in and foot flexed.
- Exhale and draw your right elbow and left knee in toward each other under your torso, rounding slightly through the mid back so they meet beneath your ribs.
- Pause for a beat in the tucked position, feeling the front of your core and obliques contract without letting your hips collapse or swing.
- Inhale and extend back out to the full arm-and-leg reach, keeping your hips square to the floor the whole time.
- Complete all repetitions on one side or alternate sides, then bring your hand and knee back down to the tabletop to reset.
- Keep your breathing steady throughout: exhale on the crunch, inhale on the extension, and never hold your breath.
Tips & Tricks
- If your hips rotate open as the leg extends, imagine balancing a glass of water on your lower back; shortening the leg's range slightly is a fair trade for a level pelvis.
- The most common mistake is letting the extended leg drift higher than the torso, which arches the lower back; stop at hip height and feel the glute do the lifting.
- Do not let the supporting shoulder collapse toward the floor during the crunch; push the ground away so the shoulder blade stays stable.
- If your wrist bothers you in the tabletop, make a fist and press down on the knuckles or hold onto dumbbells set parallel on the floor to keep the wrist neutral.
- Avoid crunching by simply rounding the whole spine; aim the elbow and knee at each other under the ribs so the fold happens at the trunk, not just the shoulders.
- Slower is harder here; take three seconds to extend and two seconds to crunch rather than bouncing between positions.
- If you wobble badly on the reach, widen your base slightly by moving your knees a touch farther apart until your control improves.
- Keep the neck long by looking down at the mat; lifting the head to look forward usually makes the low back arch.
- Place a folded towel under the kneecaps if the hard floor is the limiting factor in your reps.
Frequently Asked Questions
Which muscles does the Bird Dog Crunch Yoga Pose work?
The deep core and obliques do most of the stabilizing and crunching work, while the glutes and hamstrings drive the leg extension and the erector spinae support the spine. The supporting shoulder and upper back also work isometrically to hold you steady.
Is the Bird Dog Crunch Yoga Pose good for beginners?
Yes, it is one of the better beginner core exercises because it is load-free and teaches bracing and limb control at the same time. Beginners can start by holding only the extended position for a few seconds and adding the crunch once balance improves.
How is the Bird Dog Crunch different from a regular bird dog hold?
A regular bird dog is a static hold with the arm and leg extended, while the crunch version adds a dynamic tuck where the elbow and knee meet under the torso. The added fold brings the abs and obliques through a range of motion instead of only training stability.
Should my elbow touch my knee during the crunch?
Touching or nearly touching under the ribs is the goal, but the exact contact matters less than keeping your hips square and your trunk doing the folding. If you can only get close, shorten the reach slightly rather than swinging the hips to close the gap.
Why do I lose my balance when I extend my opposite arm and leg?
Balance issues usually come from a loose core, hips that rotate open, or a gaze that is wandering around the room. Brace the trunk before moving, keep the pelvis level, and fix your eyes on one spot on the floor between your hands.
How many reps and sets should I do?
Two to three sets of 8 to 12 slow repetitions per side works well for most people. Because the emphasis is control, treat any rep where your hips twist or your back arches as a signal to stop the set.
Can I do the Bird Dog Crunch without a mat?
You can, but the kneeling position gets uncomfortable on hard floors, which may cut your sets short. A mat or a folded towel under the knees is a simple fix.
What can I use if I need an easier version?
Extend only the leg, or only the arm, and skip the crunch at first; you can also keep the toes of the working leg on the floor instead of lifting it to hip height. Progress to the full opposite arm-and-leg crunch as your control improves.
Is it safe for my lower back?
When performed with a braced core and a level pelvis, it is generally a back-friendly movement often used in rehab-style training. If extending the leg makes your lower back arch or pinch, reduce the height of the leg and keep the movement within a pain-free range.
When is the best time to use this exercise in a workout?
It works well as a warm-up drill before lower body or overhead lifting because it primes the core and glutes without fatiguing them. It also fits as a dedicated core block near the end of a session.