Alternating Dead Hang
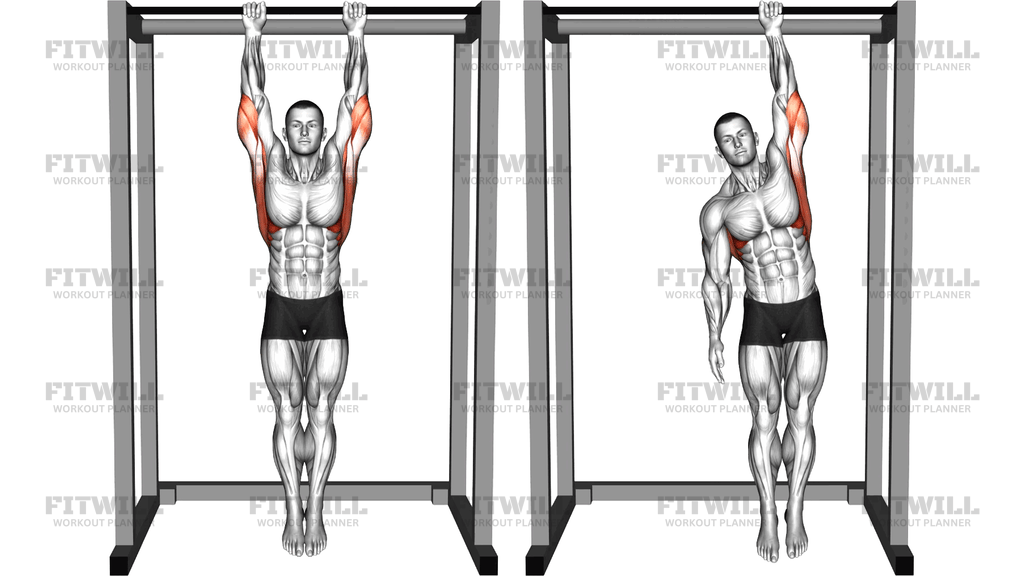
The Alternating Dead Hang is a grip and shoulder endurance exercise performed from a pull-up bar. You start in a standard two-arm dead hang with your body fully extended, then release one hand, hold the hang briefly on the remaining arm, re-grip, and repeat on the other side. The image shows the two key positions clearly: a straight vertical hang with both arms overhead, and a single-arm hang where the free arm hangs at your side while the loaded arm stays locked out overhead.
This movement is one of the most direct ways to build one-arm hang strength without any equipment beyond a sturdy bar. Because you are moving from a two-arm hold to a one-arm hold, each hand has to briefly support your entire body weight, which loads the forearm flexors, the grip, and the lats far more heavily than a regular dead hang. The moment of transition, when one hand lets go and the body settles toward the loaded side, is where most of the work happens.
The Alternating Dead Hang is especially useful for climbers, obstacle racers, and anyone working toward their first single-arm hang or one-arm pull-up. It also serves as a practical assessment: if you can alternate smoothly for several reps, your grip endurance and shoulder stability have a solid foundation. For general gym use, it makes a good finisher after pulling work when the forearms and lats can be taken close to their limit with minimal joint stress.
Setup matters more than it looks. Grip the bar roughly shoulder-width with your palms facing forward, let your body settle into a full hang, and keep a small amount of tension through the shoulders rather than letting them collapse up toward your ears. Before releasing a hand, brace the trunk lightly and shift your body slightly over the staying hand so the transition is controlled instead of a sideways drop. The legs should stay relatively still; excessive swinging usually means the grip, not the movement, is failing.
The execution itself is simple but demanding. Release one hand completely, let that arm hang at your side, and hold the single-arm hang for a beat before returning the hand to the bar. Then switch sides. Keep breathing steadily throughout rather than holding your breath, especially during the single-arm portion. If full body weight is too much at first, use a band or a foot on a low box for light assistance rather than shortening the hang or rushing the transitions.
A few safety points are worth respecting. Hold onto the bar with a full wrap of the fingers, not a fingertip grip, and make sure the bar and your hands are dry before starting. Drop down to the floor whenever your grip starts to noticeably fade rather than testing it to failure, since a grip failure at height is the main risk in this exercise.
[ Workout Log & Planner ]
Put your next workout in Fitwill
Keep your plan and training log ready when you are.


Instructions
- Stand under a sturdy pull-up bar and reach up to grip it with an overhand grip, hands about shoulder-width apart, with all fingers fully wrapped around the bar.
- Hang with your arms fully extended and your feet clear of the floor, letting your body settle so your torso and legs are stacked vertically under the bar.
- Pull your shoulder blades down slightly so your shoulders sit away from your ears, and brace your trunk with a light tension through the abs.
- Shift your hips slightly toward one side so your weight centers over the hand you are about to load.
- Release the opposite hand completely and let that arm hang down at your side, keeping the loaded arm locked out overhead in a single-arm dead hang.
- Hold the single-arm hang for one to two seconds, keeping your legs quiet and your torso facing forward rather than twisting.
- Return the released hand to the bar at its original position and re-settle into the two-arm dead hang.
- Repeat on the other side, releasing the opposite hand, and continue alternating for your target number of reps or total hang time.
- Breathe steadily throughout, exhaling as you release a hand and inhaling as you re-grip.
- When finished, lower yourself to the floor with control rather than dropping, and shake out the forearms between sets.
Tips & Tricks
- Chalk your hands or dry them on a towel first. Sweaty palms become a real problem once all your weight is on one hand.
- If your body swings when you let go, the problem is usually the hand-off, not the grip. Shift your weight over the staying arm before you release, instead of letting go and then catching the lean.
- Do not shrug the loaded shoulder up toward your ear during the single-arm hold. Keep the shoulder pulled down so the lats and traps hold you, not the passive joint structures.
- Keep the elbow of the loaded arm straight. Bending it turns the exercise into a one-arm flexor hang and removes the lat and shoulder emphasis.
- Count time rather than reps if holding one to two seconds per side feels easy. Total seconds under tension is a better progress marker for hangs.
- Start with short single-arm holds and a longer rest in the two-arm position between sides. Most people fail the transition, not the hold itself.
- If the overhand grip limits you, an alternating or neutral grip on a suitable bar is acceptable, but keep the grip consistent across both sides.
- Stop the set when your grip noticeably fades, not when it fully opens. Grabbing back on with weakened fingers is how skin and pulleys get aggravated.
- Use light assistance from a resistance band around a foot, or keep one toe on a low box, if a full single-arm hang is not yet possible.
- Keep your neck relaxed and eyes forward. Craning the chin up during the one-arm hold twists the torso and wastes tension.
Frequently Asked Questions
What muscles does the Alternating Dead Hang work?
The forearm flexors and grip carry most of the load, especially during the single-arm phase. The lats, upper back, and shoulder stabilizers work to hold the body in line while hanging from one arm.
Is the Alternating Dead Hang suitable for beginners?
Yes, with modifications. Beginners can shorten the single-arm hold to under a second, essentially a quick hand release and re-grip, or use light assistance from a band until a full one-arm hang is comfortable.
How is the Alternating Dead Hang different from a regular Dead Hang?
In a regular Dead Hang both hands stay on the bar and share your body weight. In the Alternating Dead Hang one hand releases, so the remaining arm briefly supports you alone, which makes it far more demanding on the grip and lats.
How long should I hold each single-arm hang?
One to two seconds per side is enough for most people, since the value comes from the loaded transition. More advanced users can hold three to five seconds per side, but only while keeping the shoulder down and the body still.
Why does my body swing or rotate when I let go of one hand?
That happens when you release the hand before shifting your weight over the staying arm. Lean your hips slightly toward the loaded side first, then release, and keep your eyes forward to limit rotation.
Can the Alternating Dead Hang help me toward a one-arm pull-up?
It builds the one-arm hang and grip strength that form the base of one-arm pulling work, but it does not train the pulling phase itself. Pair it with one-arm scapular pulls and assisted one-arm hangs to progress further.
Should I use a thumbless or full grip on the bar?
Always use a full grip with the thumb wrapped around the bar. During a single-arm hang your entire body weight rides on one hand, and a thumbless grip increases the chance of slipping off.
What can I use instead of a pull-up bar for this exercise?
Any secure overhead bar or sturdy ledge you can hang from works, such as gym rig uprights or outdoor fitness bars. Avoid door frames and anything that is not clearly rated for your body weight.
How do I know when to end a set of Alternating Dead Hangs?
End the set when your grip starts to slip noticeably or your body can no longer hang still. Practice missing on purpose with a controlled drop before you need it, so a grip failure never catches you by surprise.
Is it safe to do the Alternating Dead Hang every day?
For most people, two to four sessions per week is plenty once the single-arm holds become demanding. The forearms and fingers need recovery like any other working tissue, so keep at least one rest day between hard grip sessions.