Kettlebell Glute Bridge
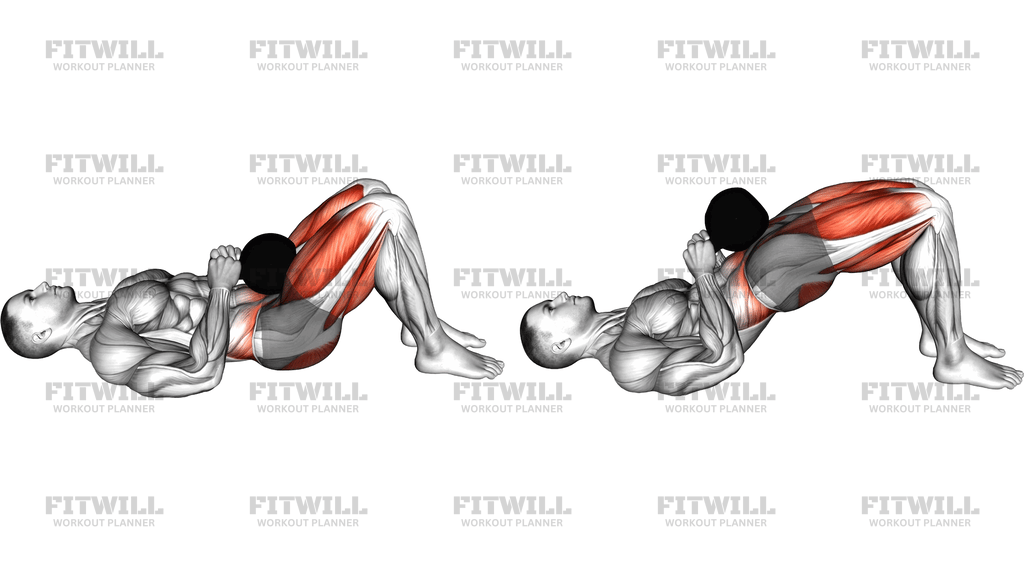
The Kettlebell Glute Bridge is a floor-based hip extension exercise where you lie on your back, place a kettlebell across your pelvis for added resistance, and drive your hips upward until your body forms a straight line from shoulders to knees. The kettlebell turns a bodyweight glute bridge into a loaded strength exercise, letting you progress the movement long before you would need a barbell or hip thrust setup.
This movement primarily targets the glutes, with strong support from the hamstrings as they work to stabilize and assist the hip extension. Your core and lower back muscles stay engaged throughout to keep your ribcage and pelvis aligned, which makes it a genuinely useful exercise for anyone building posterior chain strength without heavy spinal loading.
It suits a wide range of people: beginners learning what a proper hip extension should feel like, lifters who want extra glute volume without a barbell, and people who train at home with minimal equipment. Because you are lying on the floor, the range of motion is limited to where your hips can travel, which naturally keeps the movement honest and reduces the temptation to overarch the lower back.
Setup matters more than most people expect. The kettlebell should rest against the crease of your hips, held in place with both hands so it cannot roll toward your knees or your chest. Your feet are planted flat on the floor about hip-width apart, with knees bent roughly 90 degrees at the top. If your feet are too close, your quads take over; too far away, and the hamstrings dominate and your range shortens.
To execute it well, exhale as you drive through your heels, squeeze the glutes, and lift your hips until your thighs and torso line up. Pause briefly at the top, then lower under control until your hips tap the floor without fully relaxing. Avoid pushing your hips so high that your lower back arches and your ribs flare — the stop point is a straight line, not a maximum height.
Common use cases include glute-focused accessory work after squats or deadlifts, home workout programming, warm-up activation before lower body sessions, and rehabilitation-style training where floor-based hip extension is preferred. Keep the weight moderate at first; a kettlebell that lets you complete 10 to 15 clean reps with a visible pause at the top is a better teacher than one you have to heave up.
Fitwill
Log Workouts, Track Progress & Build Strength.
Achieve more with Fitwill: explore over 9600 exercises with images and videos, access built-in and custom workouts, perfect for both gym and home sessions, and see real results.
Start your journey. Download today!




Instructions
- Sit on the floor with your legs extended, place a kettlebell over your hips so it sits in the crease where your thighs meet your pelvis, then lie back onto the floor.
- Grip the kettlebell handle with both hands to hold it steady against your hips, and bend your knees so your feet are flat on the floor, about hip-width apart, with heels roughly a hand's length from your glutes.
- Tuck your chin slightly, brace your abdominal muscles, and gently pull your ribs down so your lower back rests in a neutral position against the floor.
- Press your arms down for stability and shift the kettlebell so it stays centered over your pelvis, not tilted toward one hip.
- Exhale and drive through your heels and mid-foot, squeezing your glutes to lift your hips until your shoulders, hips, and knees form a straight line.
- At the top, squeeze the glutes hard for one to two seconds without pushing your hips higher than the straight-line position.
- Inhale as you lower your hips back down with control, letting them lightly touch the floor without releasing tension or dumping the kettlebell forward.
- Complete all reps with the same foot position and grip, then set the kettlebell aside by sitting up carefully before standing.
- Rest briefly between sets, shake out your grip, and reposition the kettlebell the same way before your next set.
Tips & Tricks
- A common mistake is letting the kettlebell slide toward the knees during the rep, which changes the load path — reposition it against the hip crease and keep both hands on the handle for the entire set.
- If your hamstrings cramp, your feet are probably planted too far from your glutes; walk the heels in until your shins are roughly vertical at the top of the bridge.
- Do not chase height. Once your hips pass the straight-line position, your lower back arches and takes over the work — stop at the line and squeeze the glutes instead.
- Push through your heels rather than your toes; lifting onto the balls of the feet shifts emphasis toward the quads and reduces glute involvement.
- Keep your knees tracking over your ankles. If they cave inward, consciously press your knees slightly apart or place a light band above them for feedback.
- Exhaling on the drive helps you brace — holding your breath through the whole rep often leads to a loss of core tension and a sagging lower back halfway up.
- Start lighter than you think you need. If you have to bounce or thrust the kettlebell upward with your arms, the weight is stealing work from your glutes.
- Use a towel or pad under the kettlebell if the cast iron digs into your hip bones; discomfort at the pelvis is one of the most common reasons people cut sets short.
- Keep tension through the descent. Dropping the hips fast and bouncing off the floor turns the exercise into a momentum-driven movement and removes the hardest part of the rep.
Frequently Asked Questions
Which muscles does the Kettlebell Glute Bridge work?
The glutes are the primary movers, with the hamstrings assisting the hip extension. Your core and lower back muscles work isometrically to keep your ribcage and pelvis aligned throughout the rep.
Where exactly should the kettlebell sit during the Kettlebell Glute Bridge?
It should rest in the crease of your hips, directly over your pelvis, held in place with both hands on the handle. If it slides toward your knees or your chest, the leverage and the muscle emphasis both change.
Is the Kettlebell Glute Bridge good for beginners?
Yes. The floor limits the range of motion and the setup is simple, so it is one of the safest ways to learn loaded hip extension. Start with a light kettlebell or even just bodyweight to learn the hip drive first.
Why do I feel my hamstrings cramping instead of my glutes?
This usually means your heels are set too far from your glutes, placing the hips in a longer hamstring position. Walk your feet in until your shins are close to vertical at the top and reset before your next set.
Can I substitute the Kettlebell Glute Bridge with a barbell hip thrust?
Yes, they train a similar pattern, but the floor-based bridge has a shorter range and needs no bench. The kettlebell version is a good stepping stone and often more practical for home training.
How high should I lift my hips at the top of the Kettlebell Glute Bridge?
Lift until your shoulders, hips, and knees form a straight line, then stop. Pushing higher only arches the lower back and shifts work away from the glutes.
How heavy should the kettlebell be?
Choose a weight you can control for 10 to 15 reps with a deliberate pause at the top. If you need to fling the kettlebell up with your arms or bounce off the floor, it is too heavy.
Should my feet stay flat during the Kettlebell Glute Bridge?
Yes, keep your whole foot on the floor and drive mainly through your heels. Rising onto your toes reduces glute contribution and makes balance harder.
Is it safe for the lower back?
When done with a neutral spine and controlled range, it is a low-load, back-friendly way to train the hips. Avoid overarching at the top, and if you have a history of back issues, check the movement with a professional first.
How is the Kettlebell Glute Bridge different from the bodyweight version?
The kettlebell adds direct load to the hip extension, so the glutes and hamstrings work against real resistance instead of just moving your bodyweight, which makes it far more effective for building strength over time.