Incline Push Up
The Incline Push Up is a push-up variation performed with your hands elevated on a stable surface such as a step platform, bench, or sturdy box. Because your upper body is raised, the angle shifts a portion of your body weight off your arms, making the pressing motion noticeably easier than a push-up from the floor. It is one of the most practical ways to learn the horizontal pressing pattern while still getting genuine work out of the chest, triceps, and front of the shoulders.
This movement is especially valuable for beginners who cannot yet complete full push-ups with good technique, and for anyone returning to training after a layoff. It is also a smart tool for higher-rep endurance work: lifters who can do floor push-ups easily often use incline versions to accumulate volume without grinding out sloppy reps. Adjusting the height of the platform gives you a built-in progression, so you can start high and gradually work your way toward the floor as you get stronger.
The elevated setup matters more than it might seem. With hands on a step platform, your torso angles upward, which reduces the load on the pressing muscles but also makes it easier to keep a rigid plank from head to heels. That rigidity is the whole point of the exercise. A sagging hip or flared, collapsed chest on an incline will simply carry over to the same faults on the floor later, so treat the setup with the same care you would give a full push-up.
To perform it well, place your hands slightly wider than shoulder width on the edge of the platform, step your feet back until your body forms a straight line, and brace your trunk before you bend your elbows. Lower yourself until your chest approaches the edge, keeping your elbows at roughly a 45-degree angle to your torso rather than flaring straight out to the sides. Press back up until your arms are extended, exhaling on the way up.
In practice, the Incline Push Up fits into warm-ups, beginner upper-body sessions, and finisher sets where you want controlled pressing volume. If a platform is unavailable, a bench, counter edge, or wall works with the same principle, just at different heights. Keep the reps smooth and stop a set when your hips start to drop or your range shortens, since those are the first signs the position is breaking down.
Fitwill
Log Workouts, Track Progress & Build Strength.
Achieve more with Fitwill: explore over 9600 exercises with images and videos, access built-in and custom workouts, perfect for both gym and home sessions, and see real results.
Start your journey. Download today!




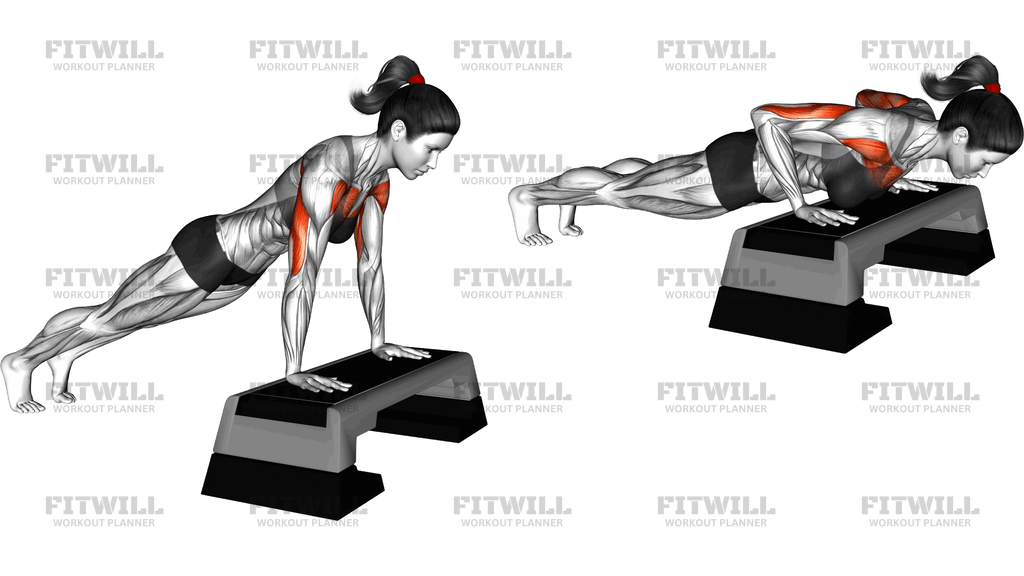
Instructions
- Place a stable step platform on a nonslip floor and position your hands on the near edge, slightly wider than shoulder width, fingers pointing forward.
- Step both feet back until your arms are fully extended and your body forms one straight line from head to heels, resting on the balls of your feet.
- Set your feet about hip-width apart and squeeze your glutes and thighs to lock in the plank position before you start moving.
- Draw your shoulders back slightly so they are not shrugged up around your ears, and brace your trunk as if preparing for a light push.
- Bend your elbows to lower your chest toward the platform edge, keeping the elbows at about a 45-degree angle to your ribs.
- Descend until your chest is close to the surface or your upper arms reach roughly parallel to your torso, whichever comes first with control.
- Press through your palms to straighten your arms and return to the starting plank, keeping your hips at the same height throughout.
- Exhale as you press up and inhale as you lower down, keeping the breathing steady rather than holding it.
- Complete your set, then step your feet forward one at a time before standing up off the platform.
Tips & Tricks
- If your hips sag during the set, the platform is likely too low for your current strength; raise the height and rebuild the rep count before lowering it again.
- A common mistake on an elevated surface is letting the head drop toward the platform to fake extra range; keep your neck neutral and your gaze slightly ahead of your hands.
- Keep your weight spread across the whole palm on the platform edge; gripping the edge too far over the front can strain the wrists as you fatigue.
- Elbows flaring out to a T position shifts stress toward the shoulder joint; cue your elbows to track back at a slight angle instead.
- Lower with the same speed you press up. Bouncing off the edge or free-falling into the bottom defeats the strength-building purpose of the incline.
- If your heels lift or your feet slide, widen your stance slightly and press the balls of your feet into the floor for stability.
- Progress by lowering the surface height gradually, for example from a counter to a standard step, before jumping straight to floor push-ups.
- Rounded shoulders at the top of each rep are a sign you are rushing; finish each press by gently pushing the platform away and spreading the shoulder blades before the next descent.
Frequently Asked Questions
What muscles does the Incline Push Up work?
It primarily trains the chest, with strong assistance from the triceps and the front of the shoulders. Your core and hip stabilizers also work to hold the straight-body plank position throughout the set.
Is the Incline Push Up easier than a regular push-up?
Yes. Elevating your hands reduces the percentage of body weight your arms have to press, which is why it is a standard stepping stone toward full floor push-ups.
How high should the step platform be?
Choose a height where you can complete 8 to 12 reps with a straight body and full range. As that becomes comfortable, move to a lower surface to keep progressing.
Why do my hips drop during the exercise?
A dropping hip usually means the core or glutes are fatiguing, or the incline is too low for now. Squeeze the glutes before each rep, and if sagging continues, move to a higher platform.
Can the Incline Push Up help me get my first floor push-up?
It is one of the best tools for that. Master the movement at a higher surface, then progressively lower the height over weeks until you are pressing from the floor.
Should my elbows flare all the way out to the sides?
No. Aim for about a 45-degree angle between your upper arms and torso, which protects the shoulders and keeps the chest and triceps in a strong pressing position.
What can I use if I don't have a step platform?
A sturdy bench, a low table, a kitchen counter, or even a wall all work on the same principle. Just make sure the surface cannot slide and can support your weight.
Is it safe for wrist discomfort?
The slightly elevated angle is often more comfortable than floor push-ups because the wrist is not extended as far back. Spread your fingers, press through the base of the palm, and skip the exercise if sharp pain occurs.
How many reps and sets should I do?
Two to four sets of 8 to 15 controlled reps is a solid starting point. End each set before your form breaks down rather than pushing to sloppy failure.