Side Plank Raise
The Side Plank Raise is a lateral core exercise performed from a side plank position on the forearm. Instead of simply holding a static side plank, you repeatedly lower your hips toward the floor and drive them back up toward the ceiling, turning the classic isometric hold into a controlled dynamic movement. The top hand is placed behind the head or resting on the hip, and the body stays in one straight line from head to feet throughout every rep.
This movement is one of the most direct ways to load the obliques and the quadratus lumborum, the deep muscle along the side of the lower back that helps control side-to-side movement of the spine and pelvis. The bottom glute medius also works hard to keep the pelvis lifted and stable, which makes the exercise valuable beyond pure ab training. Because it challenges lateral stability, it carries over well to activities that involve single-leg stance, rotation, or changing direction.
The Side Plank Raise suits a wide range of trainees. Runners and field-sport athletes use it to build hip and trunk stability that resists unwanted side bending, while general lifters use it to balance out the front-and-back work that dominates most ab routines like crunches and planks. It is also a common progression once a static side plank feels easy, since the added hip movement increases both the demand on the obliques and the coordination required.
Setup quality determines whether this exercise trains the right muscles. Your elbow should sit directly under your shoulder so the shoulder supports the torso rather than straining, and your feet, hips, and shoulders should be stacked in one vertical plane. If the hips drift backward or the torso rotates toward the floor, the obliques stop doing their job and the shoulder or lower back takes unwanted stress.
To execute it well, brace your midsection before moving, lower the hips in a slow arc toward the floor without letting the shoulder sink, then lift the hips until the body forms a straight diagonal line again. The tempo should stay controlled on the way down and deliberate on the way up, avoiding any bounce off the floor. Complete all repetitions on one side before switching, and stop the set when your hips start to sag or your form shifts, rather than pushing through a crumbing position.
[ Workout Log & Planner ]
Put your next workout in Fitwill
Keep your plan and training log ready when you are.


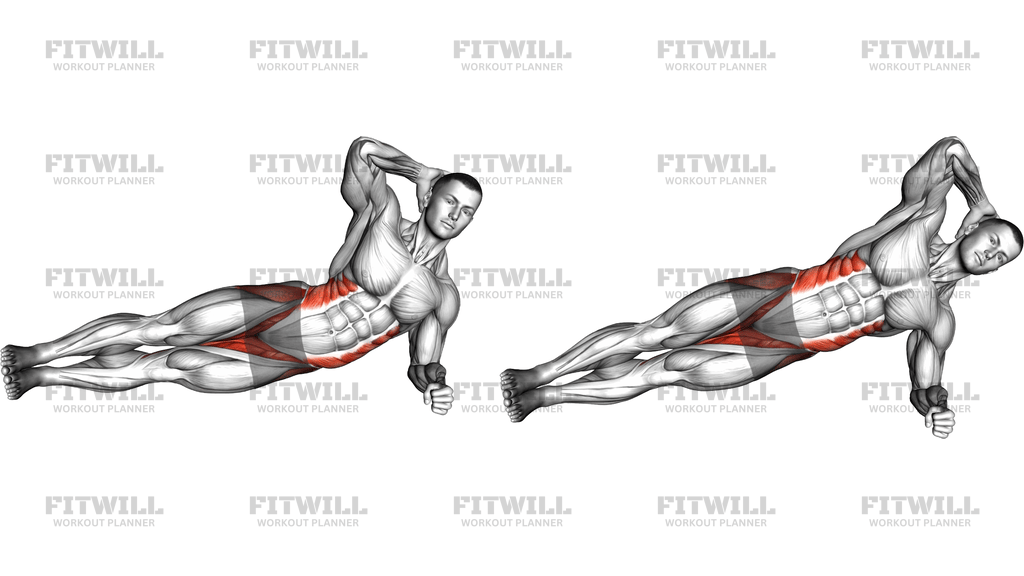
Instructions
- Lie on your right side on an exercise mat with your legs extended and stacked, and prop your upper body on your right forearm with the elbow positioned directly under your shoulder.
- Place your left hand behind your head or rest it on your top hip, and stack your left foot on top of your right foot with both feet flexed so the side of the bottom foot contacts the floor.
- Lift your hips off the floor until your body forms one straight line from head to heels, and squeeze your glutes to lock in that position before moving.
- Brace your abs as if bracing for a light punch, and keep your neck neutral by looking straight ahead rather than up or down at the floor.
- Slowly lower your hips in an arc toward the floor, stopping just before your hip touches down, and keep your shoulder packed with your elbow staying under your shoulder.
- Drive your hips back up toward the ceiling by pulling the bottom side of your waist upward and squeezing the bottom glute, finishing slightly higher than a flat line if you can.
- Pause for a beat at the top with the body straight, then begin the next lowering rep without letting your hips drop into a sag.
- Exhale as you raise the hips and inhale as you lower them, keeping the breath steady instead of holding it.
- Complete all repetitions on the right side, then reposition onto your left forearm and match the rep count on the other side.
- Between sets, shake out the shoulder and wrists, and reset your alignment from scratch each time rather than rolling straight back into the next set.
Tips & Tricks
- If your bottom shoulder feels pinched, press deliberately through the forearm and pull the shoulder blade down away from your ear; most shoulder discomfort in the Side Plank Raise comes from letting the shoulder blade wing upward as fatigue builds.
- The most common mistake is turning the rep into a small bounce off the floor. Lower for two to three seconds and pause a half-second at the bottom so the obliques, not momentum, control the descent.
- Check your hips against a mirror or a vertical reference: if they keep drifting backward, think about stacking your hips directly over your bottom knee and ankle before starting.
- If a full rep range is too hard, bend both knees to about 90 degrees and perform the raise from the knees, keeping the same straight line from head to knees.
- Do not let your top hand pull on your head; keeping it behind the head is fine for balance, but the lift should come from the waist and glute, not the neck.
- Reach your top arm straight up toward the ceiling if you struggle to stay stacked; a wider top arm acts like a counterbalance and reduces the tendency to roll forward.
- Stop the set the moment your hips start sagging with each rep. Sagging hips shift the load to the lower back and turn a quality oblique exercise into a strain.
- Keep the bottom foot actively pressed into the floor rather than sliding; a lazy bottom foot usually shows up as wobbling hips mid-set.
- To increase difficulty without adding weight, pause two to three seconds at the top of each rep or slow the lowering phase to four seconds.
Frequently Asked Questions
What muscles does the Side Plank Raise work?
The primary movers are the obliques on the side facing the floor, along with the quadratus lumborum deep in the lower back. The bottom glute medius stabilizes the pelvis, and the shoulder stabilizers and deep core work to hold the stacked position.
Is the Side Plank Raise suitable for beginners?
Yes, with a modification. Beginners should perform it from the knees with both knees bent to 90 degrees, which shortens the lever while keeping the hip raise pattern identical. Once 10 to 12 clean reps per side feel controlled, move to the full version.
Should my hips touch the floor on each rep of the Side Plank Raise?
Lower until your hip is just above the floor, then reverse. Touching down lightly is acceptable, but bouncing off the floor uses momentum and reduces the work your obliques do on the lowering phase.
Why does my bottom shoulder hurt during the Side Plank Raise?
This usually means the elbow has drifted out from under the shoulder or the shoulder blade is collapsing upward. Reposition the elbow directly beneath the shoulder, press firmly through the forearm, and reduce the rep range until the shoulder can stay packed.
How is the Side Plank Raise different from a regular side plank?
A regular side plank is an isometric hold where the hips stay at one height, while the Side Plank Raise adds repeated hip lowering and lifting. The dynamic version loads the obliques through a range of motion and generally feels harder at the same hold time.
Can I add weight to the Side Plank Raise?
Yes. Once bodyweight reps are easy, hold a light dumbbell on your top hip or wear a small weight vest. Start light, because the bottom shoulder and obliques must control the added load on every lowering rep.
How many reps and sets should I do?
Two to three sets of 8 to 12 controlled reps per side works well for strength and stability. Because each side must be trained evenly, always match the weaker side's rep count on the stronger side.
My hips keep rotating toward the floor. How do I fix it?
Focus on keeping your shoulders, hips, and feet stacked in one vertical plane, and reach your top arm toward the ceiling for a counterbalance. Slowing the tempo also helps, since rotation usually appears when you rush the lift.
What can I substitute if the Side Plank Raise is too difficult?
Use a knee-bent side plank raise first, or hold a static side plank and practice small hip lifts with a short range. Both options build the same lateral core strength with less demand on the shoulder and stabilizers.
Is the Side Plank Raise safe for people with lower back issues?
Many people with sensitive lower backs tolerate it well because the spine stays neutral and the side muscles work without repeated spinal flexion. Still, if you have a current or recurring back condition, get clearance from a qualified professional before adding it to your routine.