Low To High Lunge Pose
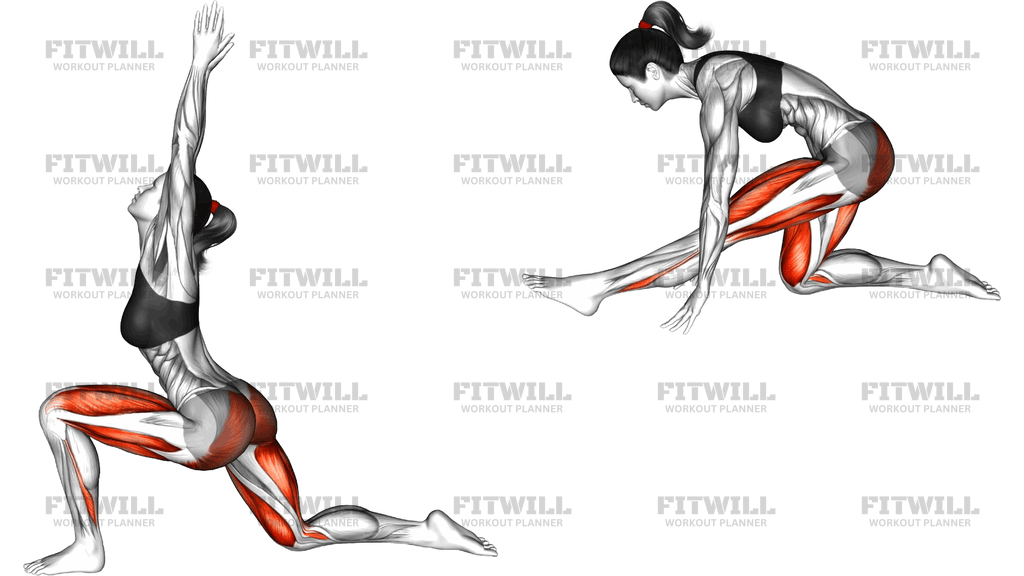
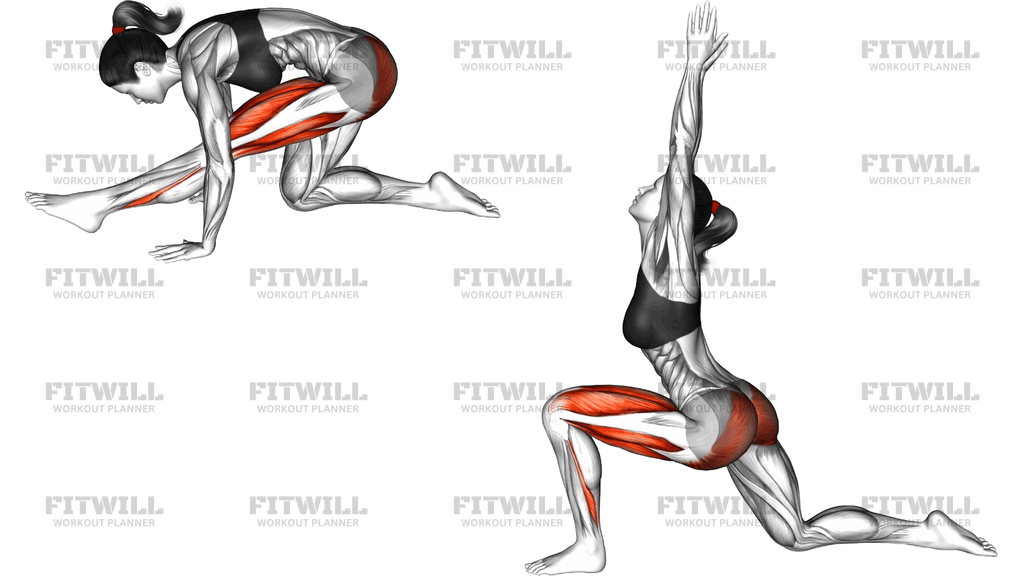
Low To High Lunge Pose is a flowing yoga transition that takes you from a deep low lunge with your hands framing your front foot up into a standing high lunge with both arms reaching straight overhead. The front knee stays bent over the ankle the entire time while the back leg extends long behind you, so you move from a supported, folded position into an open, upright one without ever releasing the lunge. It is one of the most common transitions in vinyasa practice, typically used to step the back foot forward or lift into standing sequences.
This movement is especially useful for anyone who sits for long hours, because the low position puts a direct, sustained stretch on the hip flexors of the back leg — the muscles that shorten when you spend the day in a chair. Rising into the high lunge then asks the glutes, quads, and calves of the front leg to hold you stable while the core and shoulders work to keep the torso tall and the arms overhead. You get mobility and strength work in one continuous motion rather than treating them as separate tasks.
Setup matters here because the lunge geometry determines everything that follows. Your front foot should be far enough forward that your knee can stack over or slightly behind the ankle, and your back leg needs enough length that the heel can reach toward the sky with the ball of the foot grounded. If the stance is too short, the front knee drifts past the toes and the back leg never gets a real stretch; if it is too long, you lose the height needed to rise smoothly.
To execute it well, plant your hands firmly, lengthen through the crown of your head, and let your hips sink forward and down before you begin the rise. As you lift, press the front foot into the floor, engage the back thigh, and let the torso come up as the arms sweep overhead. The rise should feel like one smooth wave, not a two-part lurch where the chest pops up first and the arms follow as an afterthought.
You will see Low To High Lunge Pose in warm-ups, sun salutation variations, and standing flow sequences, but it works just as well on its own as a hip-opening drill before squats, running, or any lower body session. Practicing it slowly on both sides is a reliable way to check for left-right differences in hip mobility.
The main safety points are simple: keep the front knee tracking over the foot rather than caving inward, keep the back kneecap lifting so the leg stays active instead of dumping into the joint, and if balance feels shaky in the high position, widen your stance slightly or keep fingertips hovering near the floor a moment longer before rising.
Fitwill
Log Workouts, Track Progress & Build Strength.
Achieve more with Fitwill: explore over 9600 exercises with images and videos, access built-in and custom workouts, perfect for both gym and home sessions, and see real results.
Start your journey. Download today!




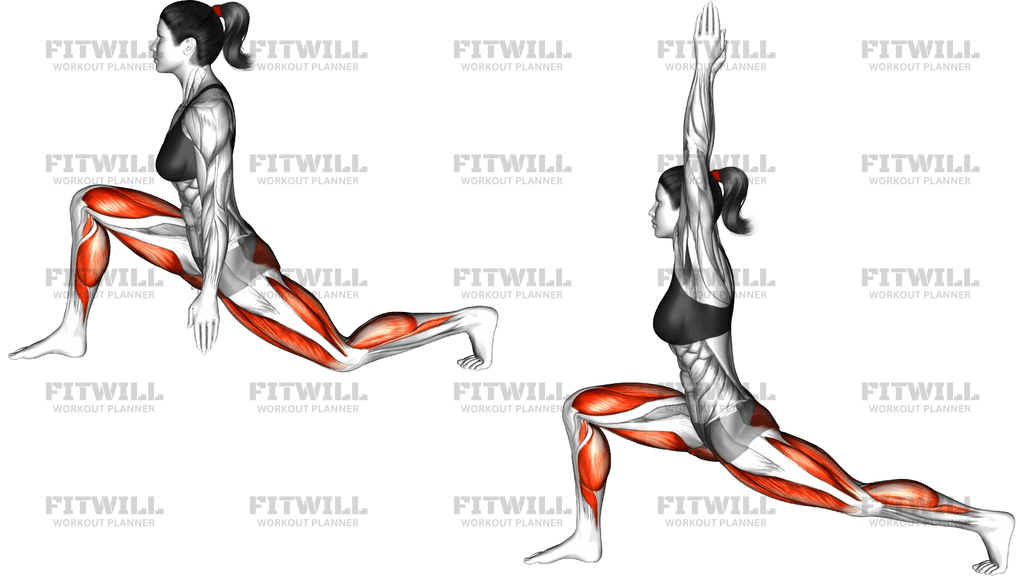
Instructions
- Start on an exercise mat in a low lunge: step your right foot forward between your hands, left leg extended straight back with the ball of the left foot on the floor and the heel pointing up.
- Place both palms flat on the mat inside your right foot, fingertips spread, shoulders stacked over wrists so your upper body is supported.
- Sink your hips forward and down until you feel a clear stretch along the front of the left hip, and keep the left thigh lifting away from the floor.
- Brace your abdomen lightly and lengthen your spine forward, chest reaching toward the space in front of you rather than collapsing toward the floor.
- Press evenly through the right foot and the ball of the left foot, then begin to rise by drawing the torso upright as your arms sweep out to the sides and up overhead.
- In High Lunge, stack the right knee directly over the right ankle, straighten and energize the back leg, and reach both palms toward each other above your head with shoulders relaxed down your back.
- Hold the high position for one or two slow breaths, keeping the hips square forward and the front knee from drifting inward.
- On an exhale, hinge the torso forward, lower your hands back to the mat on either side of the front foot, and return to the Low Lunge position with control.
- Breathe in as you rise into High Lunge and breathe out as you lower back down; complete your repetitions, then switch legs and repeat on the left side.
Tips & Tricks
- If your hands cannot reach the floor comfortably in the low position, place them on two yoga blocks instead of rounding your back to chase the ground.
- The most common mistake is a stance that is too short, which lets the front knee shoot past the toes — step the front foot a few inches further forward before you start.
- Watch for the front knee caving toward the midline as you rise; consciously press the knee toward the pinky-toe side of the foot as you stand up.
- Keep weight in the ball of the back foot rather than the kneecap — if the back knee rests on the floor, you have shifted out of the pose this exercise describes.
- Rise with the chest leading and the arms following as one motion; separating them usually means the lower back arches to compensate in the high position.
- Let the back heel reach actively toward the back wall instead of just sitting there — an active heel keeps the calf and Achilles involved and improves balance.
- If wobbling in High Lunge, look at a fixed point on the floor a few feet ahead of you rather than down at your foot or up at your hands.
- Squeeze the glute of the back leg as you rise; this deepens the hip flexor stretch safely and stops the lower back from taking over the extension.
- Move slower than feels necessary on the first couple of reps per side — the transition is where most people lose the knee-over-ankle alignment.
Frequently Asked Questions
Which muscles does Low To High Lunge Pose work the most?
The primary target is the hip flexor of the back leg, especially the iliopsoas, which gets stretched in the low position. The glutes, quads, and calves of the front leg work to hold you stable, and the core supports the torso as the arms reach overhead.
Why do my hands not reach the floor in the low position of Low To High Lunge Pose?
This is usually a combination of tight hamstrings and hips plus a short stance. Place your hands on yoga blocks set inside the front foot rather than forcing fingertips down with a rounded back.
Is Low To High Lunge Pose suitable for beginners?
Yes, it is a beginner-friendly transition as long as the stance is honest. Beginners should shorten nothing — instead, use blocks under the hands, hold the high position for only one breath, and practice near a wall for light balance support.
How long should I hold High Lunge before lowering back down?
One to two full breaths is enough in a flowing practice. If you are using the pose as a standalone strength hold, up to five breaths works, but lower down whenever the front knee alignment starts to slip.
Should the back knee touch the floor during Low To High Lunge Pose?
No — the back knee stays lifted with the ball of the foot grounded, which is what separates this pose from a kneeling low lunge. If the knee drops, shorten the stance slightly and re-engage the back thigh.
Can Low To High Lunge Pose replace a static hip flexor stretch before training?
It works well as a dynamic pre-training option because the repeated rise and lower warms the hips while stretching the hip flexors. For a longer static stretch after training, hold the low position instead of flowing through the transition.
How do I stop my front knee from hurting during this pose?
Check that the knee stacks over the ankle and tracks in line with the second toe, and never let it travel past the toes as you rise. A shorter stance or a thicker mat under the knee of the back leg can also reduce pressure.
What can I use instead of Low To High Lunge Pose if balance is an issue?
Practice the same transition with fingertips resting lightly on the wall or the back of a chair as you rise, or drop the back knee to the mat and perform a low lunge to kneeling high kneel pattern until balance improves.
How many repetitions of Low To High Lunge Pose should I do per side?
Three to five slow repetitions per side is a solid dose, whether as a warm-up or as part of a yoga flow. Spend the extra time on the side where the hips feel tighter rather than matching reps symmetrically at speed.