Weighted Kettlebell Glute Single Leg Bridge From B
The Weighted Kettlebell Glute Single Leg Bridge From B is a single-leg hip extension performed with your upper back supported on a flat bench and a kettlebell loaded across the working hip. One foot stays planted on the floor while the other leg is held up and away from the ground, so all of the lifting has to come from one hip at a time. The kettlebell sits in the crease of the hip, held in place with both hands, which lets you add meaningful load without needing a barbell or plate setup.
This movement is a focused glute builder. With the bench supporting your upper back and one leg removed from the equation, the glute of the working side does most of the work of driving the hips up, while the hamstrings assist in hip extension and the core works to keep your torso from twisting toward the loaded side. The elevated setup also gives you a longer range of motion than a floor-based single-leg bridge, since the hips can drop below bench level at the bottom of each rep.
It suits lifters who want to address side-to-side strength differences, people building toward heavier hip thrusts, and anyone whose lower back takes over during two-legged bridge variations. Because the load is per-side and the position is self-limiting, it is often easier to keep honest form here than in a barbell hip thrust, where the stronger leg can quietly contribute more than its share.
The setup is what makes or breaks this exercise. Your upper back needs to rest securely on the bench, the kettlebell should sit directly over the working hip and thigh rather than sliding toward the middle, and the planted foot should be far enough forward that your shin is roughly vertical at the top. If the foot is too close, the knee flares forward and the quads take over; too far back and the hamstrings do the lifting instead of the glutes.
Execution is simple but demanding: brace your trunk, drive through the planted heel, and push your hips up until your torso and working thigh form a straight line with a hard glute squeeze at the top. Lower with control until the hips approach the floor, then drive back up without letting the pelvis rotate. Move steadily rather than explosively, because the single-leg position gives you plenty of challenge without speed.
Use moderate kettlebell weights and higher repetitions when learning the movement, then progress the load once you can hold your hips level for every rep. Two to four sets of six to twelve reps per leg works well as a primary glute exercise, and it pairs naturally with squats or deadlifts on the same lower-body day.
[ Workout Log & Planner ]
Put your next workout in Fitwill
Keep your plan and training log ready when you are.


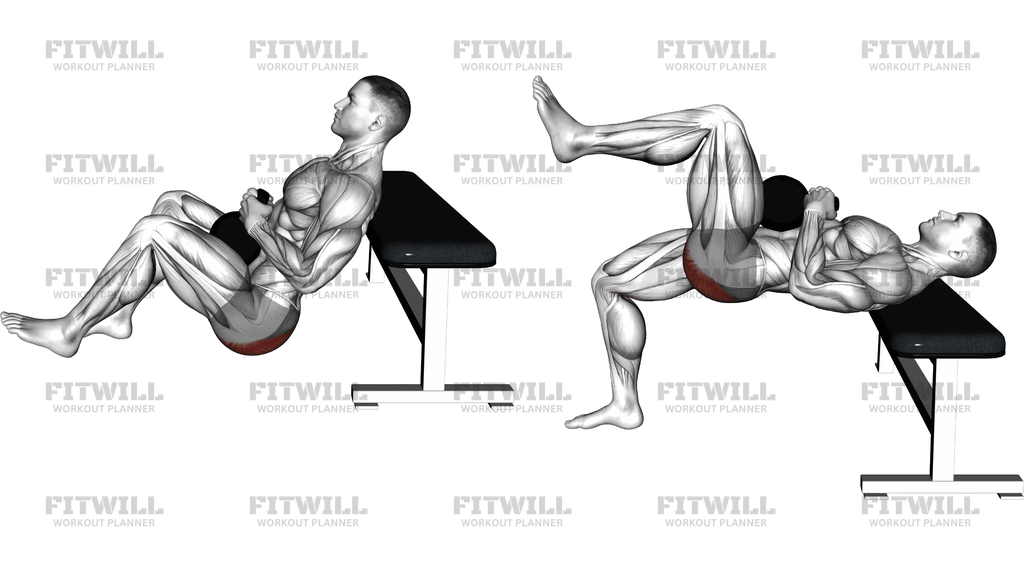
Instructions
- Sit on the floor with your upper back against the edge of a flat bench and place a kettlebell beside your working hip.
- Roll the kettlebell into the crease of your working hip, hold it steady with both hands, then walk your feet in and lean back so your shoulder blades are supported on the bench.
- Extend your non-working leg out in front of you or hold it bent with the knee up, keeping it clear of the floor.
- Position your planted foot so the shin is close to vertical when your hips reach the top, with the heel firmly on the floor.
- Brace your core and tuck your chin slightly so your ribs stay down and your neck stays relaxed against the bench.
- Exhale and drive through the heel and mid-foot of the planted leg, pushing your hips up until your torso and thigh form a straight line.
- Squeeze the glute of the working side hard at the top and pause briefly, keeping the kettlebell level over that hip.
- Inhale and lower your hips under control until they nearly touch the floor, keeping tension in the working glute instead of resting at the bottom.
- Complete all reps on one side, then reset the kettlebell on the opposite hip and work the other leg.
- To finish, lower your hips fully, guide the kettlebell off your hip to the floor, and sit up carefully with one hand on the bench for balance.
Tips & Tricks
- If the kettlebell tips toward your midline during the rep, press it slightly toward the outside of the working hip with your same-side hand so the load stays over that glute.
- A pelvis that drops or rotates on the non-working side is the most common fault here; slow the tempo down before adding weight so you can keep both hip bones level at the top.
- Watch your planted foot: if the heel lifts, the weight is too heavy or the foot is too far forward. Drive through the heel, not the toes.
- Do not hyperextend at the top by arching your lower back past the straight-line position. The rep ends when the glute is fully squeezed, not when you have leaned back further.
- If your hamstrings cramp, your foot is probably too far from the bench. Bring it in slightly so the knee bends more and the glute does the extension.
- Holding the kettlebell with both hands stacks the load centrally and steadies it; if it still shifts, wrap a towel around the handle to add grip against your clothing.
- Keep the lifted leg relaxed. Actively reaching it forward tends to pull the pelvis out of position and steals stability from the working hip.
- Pause for a full second at the top of each rep rather than bouncing, since the range is short and the pause is where the glute gets most of the stimulus.
- Warm up the pattern with a bodyweight single-leg bridge from the bench before adding the kettlebell, especially if one side feels noticeably weaker.
Frequently Asked Questions
Which muscles does the Weighted Kettlebell Glute Single Leg Bridge From B work?
The glutes of the working side are the primary movers, with the hamstrings assisting hip extension. The core and lower back stabilize the pelvis and keep your torso level while the weight sits on one hip.
Why rest my upper back on a bench instead of doing this on the floor?
The bench elevates your shoulders so your hips can drop below torso level, giving a longer range of motion and a stronger stretch on the glute at the bottom. It also creates a stable base so you can handle a heavier kettlebell than a floor bridge allows.
How do I keep the kettlebell from sliding off my hip?
Place it directly in the crease where your hip and thigh meet, hold it with both hands, and keep your torso level. Wearing grippy or thicker clothing and pressing the bell slightly outward with your same-side hand also helps.
Is the Weighted Kettlebell Glute Single Leg Bridge From B suitable for beginners?
Beginners should first master a bodyweight version or a two-legged kettlebell bridge, then add the kettlebell once they can keep their hips level for ten to twelve reps per side. Start with a light bell, around 8 to 12 kg, and build from there.
My hips twist to one side during the rep. What am I doing wrong?
The load on one hip naturally pulls you toward that side, so your core needs to resist it. Brace your abs before each rep, slow the tempo, reduce the weight, and think about pushing the non-working hip upward as you lift.
What can I substitute if I do not have a kettlebell?
A dumbbell held horizontally across the hip works with the same setup, or you can use a weight plate held with both hands. With no weight at all, the single-leg position alone still provides a solid training stimulus.
How high should I lift my hips at the top?
Lift until your shoulders, hips, and the thigh of the working leg form a roughly straight line, then squeeze the glute. Going beyond that by arching the lower back adds strain without extra glute work.
Should the non-working leg be straight or bent?
Either works. A bent knee with the thigh toward your chest shortens the lever and is usually easier to stabilize, while a straight leg extended in front adds a little more balance demand. Pick the version that lets you keep your pelvis square.
How many sets and reps should I do per leg?
Two to four sets of six to twelve reps per side is a practical range. Always start with your weaker leg, and match the reps on the stronger side to it so the imbalance does not grow.
Is it safe for my lower back?
When your ribs stay down, your core stays braced, and you stop at the straight-line top position, the lower back mostly works to stabilize rather than lift. If you feel the work in your lumbar area instead of your glutes, reduce the load and check your foot position before continuing.