Kneeling Rotation Torso Thread Through
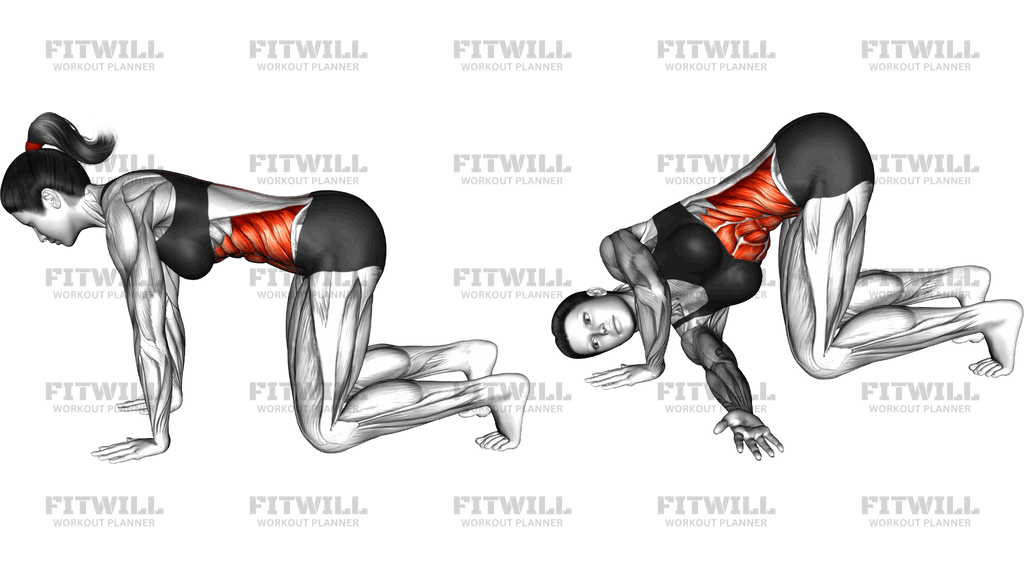
Kneeling Rotation Torso Thread Through is a kneeling rotation drill that takes you from an all-fours position into a deep thoracic twist, sliding one arm under your torso until the shoulder and temple rest on the floor. It is one of the simplest ways to work rotation into the mid-back while the hips stay stacked and quiet, because kneeling removes the balance demands that standing rotational work creates.
The movement primarily trains thoracic spine rotation along with the obliques and deep core muscles that control that twist. As the threading arm slides across, the upper back, rear shoulder, and the muscles between the shoulder blades get a strong stretch on one side while the opposite side works to keep the torso from collapsing. The supporting arm, hips, and knees stay busy the whole time stabilizing the position.
The quadruped setup matters more than most people expect. Kneeling with knees under the hips and a flat back gives you a stable base so the rotation happens in the ribcage and mid-back instead of the lower back or neck. If the hips shift or the spine rounds, the twist bleeds into the lumbar region and you lose the very thing this drill is meant to improve.
To execute it well, think of the movement as two distinct halves: first a deliberate reach toward the ceiling, then a controlled thread under the body. The end position has the back of the threading hand flat on the floor, the shoulder gently grounded, and the side of the head resting down, with the eyes tracking under and through the arm. Pause there, breathe, and let the ribcage settle before reversing the path.
This drill fits well into warm-ups before lifting, running, golf, tennis, or any sport that asks the torso to rotate. It is equally useful as a standalone mobility break for people who sit long hours and feel stiff through the mid-back. Because it is low load and self-paced, it suits beginners, but it also rewards experienced lifters who slow down and work the end range patiently.
Keep the effort moderate. You should feel a stretch through the side of the ribs, the upper back, and the back of the shoulder, never sharp pain in the neck, shoulder joint, or lower back. Support the head lightly with the floor rather than pressing into it, and keep the weight on the back of the threading hand rather than the shoulder joint itself.
[ Workout Log & Planner ]
Put your next workout in Fitwill
Keep your plan and training log ready when you are.


Instructions
- Kneel on the floor and place your hands under your shoulders and knees under your hips in a quadruped position, feet relaxed behind you.
- Level your hips so both sides of your pelvis are even, and let your spine sit in a neutral line from head to tailbone.
- Brace your core lightly and lengthen the back of your neck as if holding a small object under your chin.
- Reach one hand up toward the ceiling, opening the chest to the side and letting your eyes follow the moving hand.
- Reverse the reach and slide that same hand across the floor under your torso, palm facing up, lowering the shoulder and the side of your head toward the ground.
- Settle into the end position with the back of the threading hand flat on the floor, the shoulder lightly grounded, and your gaze tracking under and across your body.
- Hold for one to three slow breaths, letting the ribcage rotate a little further with each exhale without forcing it.
- Press through the opposite hand and slowly unwind, lifting the shoulder first and sliding the arm back out to the starting quadruped position.
- Exhale as you thread, inhale as you return, keeping your breathing steady and unhurried throughout.
- Complete all reps on one side or alternate sides, resetting your hip position and neutral spine between each rep.
Tips & Tricks
- If your hips drift toward the threading side, imagine a glass of water balanced on your lower back that you must not spill; that cue keeps the pelvis square so the twist lands in the mid-back.
- Avoid cramming the shoulder into the floor. Most of the weight should stay on the back of the hand and the opposite supporting arm, with the shoulder only lightly touching.
- Do not crane the neck to look up. Let the temple rest down and keep the neck long; the rotation should be felt in the ribs, not the neck.
- If rounding the upper back limits your reach, add a few slow cat-cow reps first so the thoracic spine is warm before threading.
- Sore wrists from the supporting arm? Make a fist or lower onto your forearm for the support side while keeping the hips level.
- Reaching too fast is the most common error. Slow the thread down and you will feel the obliques and ribs on the stretching side far more than a quick swing ever gives you.
- Keep the knees wide enough that they feel stable but not so wide that the pelvis tilts; hip width is usually the sweet spot for keeping the lumbar spine quiet.
- Sneezing or shallow breathing at the end range usually means you are bracing too hard. Soften the abdominal tension slightly so the ribcage can actually rotate.
- If one side is noticeably tighter, start each set with the stiffer side and give it one extra breath in the end position rather than adding extra reps.
Frequently Asked Questions
Which muscles does the Kneeling Rotation Torso Thread Through work?
It primarily targets the obliques and deep core muscles that produce and control trunk rotation, with a strong stretch through the upper back and the muscles between the shoulder blades. The supporting arm and shoulders work statically to hold the quadruped base.
Is the Kneeling Rotation Torso Thread Through good for beginners?
Yes. The kneeling position removes balance demands and the movement is low load and self-paced, so beginners can learn it quickly. The main adjustment is reducing the depth of the thread until the shoulder and ribs move comfortably.
Why do my hips shift when I thread my arm through?
Hip drift usually means the mid-back is stiff, so the body borrows rotation from the pelvis and lower back. Widen your base slightly, brace the core, and rotate only as far as you can keep both hips square to the floor.
Should my shoulder actually touch the floor in the Kneeling Rotation Torso Thread Through?
A light touch of the shoulder toward the floor is fine, but the weight should rest on the back of the threading hand and the opposite supporting arm. If you feel pinching in the shoulder joint, back off the depth instead of pressing into it.
How long should I hold the threaded position?
One to three slow breaths per rep works well. Exhaling as you settle lets the ribcage rotate slightly further each time without forcing the range.
Can I do the Kneeling Rotation Torso Thread Through every day?
Yes, its gentle, unloaded nature makes it suitable for daily practice, especially as a warm-up or desk-break drill. Stop adding depth if the shoulder or neck feels irritated rather than stretched.
What can I use instead if kneeling hurts my knees?
Place a folded mat or towel under your knees, or perform a seated version in a chair by folding one arm across your chest and rotating toward the opposite knee. The key is keeping the pelvis stable so rotation stays in the mid-back.
Why does one side rotate further than the other in this exercise?
Side-to-side differences in thoracic rotation are common, especially in people who favor one side in sports or daily habits. Work both sides equally and give the tighter side one extra breath rather than chasing extra reps on the looser side.
Where should my head be during the Kneeling Rotation Torso Thread Through?
Rest the side of your head lightly toward the floor and let your eyes follow the threading hand underneath your body. Avoid lifting or craning the neck, since the twist belongs in the ribcage rather than the cervical spine.
When is the best time to use this drill in a workout?
It works well in the warm-up before squats, presses, golf, tennis, or throwing, and also as a standalone mobility break between long periods of sitting. Doing it cold is fine, but a few cat-cows beforehand often improve the range you can access.