Air Pillow Balance Counterbalanced Skater Squat
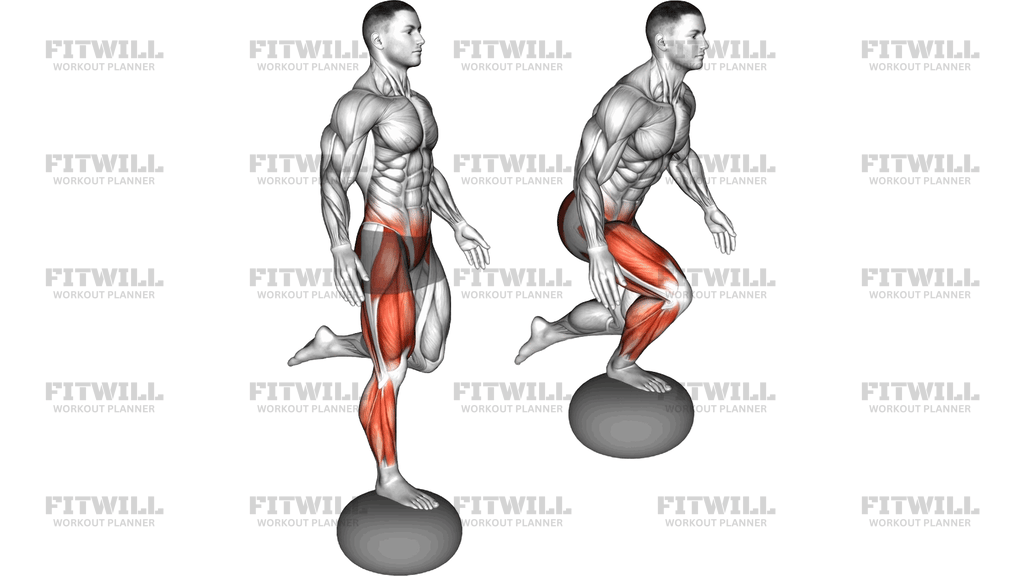
The Air Pillow Balance Counterbalanced Skater Squat is a single-leg squat variation performed with your working foot planted on an unstable inflatable balance pillow. Your free leg trails behind you in the same bent position a skater's push-off leg takes, and your arms reach forward as a counterbalance to help you sit back into the squat without tipping. Combining a demanding single-leg strength pattern with an unstable surface makes this one of the more challenging balance-focused lower body exercises you can do with just your body weight.
This movement is most useful for people who already have solid single-leg control on a stable floor and want to develop ankle and hip stability further. It is popular in rehab-style training for the knee and ankle, in sports preparation for skating, skiing, and court sports, and in general strength programs as a finisher that challenges the small stabilizing muscles around the foot, ankle, and hip. Because the pillow shifts under you, your nervous system has to constantly make small corrections, which is exactly what trains those stabilizers.
The primary work comes from the quadriceps and glutes of the standing leg, with the hamstrings helping control your descent and the calves and muscles of the foot working hard just to keep you balanced on the soft, moving surface. The trailing leg stays relaxed behind you, and your trunk has to stay organized, so you will feel your core working to keep your torso from wobbling side to side or collapsing forward.
The setup matters more here than in a floor-based skater squat. The pillow sits directly under the middle of your working foot, so your whole foot, from heel to toes, contacts the surface. If your heel hangs off or you stand too far forward on the ball of the foot, the pillow will tip and the squat becomes a fight for balance rather than a leg exercise. Take a moment to find even pressure across your foot before you start each rep.
To execute it well, shift your weight fully onto the working leg, lift the opposite foot off the floor, and bend that knee so the foot trails behind your hip. Reach both arms forward at chest height as you unlock the knee and push your hips back and down. Descend only as deep as you can control while keeping the standing knee tracking over your toes, then drive through the whole foot to stand back up. Move deliberately; the pillow punishes rushing.
A practical safety note: this exercise rewards patience. Start with a shallow range of motion and a spotter, wall, or sturdy support nearby, especially if you are new to unstable-surface training. If your knee caves inward, your arch collapses, or you cannot keep the trailing leg under control, regress to a floor-based skater squat or a shallower depth until your balance improves.
[ Workout Log & Planner ]
Put your next workout in Fitwill
Keep your plan and training log ready when you are.


Instructions
- Place an inflated air pillow on a flat, non-slip surface and position it under the middle of one foot so your heel and toes both rest fully on top of it.
- Stand tall on that leg with a soft knee, and bend your opposite knee behind you so that foot lifts off the floor and hovers behind your hip.
- Extend both arms straight out in front of your chest at about shoulder height to act as a counterbalance, and brace your core as if preparing for a light push to the torso.
- Keep your gaze forward and your chest up, with even pressure spread across your whole standing foot rather than dumping weight into the toes.
- Begin the descent by pushing your hips back and bending the standing knee, letting your torso lean slightly forward as your arms stay extended for balance.
- Lower until your thigh reaches a comfortable depth, typically partway toward parallel, while the trailing knee stays bent behind you and the standing knee tracks in line with your toes.
- Pause briefly at the bottom to stop any wobble in the pillow before driving back up.
- Press through your heel and mid-foot to extend the knee and hip, exhaling as you rise back to a tall, single-leg standing position.
- Complete all reps on one side, then carefully step off the pillow, reset it, and switch to the other leg.
- Breathe steadily throughout, inhaling on the way down and exhaling on the drive up, and re-establish your balance on the pillow before every rep.
Tips & Tricks
- If the pillow edge digs into your arch, reposition your foot so the center of the pillow sits under your mid-foot; standing too far forward or back is the most common setup error.
- Keep your arms extended the entire rep. Dropping them to your sides mid-squat removes the counterbalance and usually sends you backward off the pillow.
- Watch for the standing knee drifting inward as you fatigue. Actively push the knee out over your little toe to keep the hip doing its stabilizing job.
- A common mistake is turning this into a toe-balance drill by lifting the heel. Keep weight across the whole foot; if your heel rises, you are going too deep or leaning too far forward.
- Grip a wall, rack, or doorway frame with one hand at first if you cannot complete a controlled rep. Reduce the assistance over several weeks instead of sacrificing depth and knee position.
- The trailing leg often swings forward for momentum. Hold it still behind your hip for the whole set; this keeps the load on the standing leg and improves your balance challenge.
- Use a slower lowering phase, around two to three seconds, because the unstable surface makes fast reps sloppy and less effective.
- If your foot cramps, that usually means your toes are clawing the pillow to compensate for weak ankle stabilizers. Relax the toes, shorten the range, and build up gradually.
- Deflate the pillow slightly if it feels impossible to control; a softer, less domed surface is a legitimate progression step rather than a shortcut.
Frequently Asked Questions
What muscles does the Air Pillow Balance Counterbalanced Skater Squat work?
The quadriceps and glutes of the standing leg do most of the work, supported by the hamstrings during the descent. The calves, foot muscles, and deep hip stabilizers work continuously to keep you balanced on the unstable pillow.
Is the Air Pillow Balance Counterbalanced Skater Squat suitable for beginners?
It is generally too challenging as a first single-leg exercise. Beginners should start with regular split squats or floor-based skater squats holding a support, then progress to the pillow version once they can perform clean reps on stable ground.
Why do the arms reach forward in this exercise?
The extended arms shift your center of mass forward, which counterbalances your hips sitting back and lets you reach a deeper squat without falling off the pillow. It is the same principle as holding a light plate in front of you during a squat.
How deep should I squat on the air pillow?
Descend only as far as you can keep your heel down, your knee tracking over your toes, and the pillow steady. For most people that is somewhere between a quarter and half squat at first, deepening over time as control improves.
My foot keeps sliding or rolling off the pillow. What should I fix?
Check that the pillow sits under your mid-foot with even pressure from heel to toes, and make sure it is on a non-slip floor. Also avoid letting your weight drift to the ball of the foot, which lifts the pillow's back edge and starts the roll.
Can I substitute anything if I do not have an air pillow?
A folded exercise mat, foam pad, or half-deflated stability cushion can work, though the challenge changes with the surface. On a hard floor, the same skater squat pattern with forward-reaching arms is a good substitute.
Should the trailing leg touch the floor during the Air Pillow Balance Counterbalanced Skater Squat?
No, the trailing knee stays bent and the foot hovers behind your hip for the entire rep. Touching the floor turns it into a partial lunge and removes much of the single-leg balance demand.
How many reps and sets should I do?
Because balance fails quickly, start with 2-3 sets of 5-8 controlled reps per leg, resting between sides. Add reps or depth before adding external load, and stop a set when your form on the pillow deteriorates.
Is this exercise safe for my knees?
When performed with the knee tracking over the toes, the heel down, and a controlled tempo, it is generally well tolerated. If you have a current knee injury or the pillow causes sharp pain or instability, skip it and consult a qualified professional first.
How is this different from a regular skater squat?
The unstable air pillow forces constant small corrections from your ankle and hip stabilizers, so the same squat pattern becomes much harder to control. You will usually use a shallower depth and slower tempo than on a stable floor.