Stick Bent Over Pronated Grip Row
The Stick Bent Over Pronated Grip Row is a bent-over rowing pattern performed with a simple stick or light bar held in an overhand, palms-down grip. You hinge forward at the hips until your torso is angled well toward the floor, let the stick hang at arm's length beneath your chest, then pull it up toward your lower ribcage by driving your elbows back and squeezing your shoulder blades together. Because the load is light, the exercise behaves more like a movement drill and activation exercise than a strength test, which makes it ideal for learning what a proper row should feel like.
This is one of the best starting points for anyone new to horizontal rowing. With little or no weight on the stick, you can focus entirely on the path of the elbows, the position of the spine, and the feeling of the upper back muscles contracting, without grip fatigue or heavy loading masking poor technique. It is equally useful for experienced lifters as a warm-up before barbell or dumbbell rows, and for people recovering from long breaks who want to re-establish scapular control before adding resistance.
The primary work comes from the lats, rhomboids, and middle traps, which draw the elbows up and retract the shoulder blades. The rear shoulders assist the pull, the biceps and forearms handle elbow flexion and grip, and the lower back and glutes work isometrically to hold the hinged position. Because the pronated grip places the shoulders in slight internal rotation at the bottom, it biases the pull toward the lats and mid-back rather than the upper traps.
Setup matters more here than it might seem. The hinge angle determines everything: bend too far upright and the exercise turns into a shrug; round your lower back and you lose the stable platform your elbows pull against. Set the hinge first with a flat back and soft knees, then let the arms hang fully extended so the stick sits under the chest before the first rep begins.
To execute well, pull the stick toward your lower abdomen rather than your chest, keeping elbows close to the body and pointing behind you. Pause briefly at the top with the shoulder blades drawn together, then lower the stick under control until the arms are straight again. Keep your neck neutral by looking at a spot on the floor a short distance ahead of your feet, and keep your core braced for the entire set.
A practical safety note: this movement is only as safe as the hinge holding it up. If your lower back starts rounding or shaking as the set progresses, stop and rest rather than pushing through. Since the stick is light, there is rarely a reason to chase fatigue — two or three clean sets of ten to fifteen controlled reps do the job this exercise is meant for.
[ Workout Log & Planner ]
Put your next workout in Fitwill
Keep your plan and training log ready when you are.


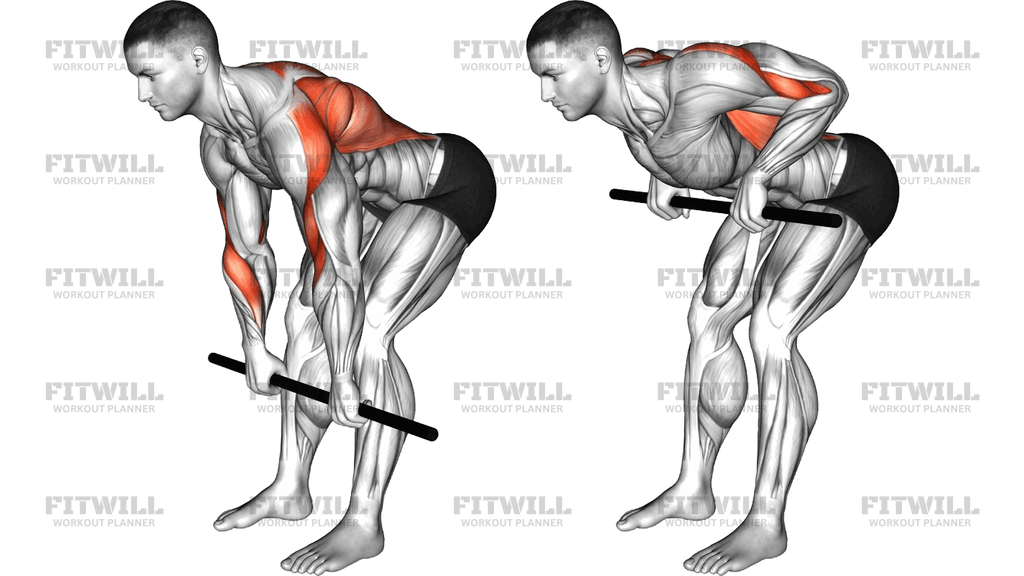
Instructions
- Stand with your feet about hip-width apart and hold a stick with an overhand, pronated grip roughly shoulder-width apart.
- Hinge forward at the hips with soft knees until your torso is angled between 45 and 90 degrees to the floor, keeping your back flat and your weight over the middle of your feet.
- Let the stick hang at full arm's length directly below your shoulders, and relax your shoulders down away from your ears.
- Brace your core as if bracing for a light push to the stomach, and set your gaze on a spot on the floor slightly ahead of your feet so your neck stays neutral.
- Pull the stick up toward your lower abdomen by driving your elbows back and up, keeping them close to your body rather than flaring them wide.
- At the top, squeeze your shoulder blades together and hold the stick against your lower ribcage for a beat.
- Lower the stick slowly along the same path until your arms are fully straight and you feel a light stretch across your upper back.
- Exhale as you pull the stick up, inhale as you lower it, and avoid holding your breath through the rep.
- Complete your set while maintaining the hinge, then stand up by driving your hips forward, keeping your back flat as you rise.
Tips & Tricks
- If your lower back rounds at the bottom of the hinge, bend your knees slightly more or reduce the forward lean — a shorter range with a flat back beats a deeper hinge that collapses.
- Aim the stick for your belly button, not your chest; pulling high turns the row into an upright-row-style shrug and shifts work away from the lats.
- Check your elbows, not your hands. If your elbows drift out toward your ears at the top, you are pulling with the upper traps instead of the mid-back.
- Use the light stick to your advantage: add a one-second pause at the top of each rep and focus on the shoulder blades drawing together, which is hard to feel when a heavy bar is involved.
- Do not let your torso rise as you pull. If your chest lifts toward vertical each rep, the hinge is doing the work the arms should be doing — reset the lean and continue.
- Keep the grip firm but relaxed enough that your forearms do not burn out first; a death grip on the stick will rob the pull of quality reps.
- If you feel the work mostly in your biceps, think of your hands as hooks and start each rep by pulling the elbows back rather than bending the arms.
- Start with the stick at arm's length before every set rather than beginning from a partially pulled position; the first rep from a true dead hang sets the standard for the whole set.
Frequently Asked Questions
Which muscles does the Stick Bent Over Pronated Grip Row work?
The lats, rhomboids, and middle traps do most of the pulling, with the rear shoulders and biceps assisting. Your lower back and glutes work statically to hold the bent-over position throughout the set.
Why use a stick instead of a barbell for this row?
A stick removes the load, so you can concentrate on hinge position, elbow path, and scapular retraction without grip or lower back fatigue. It is an ideal teaching and activation version before progressing to weighted rows.
What does the pronated grip change compared to an underhand grip?
With palms facing down, the shoulders sit in slight internal rotation at the bottom, which biases the pull toward the lats and mid-back. An underhand grip tends to involve the biceps more and lets the elbows travel a slightly different path.
How far forward should I bend for this exercise?
Anywhere from about 45 degrees to nearly parallel with the floor works, as long as you can keep your back flat and hold the position without strain. Deeper hinges increase lower back demand, so choose the angle you can maintain for every rep.
Where should I pull the stick to at the top of the row?
Pull it toward your lower abdomen or upper hip area with your elbows staying close to your sides. Pulling to your chest encourages flared elbows and turns the movement into a shrug-heavy pattern.
Is the Stick Bent Over Pronated Grip Row suitable for beginners?
Yes, it is one of the best beginner rows because the light stick lets you learn the hinge and the pull separately. Master the position here before adding weight with a barbell or dumbbells.
My lower back gets tired before my upper back — what should I do?
That usually means the hinge is too deep or your core is not braced. Reduce the forward lean, soften the knees more, and cut the set short when your back position starts to slip rather than pushing on.
What can I use if I do not have a stick or bar?
Any long, light object works — a broom handle, PVC pipe, or even a resistance band anchored under your feet in the same hinge position. The grip and pulling path stay the same regardless of the implement.
How many reps and sets should I do with just a stick?
Two to three sets of ten to fifteen slow, controlled reps with a pause at the top works well as an activation drill or warm-up. Since the load is minimal, the quality of the squeeze matters far more than the rep count.