Standing Opposite Straight Arm Clasp (Left Over Ri)
The Standing Opposite Straight Arm Clasp (Left Over Right) is a simple standing stretch that targets the muscles running between your shoulder blades and ribcage, particularly the serratus anterior, along with the rear shoulders and upper back. You stand upright, extend both arms straight out in front of you at shoulder height, clasp your hands together with the left hand wrapping over the right, and then push your arms forward while letting your upper back round slightly. That forward push with a clasped grip is what spreads the shoulder blades apart and creates the stretch.
This is one of those movements that feels small but does a lot. Desk workers, lifters who press or pull heavy, swimmers, and anyone who does a lot of push-ups tend to carry tension in the serratus and the muscles around the scapula. Because the arms are held straight and pulled forward together, the stretch reaches areas that typical shoulder circles and doorway stretches miss. It is also a common warm-up or cooldown drill in group fitness and martial arts classes for exactly that reason.
The setup matters more than it looks. Your feet should be about hip-width apart with a tall, neutral spine before you begin. If your spine is already rounded when you clasp your hands, the stretch loses its focus on the shoulders and upper back and turns into a vague full-torso slouch. Start tall, extend the arms at shoulder height, lock the elbows out, and only then push the clasped hands away from your chest so the rounding happens deliberately at the end range.
To execute it well, think about reaching through your knuckles rather than just bending forward. The clasp with the left hand over the right slightly rotates the forearms, which biases the stretch into the outer shoulder and the muscles along the side of the ribcage. Breathe steadily and let each exhale soften the tension a little. Hold the position for roughly twenty to thirty seconds, then release the clasp, shake out the arms, and if you are doing this as part of a routine, repeat it with the right hand over the left to balance the stretch.
Common use cases include warming up the shoulders before pressing or pulling sessions, breaking up stiffness during a long workday, and cooling down after chest, shoulder, or back training. It needs no equipment and very little space, so it works anywhere from the gym floor to an office hallway.
A few safety points: keep the rounding gentle and controlled rather than forcing a deep slouch, avoid shrugging the shoulders up toward the ears, and never stretch into sharp pain. If clasping the hands comfortably is difficult due to wrist or shoulder limitation, rest the left palm over the back of the right hand instead of interlacing the fingers and work within a shorter hold.
[ Workout Log & Planner ]
Put your next workout in Fitwill
Keep your plan and training log ready when you are.


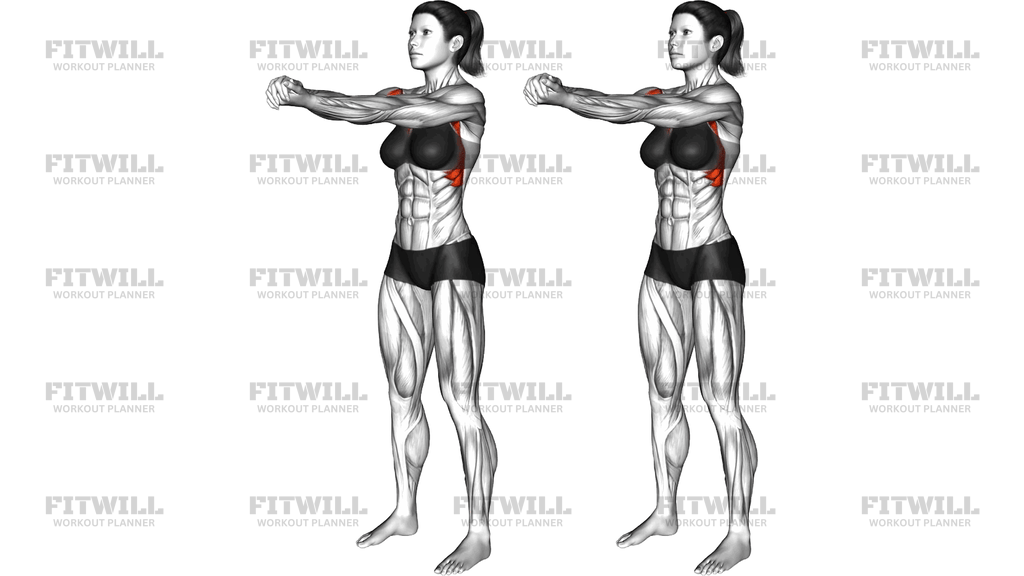
Instructions
- Stand with your feet hip-width apart, knees soft but not bent, and your spine tall with the crown of your head reaching upward.
- Extend both arms straight out in front of your chest at shoulder height, elbows fully locked and palms facing each other.
- Clasp your hands together with the left hand wrapping over the right, either interlacing the fingers or resting the left palm over the back of the right hand.
- Draw your belly in lightly to brace the torso and keep your hips stacked under your shoulders.
- Push your clasped hands forward and slightly away from your chest, letting your upper back round gently as the shoulder blades spread apart.
- Reach through your knuckles so the arms stay long and straight rather than dropping downward.
- Hold the stretched position for 20 to 30 seconds while breathing slowly, letting each exhale release a little more tension.
- Ease the arms back toward your chest with control before releasing the clasp, rather than letting the hands snap apart.
- Lower your arms, roll the shoulders once or twice, and repeat on the opposite side with the right hand over the left if you want a balanced stretch.
Tips & Tricks
- The most common mistake is shrugging the shoulders up toward the ears as you reach forward. Before pushing out, actively pull the shoulders down away from your neck, then clasp and reach.
- If your elbows bend during the stretch, the tension leaks out of the shoulders. Think about pressing the inside of your forearms together to keep both arms locked straight.
- Rounding should come from the upper back only. If your whole torso collapses forward and your hips drift back, you have gone too far; reduce the reach and keep the ribs stacked over the pelvis.
- The left-over-right clasp subtly rotates the forearms, so expect to feel the stretch slightly more on the outer right shoulder. That asymmetry is normal, which is why switching to right-over-left on the next rep is worthwhile.
- Interlaced fingers can pinch the wrists if you are tight through the forearms. If that happens, lay the left palm flat over the back of the right hand instead and push with the same intent.
- Do not hold your breath. The stretch deepens naturally on the exhale, and holding your breath tends to make the shoulders creep upward.
- Keep the arms at chest height, not above the shoulders. Raising the hands turns this into a different stretch and takes tension off the serratus and rear shoulder area.
- If your upper back feels stiff but not stretched, try a slow pulse: push the hands forward for two seconds, ease back an inch, and repeat three or four times before settling into the long hold.
Frequently Asked Questions
What muscles does the Standing Opposite Straight Arm Clasp (Left Over Right) stretch?
It primarily stretches the serratus anterior along the side of the ribcage, along with the rear shoulders and the muscles between the shoulder blades such as the rhomboids. The lats often feel a gentle pull as well.
Why does the exercise specify the left hand over the right?
The left-over-right clasp slightly rotates the forearms and shifts the stretch toward the outer right shoulder and ribcage. Repeating the drill with the right hand over the left balances the two sides.
Is this a strength exercise or a stretch?
It is a stretch. The muscles are being lengthened rather than loaded, so there is no resistance beyond your own arms pushing into each other.
How long should I hold the Standing Opposite Straight Arm Clasp (Left Over Right)?
Twenty to thirty seconds works well for most people. If you are doing it as a warm-up, shorter holds of ten to fifteen seconds with two or three repetitions are enough.
Should my back round during the stretch?
Yes, but only gently and only in the upper back. Start with a tall spine and let the rounding happen as you push the clasped hands away; forcing a deep slouch turns it into a back strain rather than a shoulder stretch.
Can beginners do this movement?
Absolutely. It requires no equipment and very little mobility, so it is suitable for beginners as long as they keep the shoulders relaxed and the reach comfortable.
What should I do if I cannot interlace my fingers comfortably?
Rest the left palm over the back of the right hand instead of interlacing, and push with the same forward reach. You will lose a little of the forearm rotation but keep the stretch on the shoulders and upper back.
When is the best time to use this stretch?
It works well as a warm-up before pressing or pulling workouts, as a cooldown after chest or shoulder training, or as a midday reset if you spend long hours sitting at a desk.
My shoulders rise up toward my ears during the stretch. How do I fix that?
Pause before clasping, consciously pull the shoulder blades down and back, then reach forward. Slowing the reach down also helps, since the shrug usually happens when you push out too quickly.
Is it safe for cranky shoulders?
Generally yes because it is a gentle, unloaded position, but keep the arms at chest height, avoid pushing into any pinching at the front of the shoulder, and shorten the reach if anything feels sharp.