Hanstand Heel Pull
The Handstand Heel Pull is a wall-supported handstand drill that teaches you how to move from a heavily assisted position into a true balance hold. You kick or walk up into a handstand with your back near the wall, rest your heels against it for support, and then deliberately pull your heels off the wall by shifting your weight over your hands. That small shift is the exact skill that separates someone who can lean on a wall from someone who can actually hold a freestanding handstand.
This drill is aimed at anyone past the first stages of handstand training: you should already be comfortable kicking up to the wall and holding that position for 20-30 seconds. If you are a complete beginner, spend time on planks, wall walks, and box handstand holds first, because the heel pull demands solid overhead shoulder strength and a stable wrist position before it becomes productive.
The load lands on the shoulders, triceps, and upper back, with the traps and serratus anterior working hard to keep the shoulder blades pushed up into a stable overhead position. Your core and glutes hold the body in one straight line, and once the heels leave the wall, those deep stabilizers do most of the fine control. The wrists also take constant, sustained loading, so expect them to adapt over several weeks of practice.
Setup matters more here than in most strength work. Hand placement, distance from the wall, and how much arch you allow in your lower back all decide whether the heel pull feels controlled or chaotic. Keep the hands roughly a hand-width to a hand-length away from the wall so your hips can stack over your shoulders, and brace the ribs down so you are not hanging in a banana shape with your heels pinned hard against the wall.
To execute well, press the floor away, push tall through the shoulders, and think of pulling your heels toward each other and slightly off the wall while your hips drift a few centimeters over your fingertips. Hold the free position for a second or two, then let the heels find the wall again. The wall is your brake, not a crutch you lean into for the whole set.
Use this drill as the bridge between wall handstands and freestanding work. It fits well near the start of an upper body or skill session when you are fresh, three to five sets of a few pulls at a time. Stop the set when your elbows start bending or your wrists ache, because quality of the weight shift is what drives progress, not fatigue.
[ Workout Log & Planner ]
Put your next workout in Fitwill
Keep your plan and training log ready when you are.


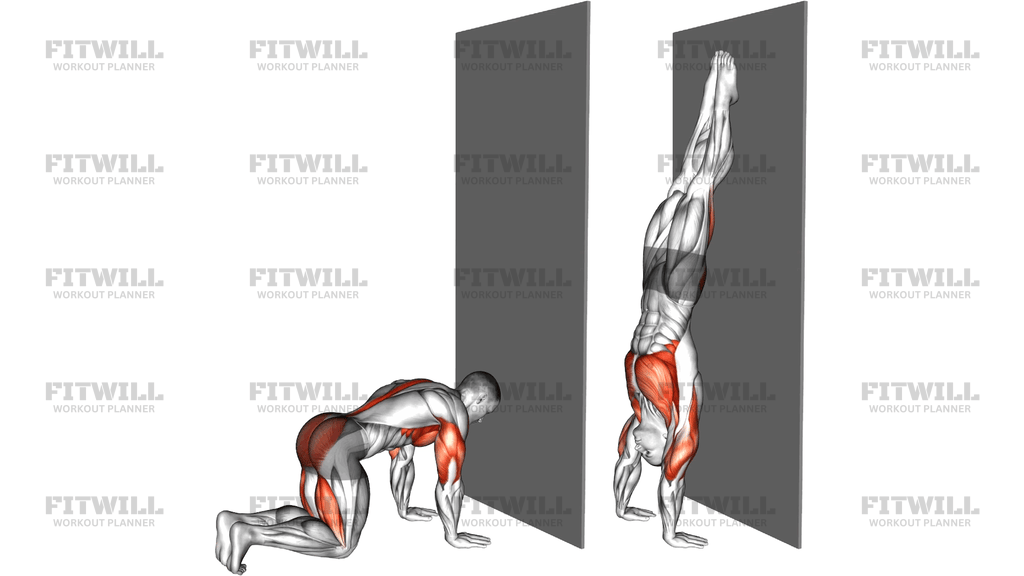
Instructions
- Place your hands on the floor about one hand-length from the wall, slightly wider than shoulder width, with fingers spread and facing forward.
- Walk or kick your feet up until your back rests lightly against the wall and your body is upside down in a straight line, heels touching the wall.
- Straighten your elbows completely and push the floor away so your shoulders rise toward your ears and your shoulder blades are propped up.
- Squeeze your glutes and brace your abdominals to tuck the ribs, keeping your lower back from arching deeply toward the wall.
- Exhale, then slowly shift your hips slightly over your fingertips and pull both heels off the wall, keeping your toes pointed toward the ceiling.
- Hold the heels-free position for one to three seconds, balancing your weight through the center of your palms.
- Let your heels drift back and touch the wall again under control rather than collapsing into it.
- Breathe steadily in small sips while inverted, and avoid holding your breath during the pull.
- Lower one leg down, then the other, or walk your hands out and step down; rest before the next attempt.
- Repeat for 3-5 controlled pulls per set, finishing while your form is still clean.
Tips & Tricks
- If your heels stay glued to the wall, you are probably arching your lower back; tuck the ribs and push the floor away harder before attempting the pull.
- Falling back into the wall with a thud means you shifted too far; the hips should move only a few centimeters, not a full slide.
- Do not let the elbows bend during the pull - bent elbows turn this into a pressing exercise and kill the balance cue.
- Check your hand distance: too close to the wall forces an arch, too far makes the kick-up unstable and the heel pull harder to time.
- Grip the floor actively with spread fingers; most wobbling in the heels-free moment comes from passive wrists.
- Turn your toes toward each other slightly and point them - it makes the legs easier to hold together and stops one heel sneaking back to the wall.
- Film yourself from the side so you can see whether your hips stack over your shoulders or hang behind them.
- Warm up the wrists with circles and rocks before starting, since they carry your full body weight for the entire drill.
- Keep sessions short and fresh; practicing this drill tired produces sloppy arching and reinforces bad balance habits.
Frequently Asked Questions
What muscles does the Handstand Heel Pull work?
The shoulders and triceps carry most of the load, with the upper traps and serratus anterior stabilizing the shoulder blades. Once the heels leave the wall, the core and glutes take over to keep the body in a straight line.
Is the Handstand Heel Pull suitable for beginners?
It is best for people who can already hold a wall handstand for 20-30 seconds. Complete beginners should build basics first with planks, wall walks, and wall-facing holds before attempting the heel pull.
Why do my heels fall back to the wall immediately?
Most often your hips are behind your shoulders, not stacked over your hands. Push taller through the shoulders and shift the hips slightly over your fingertips as you pull the heels off.
How far from the wall should my hands be?
Roughly one hand-length from the wall works for most people. Too close forces you to arch over your lower back, which makes pulling the heels away much harder.
Can the Handstand Heel Pull help me get a freestanding handstand?
Yes, that is its main purpose. It lets you experience the exact balance point over your hands while the wall remains available as a safety catch when you overshoot.
How long should I hold each heel pull?
One to three seconds is enough at first. The goal is learning the weight shift, not endurance, so multiple short controlled pulls beat one long grinding hold.
My wrists hurt when I practice this drill - what should I do?
Warm the wrists up thoroughly with circles and loaded stretches, keep your fingers spread and gripping the floor, and stop the set when discomfort appears. Persistent wrist pain is a signal to reduce volume and build wrist strength gradually.
Should I face the wall or have my back to the wall for this drill?
The back-to-wall version shown here is the standard setup, because it lets you pull the heels off and drift toward balance. Wall-facing work is a useful complementary drill but trains a slightly different entry.
How often should I practice the Handstand Heel Pull?
Two to four short sessions per week is a good rhythm. Skill work like this responds to frequent, fresh practice rather than long, exhausting sessions.