Standing Anterior Pelvic Tilt
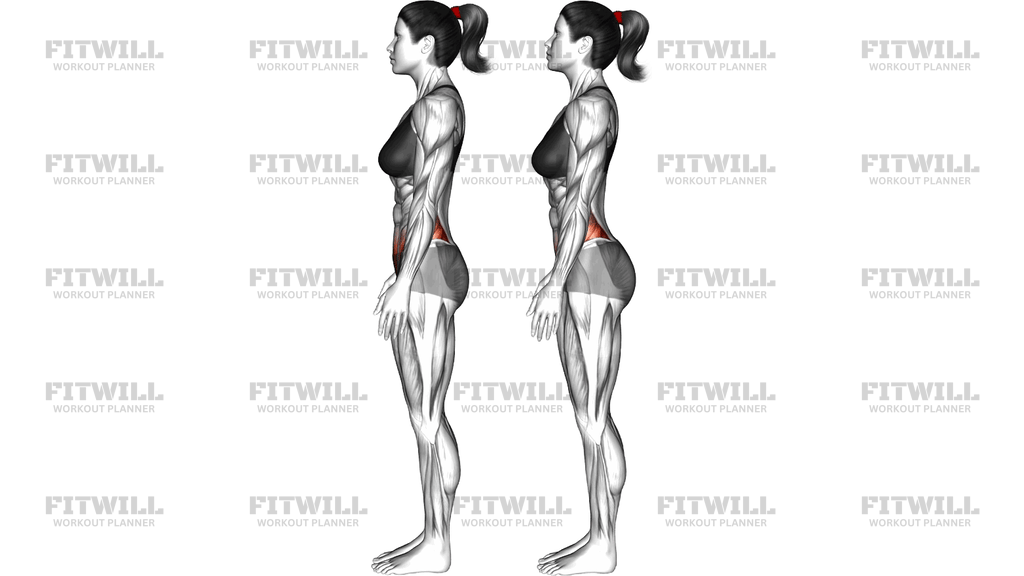
The Standing Anterior Pelvic Tilt is a body-weight control drill that teaches you to deliberately rotate your pelvis forward while standing. In the end position, your tailbone travels up and back, your lower back arches slightly more, and your hip bones tip toward the floor in front. It is the opposite of tucking your hips under, and it is one of the most useful positions you can learn if you want to feel and manage your own pelvic position.
This drill is especially valuable for people who sit for long hours and have flattened their natural awareness of pelvic movement, as well as for lifters who need to find an anterior tilt on purpose during deadlift setups, squats, and hip hinges. Dancers, runners, and anyone rehabbing or relearning posture after pregnancy or injury also benefit from practicing the tilt in a standing position, because standing is where the skill actually gets used.
The muscles working here are not moving a load; they are controlling a joint position. Your hip flexors at the front of the hip and your lower back extensors help create the anterior tilt, while your lower abs and glutes control how far you go and bring you back to neutral. Because the range of motion is small, the emphasis is on precision and awareness rather than effort or fatigue.
Setup matters more than it looks. Stand tall with feet hip-width apart, knees soft but not bent, and place your fingertips or thumbs on the tops of your hip bones. This contact gives you instant feedback: when the pelvis tips forward, you feel the hip bones rotate down and forward under your hands. Without that feedback, most people either bend their knees or arch their mid back and mistake those motions for a pelvic tilt.
To execute well, keep your upper body relaxed and your knees still. Let the tilt come from the pelvis itself: think of pouring the front of your hip bones toward the floor and letting your tailbone rise behind you. The movement should be slow, only a few degrees at each end, and fully reversible. Breathe normally throughout rather than holding your breath.
Use this drill as part of a warm-up, as a movement-prep exercise before lower body training, or as a standalone practice session for pelvic awareness. It is low intensity and generally safe, but keep the arch in your lower back modest and comfortable. If you feel pinching or discomfort, reduce the range or practice the same skill lying down first.
[ Workout Log & Planner ]
Put your next workout in Fitwill
Keep your plan and training log ready when you are.


Instructions
- Stand upright with your feet hip-width apart, toes pointing forward, and your weight balanced evenly across both feet.
- Soften your knees slightly so they are not locked, but keep your legs otherwise still for the entire set.
- Place your fingertips on the tops of your hip bones and your thumbs at your lower back so you can feel the pelvis rotate.
- Take a relaxed breath and settle into a neutral pelvis, where your hip bones and tailbone sit level with each other.
- Exhale slowly and tip your pelvis forward, letting your hip bones rotate down and your tailbone lift up and back, so the arch in your lower back increases slightly.
- Pause at the end of the tilt for one to two seconds, feeling the hip bones move under your fingers without bending your knees or leaning your torso.
- Inhale and slowly return the pelvis to the neutral starting position by gently drawing your lower abs in and letting your glutes guide the pelvis level.
- Continue breathing smoothly through each repetition, never holding your breath during the tilt.
- Perform 8 to 12 slow repetitions, then reset by standing tall, shaking out your legs, and rechecking your neutral stance before the next set.
Tips & Tricks
- The most common mistake is bending the knees to fake the tilt. If your heels rise or your knees bend as your back arches, lock in a soft-but-fixed knee position and use a smaller range.
- Watch yourself from the side in a mirror if possible. A true anterior tilt shows the tailbone moving up and back, not the chest lifting or the shoulders leaning backward.
- Do not chase a deep arch in your lower back. A few degrees of extra tilt is enough; forcing maximum lumbar extension can create compression rather than control.
- Keep the ribcage quiet. If your ribs flare forward and your chest pops up, you are arching your upper back instead of tilting from the pelvis.
- Keep your fingertips on the hip bones for every rep. Once you can feel the rotation clearly, you can progress to practicing without your hands.
- Practice the tilt in both directions if you are new to pelvic control, moving from anterior tilt to neutral and then to a slight posterior tilt, so you learn the full range of your pelvis.
- Move slower than feels necessary. The drill is too easy to benefit from at speed, and most of the learning happens in the transition between positions.
- If standing feels difficult at first, rehearse the same tilt lying on your back with knees bent, then bring the skill to standing once the motion feels familiar.
- Avoid practicing with a heavy barbell or load in hand while learning; the drill works best with nothing in your hands so your attention stays on the pelvis.
Frequently Asked Questions
What muscles does the Standing Anterior Pelvic Tilt work?
The primary muscles are the hip flexors at the front of the hip and the lower back extensors, which help create the forward tilt. Your lower abs and glutes work to control the range and return the pelvis to neutral.
Is the Standing Anterior Pelvic Tilt good for beginners?
Yes, it is one of the best starting points for learning pelvic control because it requires no equipment and the range of motion is small. Beginners should keep the tilt subtle and use their hands on the hip bones for feedback.
Why do I need to keep my knees still during the Standing Anterior Pelvic Tilt?
Bending the knees lets the hips shift and makes it easy to fake the tilt without actually moving the pelvis. Keeping the legs fixed forces the motion to come from the pelvis, which is the point of the drill.
How is anterior pelvic tilt different from just arching my back?
Arching your back often involves leaning the torso back and flaring the ribs, while a pelvic tilt is a rotation of the hip bones with the torso staying vertical. Your hands on the hip bones will show you whether the pelvis is actually rotating.
How many repetitions of the Standing Anterior Pelvic Tilt should I do?
Eight to twelve slow, controlled repetitions per set works well, usually for one to three sets. Because the goal is awareness and control, prioritize smooth transitions over doing more reps.
Can I do the Standing Anterior Pelvic Tilt if I have lower back sensitivity?
Keep the range small and comfortable, and stop if you feel pinching or sharp discomfort. If standing feels stressful, practice the same pelvic tilt lying on your back with knees bent and consult a qualified professional about your specific situation.
What is a good substitute for the Standing Anterior Pelvic Tilt?
The supine pelvic tilt lying on your back trains the same skill with less balance demand. Cat-cow stretches also explore the same pelvic rotation through a larger range on hands and knees.
Should I hold the end position of the Standing Anterior Pelvic Tilt?
A brief one-to-two-second pause at the end of the tilt is enough to notice the position and feel the hip bones rotate. Long static holds are not necessary for this drill.
Why does the Standing Anterior Pelvic Tilt matter for lifting?
Being able to find an anterior tilt on demand helps you set your lower back position for deadlifts, squats, and hip hinges. Lifters who can only tuck their hips often struggle to brace in a strong neutral position under load.
How do I know I am doing the Standing Anterior Pelvic Tilt correctly?
You should feel your hip bones rotate downward under your fingertips, your tailbone lift slightly behind you, and your lower back arch a little more, all while your knees, chest, and head stay in the same place. A side-view mirror check confirms nothing else is moving.